
PostgreSQL Setup For Windows & WSL/Ubuntu
If you follow this guide to a tee… you will install PostgreSQL itself on your Windows installation. Then, you will install psql in your…
PostgreSQL Setup For Windows & WSL/Ubuntu

Important Distinction: PSQL is the frontend interface for PostgreSQL … they are not synonymous!
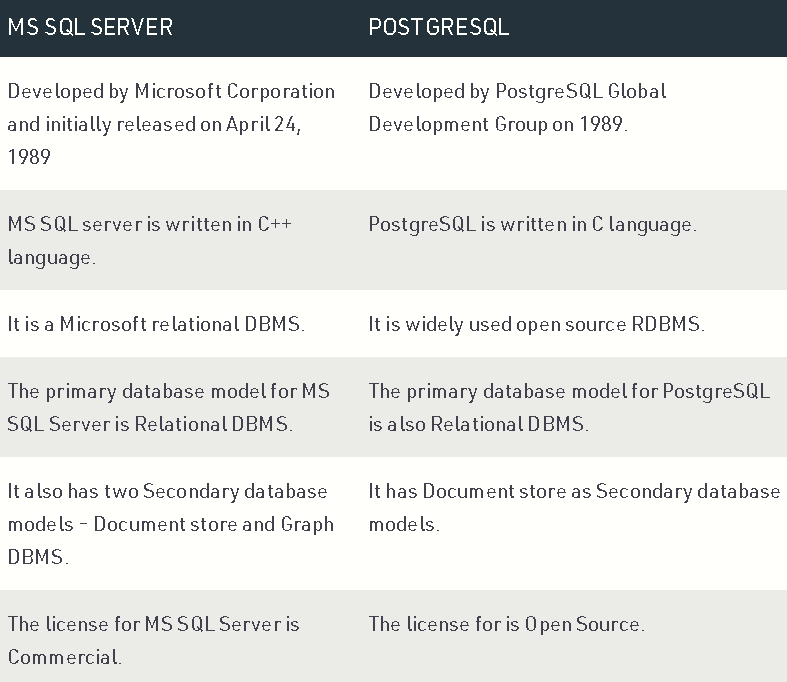
Postgres, is a free and open-source relational database management system (RDBMS)
PSQL:
The primary front-end for PostgreSQL is the psql command-line program, which can be used to enter SQL queries directly, or execute them from a file.
In addition, psql provides a number of meta-commands and various shell-like features to facilitate writing scripts and automating a wide variety of tasks; for example tab completion of object names and SQL syntax.
pgAdmin:
The pgAdmin package is a free and open-source graphical user interface (GUI) administration tool for PostgreSQL.
When you read "installation", that means the actual OS that's running on your machine. So, you have a Windows installation, Windows 10, that's running when you boot your computer. Then, when you start the Ubuntu installation, it's as if there's a completely separate computer running inside your computer. It's like having two completely different laptops.
Other Noteworthy Distinctions:
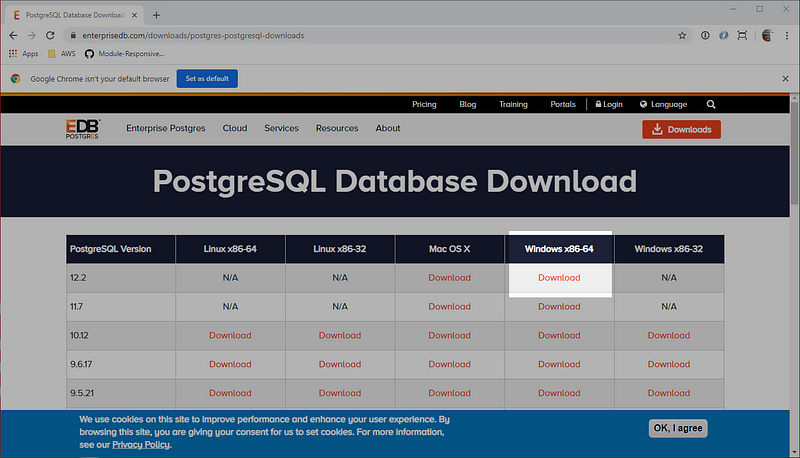
To install PostgreSQL 12, you need to download the installer from the Internet. PostgreSQL's commercial company, Enterprise DB, offers installers for PostgreSQL for every major platform.
Open https://www.enterprisedb.com/downloads/postgres-postgresql-downloads. Click the link for PostgreSQL 12 for Windows x86-64.
- Yes, Windows, let the installer make changes to my device.
- Thanks for the welcome. Next.
- Yeah, that's a good place to install it. Next.
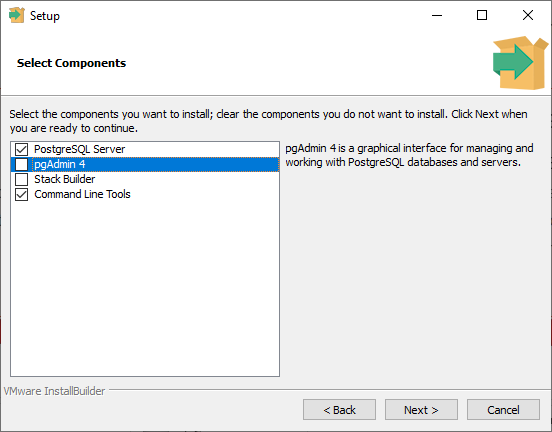
- I don't want that pgAdmin nor the Stack Builder things. Uncheck. Uncheck. Next.
Oooh! A password! I'll enter ****. I sure won't forget that because, if I do, I'll have to uninstall and reinstall PostgreSQL and lose all of my hard work. Seriously, write down this password or use one you will not forget!!!!!!!!!!!!!!!
I REALLY CANNOT STRESS THE ABOVE POINT ENOUGH… Experience is a great teacher but in this case … it's not worth it.
- Sure. 5432. Good to go. Next.
- Not even sure what that means. Default! Next.
- Yep. Looks good. Next.
Insert pop culture reference to pass the time
Installing PostgreSQL Client Tools on Ubuntu
Now, to install the PostgreSQL Client tools for Ubuntu. You need to do this so that the Node.js (and later Python) programs running on your Ubuntu installation can access the PostgreSQL server running on your Windows installation. You need to tell apt, the package manager, that you want it to go find the PostgreSQL 12 client tools from PostgreSQL itself rather than the common package repositories. You do that by issuing the following two commands. Copy and paste them one at a time into your shell. (If your Ubuntu shell isn't running, start one.)
Pro-tip: Copy those commands because you're not going to type them, right? After you copy one of them, you can just right-click on the Ubuntu shell. That should paste them in there for you.
wget --quiet -O - https://www.postgresql.org/media/keys/ACCC4CF8.asc | sudo apt-key add -If prompted for your password, type it.
echo "deb http://apt.postgresql.org/pub/repos/apt/ `lsb_release -cs`-pgdg main" | sudo tee /etc/apt/sources.list.d/pgdg.listThe last line of output of those two commands running should read "OK". If it does not, try copying and pasting them one at a time.
Now that you've registered the PostgreSQL repositories as a source to look for PostgreSQL, you need to update the apt registry. You should do this before you install any software on Ubuntu.
sudo apt updateOnce that's finished running, the new entries for PostgreSQL 12 should be in the repository. Now, you can install them with the following command.
sudo apt install postgresql-client-12 postgresql-commonIf it asks you if you want to install them, please tell it "Y".
Test that it installed by typing psql --version. You should see it print out information about the version of the installed tools. If it tells you that it can't find the command, try these instructions over.
Configuring the client tools
Since you're going to be accessing the PosgreSQL installation from your Ubuntu installation on your Windows installation, you're going to have to type that you want to access it over and over, which means extra typing. To prevent you from having to do this, you can customize your shell to always add the extra commands for you.
This assumes you're still using Bash. If you changed the shell that your Ubuntu installation uses, please follow that shell's directions for adding an alias to its startup file.
Make sure you're in your Ubuntu home directory. You can do that by typing cd and hitting enter. Use ls to find out if you have a .bashrc file. Type ls .bashrc. If it shows you that one exists, that's the one you will add the alias to. If it tells you that there is no file named that, then type ls .profile. If it shows you that one exists, that's the one you will add the alias to. If it shows you that it does not exist, then use the file name .bashrc in the following section.
Now that you know which profile file to use, type code «profile file name» where "profile file name" is the name of the file you determined from the last section. Once Visual Studio Code starts up with your file, at the end of it (or if you've already added aliases, in that section), type the following.
alias psql="psql -h localhost"When you run psql from the command line, it will now always add the part about wanting to connect to localhost every time. You would have to type that each time, otherwise.
To make sure that you set that up correctly, type psql -U postgres postgres. This tells the psql client that you want to connect as the user "postgres" (-U postgres) to the database postgres (postgres at the end), which is the default database created when PostgreSQL is installed. It will prompt you for a password. Type the password that you used when you installed PostgrSQL, earlier. If the alias works correctly and you type the correct password, then you should see something like the following output.
psql (12.2 (Ubuntu 12.2-2.pgdg18.04+1))
Type "help" for help.

postgres=#
Type \q and hit Enter to exit the PostgreSQL client tool.
Now, you will add a user for your Ubuntu identity so that you don't have to specify it all the time. Then, you will create a file that PostgreSQL will use to automatically send your password every time.
Copy and paste the following into your Ubuntu shell. Think of a password that you want to use for your user. Replace the password in the single quotes in the command with the password that you want. It has to be a non-empty string. PostgreSQL doesn't like it when it's not.
psql -U postgres -c "CREATE USER `whoami` WITH PASSWORD 'password' SUPERUSER"It should prompt you for a password. Type the password that you created when you installed PostgreSQL. Once you type the correct password, you should see "CREATE ROLE".
Now you will create your PostgreSQL password file. Type the following into your Ubuntu shell to open Visual Studio Code and create a new file.
code ~/.pgpassIn that file, you will add this line, which tells it that on localhost for port 5432 (where PostgreSQL is running), for all databases (*), use your Ubuntu user name and the password that you just created for that user with the psql command you just typed. (If you have forgotten your Ubuntu user name, type whoami on the command line.) Your entry in the file should have this format.
localhost:5432:*:«your Ubuntu user name»:«the password you just used»Once you have that information in the file, save it, and close Visual Studio Code.
The last step you have to take is change the permission on that file so that it is only readable by your user. PostgreSQL will ignore it if just anyone can read and write to it. This is for your security. Change the file permissions so only you can read and write to it. You did this once upon a time. Here's the command.
chmod go-rw ~/.pgpassYou can confirm that only you have read/write permission by typing ls -al ~/.pgpass. That should return output that looks like this, with your Ubuntu user name instead of "web-dev-hub".
-rw------- 1 web-dev-hub web-dev-hub 37 Mar 28 21:20 /home/web-dev-hub/.pgpassNow, try connecting to PostreSQL by typing psql postgres. Because you added the alias to your startup script, and because you created your .pgpass file, it should now connect without prompting you for any credentials! Type \q and press Enter to exit the PostgreSQL command line client.
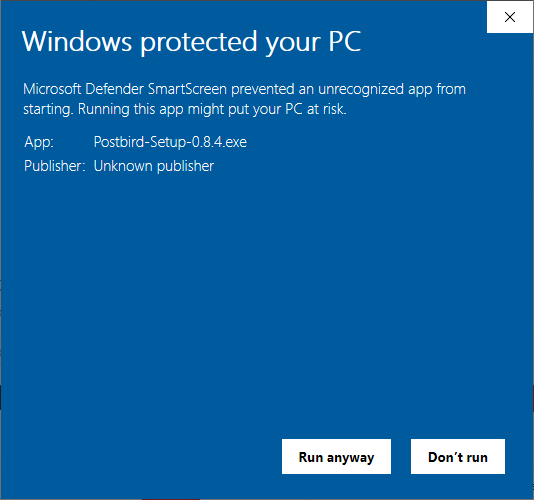
Installing Postbird
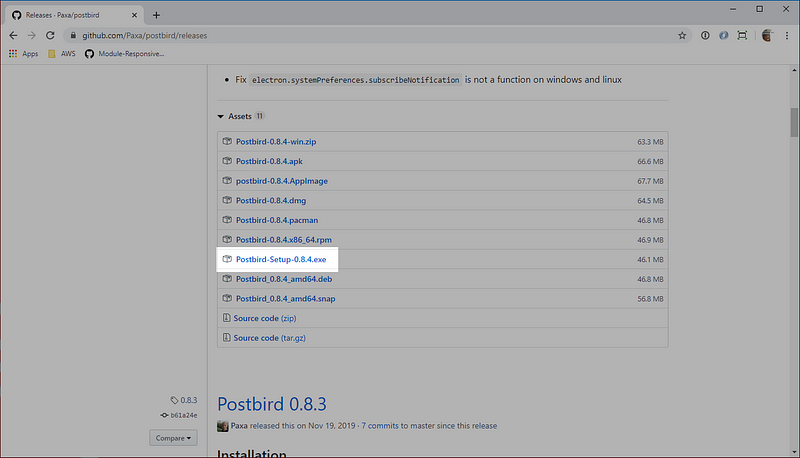
Head over to the Postbird releases page on GitHub. Click the installer for Windows which you can recognize because it's the only file in the list that ends with ".exe".
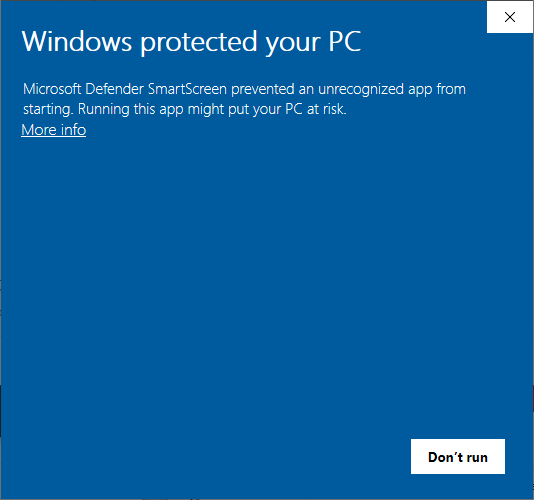
Otherwise, if you trust Paxa like web-dev-hub and tens of thousands of other developers do, then click the link that reads "More info" and the "Run anyway" button.
You can close it for now. It also installed an icon on your desktop. You can launch it from there or your Start Menu at any time.
Now.. if you still have some gas in the tank… let's put our new tools to work:
The node-postgres
The node-postgres is a collection of Node.js modules for interfacing with the PostgreSQL database. It has support for callbacks, promises, async/await, connection pooling, prepared statements, cursors, and streaming results.
In our examples we also use the Ramda library. See Ramda tutorial for more information.
Setting up node-postgres
First, we install node-postgres.
$ node -v v14.2
$ npm init -y
We initiate a new Node application.
npm i pg
We install node-postgres with nmp i pg.
npm i ramda
In addition, we install Ramda for beautiful work with data.
cars.sql
DROP TABLE IF EXISTS cars;
CREATE TABLE cars(id SERIAL PRIMARY KEY, name VARCHAR(255), price INT); INSERT INTO cars(name, price) VALUES('Audi', 52642); INSERT INTO cars(name, price) VALUES('Mercedes', 57127); INSERT INTO cars(name, price) VALUES('Skoda', 9000); INSERT INTO cars(name, price) VALUES('Volvo', 29000); INSERT INTO cars(name, price) VALUES('Bentley', 350000); INSERT INTO cars(name, price) VALUES('Citroen', 21000); INSERT INTO cars(name, price) VALUES('Hummer', 41400); INSERT INTO cars(name, price) VALUES('Volkswagen', 21600);
In some of the examples, we use this cars table.
The node-postgres first example
In the first example, we connect to the PostgreSQL database and return a simple SELECT query result.
first.js
const pg = require('pg');
const R = require('ramda');
const cs = 'postgres://postgres:s$cret@localhost:5432/ydb';
const client = new pg.Client(cs);
client.connect();
client.query('SELECT 1 + 4').then(res => {

const result = R.head(R.values(R.head(res.rows)))

console.log(result)
}).finally(() => client.end());
The example connects to the database and issues a SELECT statement.
const pg = require('pg');
const R = require('ramda');
We include the pg and ramda modules.
const cs = 'postgres://postgres:s$cret@localhost:5432/ydb';This is the PostgreSQL connection string. It is used to build a connection to the database.
const client = new pg.Client(cs);
client.connect();
A client is created. We connect to the database with connect().
client.query('SELECT 1 + 4').then(res => {

const result = R.head(R.values(R.head(res.rows)));

console.log(result);

}).finally(() => client.end());
We issue a simple SELECT query. We get the result and output it to the console. The res.rows is an array of objects; we use Ramda to get the returned scalar value. In the end, we close the connection with end().
node first.js
5
This is the output.
The node-postgres column names
In the following example, we get the columns names of a database.
column_names.js
const pg = require('pg');

const cs = 'postgres://postgres:s$cret@localhost:5432/ydb';

const client = new pg.Client(cs);

client.connect();

client.query('SELECT * FROM cars').then(res => {

const fields = res.fields.map(field => field.name);

console.log(fields);

}).catch(err => {
console.log(err.stack);
}).finally(() => {
client.end()
});
The column names are retrieved with res.fields attribute. We also use the catch clause to output potential errors.
node column_names.js
'id', 'name', 'price'′id′,′name′,′price′
The output shows three column names of the cars table.
Selecting all rows
In the next example, we select all rows from the database table.
all_rows.js
const pg = require('pg');
const R = require('ramda');

const cs = 'postgres://postgres:s$cret@localhost:5432/ydb';

const client = new pg.Client(cs);

client.connect();

client.query('SELECT * FROM cars').then(res => {

const data = res.rows;

console.log('all data');
data.forEach(row => {
    console.log(\`Id: ${row.id} Name: ${row.name} Price: ${row.price}\`);
})

console.log('Sorted prices:');
const prices = R.pluck('price', R.sortBy(R.prop('price'), data));
console.log(prices);

}).finally(() => {
client.end()
});
TBC…
If you found this guide helpful feel free to checkout my github/gists where I host similar content:
bgoonz — OverviewWeb Developer, Electrical Engineer JavaScript | CSS | Bootstrap | Python | React | Node.js | Express | Sequelize…github.com
Or Checkout my personal Resource Site:
Stackbit Web-Dev-HubThemeMemoization, Tabulation, and Sorting Algorithms by Example Why is looking at runtime not a reliable method of…bgoonz-blog.netlify.app
By Bryan Guner on March 6, 2021.
August 6, 2021.