
For Front end developers who like myself struggle with making the jump to fullstack.
You can access and query the data using the findByPk, findOne, and findAll methods.
Terminology:
- NodeJS We re going to use this to run JavaScript code on the server. I ve decided to use the latest version of Node, v6.3.0 at the time of writing, so that we ll have access to most of the new features introduced in ES6.
- Express As per their website, Express is a Fast, unopinionated, minimalist web framework for Node.js , that we re going to be building our Todo list application on.
- PostgreSQL This is a powerful open-source database that we re going to use. I ve attached an article I published on the setup below!
[PostgreSQL Setup For Windows & WSL/Ubuntu
If you follow this guide to a tee you will install PostgreSQL itself on your Windows installation. Then, you will bryanguner.medium.com](https://bryanguner.medium.com/postgresql-setup-for-windows-wsl-ubuntu-801672ab7089 "https://bryanguner.medium.com/postgresql-setup-for-windows-wsl-ubuntu-801672ab7089")
- However, if you face issues while installing PostgreSQL, or you don t want to dive into installing it, you can opt for a version of PostgreSQL hosted online. I recommend ElephantSQL. I found it s pretty easy to get started with. However, the free version will only give you a 20MB allowance.
- Sequelize In addition, we re going to use Sequelize, which is a database ORM that will interface with the Postgres database for us.
RDBMS and Database Entities
Define what a relational database management system is
- RDBMS stands for Relational Database Management System
- A software application that you run that your programs can connect to so that they can store, modify, and retrieve data.
- An RDBMS can track many databases. We will use PostgreSQL, or postgres , primarily for our RDBMS and it will be able to create individual databases for each of our projects.
Describe what relational data is
- In general, relational data is information that is connected to other pieces of information.
- When working with relational databases, we can connect two entries together utilizing foreign keys (explained below).
- In a pets database, we could be keeping track of dogs and cats as well as the toys that each of them own. That ownership of a cat to a toy is the relational aspect of relational data. Two pieces of information that can be connected together to show some sort of meaning.
Define what a database is
- The actual location that data is stored.
- A database can be made up of many tables that each store specific kinds of information.
- We could have a pets database that stores information about many different types of animals. Each animal type could potentially be represented by a different table.
Define what a database table is
- Within a database, a table stores one specific kind of information.
- The records (entries) on these tables can be connected to records on other tables through the use of foreign keys
- In our pets database, we could have a dogs table, with individual records
Describe the purpose of a primary key
- A primary key is used in the database as a unique identifier for the table.
- We often use an id field that simply increments with each entry. The incrementing ensures that each record has a unique identifier, even if their are other fields of the record that are repeated (two people with the same name would still need to have a unique identifier, for example).
- With a unique identifier, we can easily connect records within the table to records from other tables.
Describe the purpose of a foreign key
- A foreign key is used as the connector from this record to the primary key of another table s record.
- In our pets example, we can imagine two tables to demonstrate: a table to represent cats and a table to represent toys. Each of these tables has a primary key of id that is used as the unique identifier. In order to make a connection between a toy and a cat, we can add another field to the cat table called ownerid , indicating that it is a foreign key for the cat table. By setting a toy s ownerid to the same value as a particular cat s id , we can indicate that the cat is the owner of that toy.
Describe how to properly name things in PostgreSQL
- Names within postgres should generally consist of only lowercase letters, numbers, and underscores.
- Tables within a database are plural by convention, so a table for cats would typically be cats and office locations would be office_locations (all lowercase, underscores to replace spaces, plural)
Connect to an instance of PostgreSQL with the command line tool psql
- The psql command by default will try to connect to a database and username that matches your system s username
- We connect to a different database by providing an argument to the psql command
- psql pets
- To connect with a different username we can use the -U flag followed by the username we would like to use. To connect to the pets database as pets_user
- psql -U pets_user pets
- If there is a password for the user, we can tell psql that we would like a prompt for the password to show up by using the -W flag.
- psql -U petsuser -W pets (the order of our flags doesn t matter, as long as any arguments associated with them are together, such as petsuser directly following -U in this example)
Identify whether a user is a normal user or a superuser by the prompt in the psql shell
- You can tell if you are logged in as a superuser or normal user by the prompt in the terminal.
- If the prompt shows =>, the user is a normal user
- If the prompt show =#, the user is a superuser
Create a user for the relational database management system
- Within psql, we can create a user with the CREATE USER {username} {WITH options} command.
- The most common options we ll want to use are WITH PASSWORD 'mypassword' to provide a password for the user we are creating, CREATEDB to allow the user to create new databases, or SUPERUSER to create a user with all elevated permissions.
Create a database in the database management system
- We can use the command CREATE DATABASE {database name} {options} inside psql to create a new database.
- A popular option we may utilize is WITH OWNER {owner name} to set another user as the owner of the database we are making.
Configure a database so that only the owner (and superusers) can connect to it
- We can GRANT and REVOKE privileges from a database to users or categories of users.
- In order to remove connection privileges to a database from the public we can use REVOKE CONNECT ON DATABASE {db_name} FROM PUBLIC;, removing all public connection access.
- If we wanted to grant it back, or to a specific user, we could similarly do GRANT CONNECT ON DATABASE {db_name} FROM {specific user, PUBLIC, etc.};
View a list of databases in an installation of PostgreSQL
- To list all databases we can use the \l or \list command in psql.
Create tables in a database
CREATE TABLE {table name} ( {columnA} {typeA}, {columnB} {typeB}, etc... );
- The whitespace does not matter. Creating the SQL statements on multiple lines is easier to read, but just like JavaScript, they can be presented differently.
- One common issue is that SQL does not like trailing commas, so the last column cannot have a comma after its type in this example.
View a list of tables in a database
- To list all database tables, use the \dt command.
Identify and describe the common data types used in PostgreSQL
- There are many different data types that we can use in our tables, here are some common examples:
- SERIAL: autoincrementing, very useful for IDs
- VARCHAR(n): a string with a character limit of n
- TEXT: doesn t have character limit, but less performant
- BOOLEAN: true/false
- SMALLINT: signed two-byte integer (-32768 to 32767)
- INTEGER: signed four-byte integer (standard)
- BIGINT: signed eight-byte integer (very large numbers)
- NUMERIC: or DECIMAL, can store exact decimal values
- TIMESTAMP: date and time
Describe the purpose of the UNIQUE and NOT NULL constraints, and create columns in database tables that have them
- In addition to the data type, we can provide flags for constraints to place on our column data.
- The UNIQUE flag indicates that the data for the column must not be repeated.
- By default we can create entries in our tables that are missing data from columns. When creating a pet, maybe we don t provide an age because we don t know it, for example. If we want to require that the data be present in order to create a new record, we can indicate that column must be NOT NULL.
In the example below, we are requiring our pets to have unique names and for them to be present (both UNIQUE and NOT NULL). We have no such constraints on the age column, allowing repetition of ages or their complete absence.
CREATE TABLE pets (
id SERIAL PRIMARY KEY,
name VARCHAR(255) UNIQUE NOT NULL,
age SMALLINT
);
Create a primary key for a table
When creating a table we can indicate the primary key by passing in the column name to parentheses like so:
CREATE TABLE people (
id SERIAL,
firstname VARCHAR(50),
lastname VARCHAR(50),
PRIMARY KEY (id)
);We could have also used the PRIMARY KEY flag on the column definition itself:
CREATE TABLE people (
id SERIAL PRIMARY KEY,
firstname VARCHAR(50),
lastname VARCHAR(50)
);
Create foreign key constraints to relate tables
- In our table definition, we can use the line FOREIGN KEY (foreignkeystoredinthistable) REFERENCE {other table} ({othertableskeyname}) to connect two tables.
This is probably easier to see in an example:
CREATE TABLE people (
id SERIAL PRIMARY KEY,
firstname VARCHAR(50),
lastname VARCHAR(50)
);CREATE TABLE pets (
id SERIAL PRIMARY KEY,
name VARCHAR(255),
age SMALLINT,
personid INTEGER,
FOREIGN KEY (personid) REFERENCES people (id)
);
SQL is not case sensitive for its keywords but is for its entity names
- Exactly as the LO states, CREATE TABLE and create table are interpreted the same way. Using capitalization is a good convention in order to distinguish your keywords.
- The entity names that we use ARE case-sensitive, however. So a table named pets is unique from a table named Pets. In general, we prefer to use all lowercase for our entities to avoid any of this confusion.
SQL
- How to use the SELECT ... FROM ... statement to select data from a single table
- Supply the column names in the SELECT clause. If we want all columns, we can also use *
- Supply the table names in the FROM clause
--- Selects all columns from the friends table
SELECT * FROM friends;
--- Selects the first_name column from the friends table (remember whitespace is ignored)
SELECT name
FROM friends;
- Sometimes we may need to specify what table we are selecting a column from, particulurly if we had joined multiple tables together.
--- Notice here we are indicating that we want the "name" field from the "friends" table as well as the "name" field from the "puppies" table. We indicate the table name by table.column
--- We are also aliasing these fields with the AS keyword so that our returned results have friendname and puppyname as field headers
SELECT friends.name AS friendname , puppies.name AS puppyname FROM friends JOIN puppies ON friends.puppy_id = puppies.id
How to use the WHERE clause on SELECT, UPDATE, and DELETE statements to narrow the scope of the command
- The WHERE clause allows us to select or apply actions to records that match specific criteria instead of to a whole table.
- We can use WHERE with a couple of different operators when making our comparison
- WHERE {column} = {value} provides an exact comparison
- WHERE {column} IN ({value1}, {value2}, {value3}, etc.) matches any provided value in the IN statement. We can make this more complex by having a subquery inside of the parentheses, having our column match any values within the returned results.
- WHERE {column} BETWEEN {value1} AND {value2} can check for matches between two values (numeric ranges)
- WHERE {column} LIKE {pattern} can check for matches to a string. This is most useful when we use the wildcard %, such as WHERE breed LIKE '%Shepherd', which will match any breed that ends in Shepherd
- The NOT operator can also be used for negation in the checks.
Mathematical operators can be used when performing calculations or comparisons within a query as well, such as
SELECT name, breed, weightlbs FROM puppies WHERE weightlbs > 50; --- OR SELECT name, breed, ageyrs FROM puppies WHERE ageyrs * 10 = 5;
How to use the JOIN keyword to join two (or more) tables together into a single virtual table
- When we want to get information from a related table or do querying based on related table values, we can join the connected table by comparing the foreign key to where it lines up on the other table:
--- Here we are joining the puppies table on to the friends table. We are specifying that the comparison we should make is the foreign key puppy_id on the friends table should line up with the primary key id on the puppies table.
SELECT * FROM friends JOIN puppies ON friends.puppy_id = puppies.id
How to use the INSERT statement to insert data into a table
- When a table is already created we can then insert records into it using the INSERT INTO keywords.
- We provide the name of the table that we would like to add records to, followed by the VALUES keyword and each record we are adding. Here s an example:
--- We are providing the table name, then multiple records to insert
--- The values are listed in the order that they are defined on the table
INSERT INTO tablename VALUES (column1value, colum2value, column3value), (column1value, colum2value, column3value), (column1value, colum2value, column3value);
- We can also specify columns when we are inserting data. This makes it clear which fields we are providing data for and allows us to provide them out of order, skip null or default values, etc.
--- In this example, we want to use the default value for id since it is autoincremented, so we provide DEFAULT for this field
INSERT INTO friends (id, firstname, lastname) VALUES (DEFAULT, 'Amy', 'Pond');
--- Alternatively, we can leave it out completely, since the default value will be used if none is provided
INSERT INTO friends (firstname, lastname) VALUES ('Rose', 'Tyler'), ('Martha', 'Jones'), ('Donna', 'Noble'), ('River', 'Song');
How to use an UPDATE statement to update data in a table
- The UPDATE keyword can be used to find records and change their values in our database.
- We generally follow the pattern of UPDATE {table} SET {column} = {new value} WHERE {match condition};.
- Without a condition to narrow our records down, we will update every record in the table, so this is an important thing to double check!
- We can update multiple fields as well by specifying each column in parentheses and their associated new values: UPDATE {table} SET ({column1}, {column2}) = ({value1}, {value2}) WHERE {match condition};
--- Updates the pet with id of 4 to change their name and breed
UPDATE pets SET (name, breed) = ('Floofy', 'Fluffy Dog Breed') WHERE id = 4;
How to use a DELETE statement to remove data from a table
- Similar to selecting records, we can delete records from a table by specifying what table we are deleting from and what criteria we would like to match in order to delete.
- We follow the general structure DELETE FROM {table} WHERE {condition};
- The condition here is also very important! Without a condition, all records match and will be deleted.
--- Deletes from the pets table any record that either has a name Floofy, a name Doggo, or an id of 3.
DELETE FROM pets WHERE name IN ('Floofy', 'Doggo') OR id = 3;
How to use a seed file to populate data in a database
- Seed files are a great way for us to create records that we want to start our database out with.
- Instead of having to individually add records to our tables or manually entering them in psql or postbird, we can create a file that has all of these records and then just pass this file to psql to run.
- Seed files are also great if we ever need to reset our database. We can clear out any records that we have by dropping all of our tables, then just run our seed files to get it into a predetermined starting point. This is great for our personal projects, testing environments, starting values for new tables we create, etc.
- There are two main ways we can use a seed file with psql, the < and the | operators. They perform the same function for us, just in slightly different orders, taking the content of a .sql file and executing in within the psql environment:
- psql -d {database} < {sql filepath}
- cat {sql filepath} | psql -d {database}
SQL (continued)
How to perform relational database design
- Steps to Designing the Database:
- Define the entities. What data are are you storing, what are the fields for each entity?
- You can think of this in similar ways to OOP (object oriented programming).
- If you wanted to model this information using classes, what classes would you make? Those are generally going to be the tables that are created in your database.
- The attributes of your classes are generally going to be the fields/columns that we need for each table.
- Identify primary keys. Most of the time these will be ids that you can generate as a serial field, incrementing with each addition to the database.
- Establish table relationships. Connect related data together with foreign keys. Know how we store these keys in a one-to-one, one-to-many, or many-to-many relationship.
- With a one-to-one or one-to-many relationship, we are able to use a foreign key on the table to indicate the other specific record that it is connected to.
- With a many-to-many relationship, each record could be connected to multiple records, so we have to create a join table to connect these entities. A record on this join table connects a record from one table to a record from another table.
How to use transactions to group multiple SQL commands into one succeed or fail operation
- We can define an explicit transaction using BEGIN and ending with either COMMIT or ROLLBACK.
If any command inside the block fails, everything will be rolled back. We can also specify that we want to roll back at the end of the block instead of committing. We saw that this can be useful when analyzing operations that would manipulate our database.
BEGIN;
UPDATE accounts SET balance = balance --- 100.00
WHERE name = 'Alice';
UPDATE branches SET balance = balance --- 100.00
WHERE name = (SELECT branchname FROM accounts WHERE name = 'Alice');
UPDATE accounts SET balance = balance + 100.00
WHERE name = 'Bob';
UPDATE branches SET balance = balance + 100.00
WHERE name = (SELECT branchname FROM accounts WHERE name = 'Bob');
COMMIT;BEGIN;
EXPLAIN ANALYZE
UPDATE cities
SET city = 'New York City'
WHERE city = 'New York';
ROLLBACK;
How to apply indexes to tables to improve performance
- An index can help optimize queries that we have to run regularly. If we are constantly looking up records in a table by a particular field (such as username or phone number), we can add an index in order to speed up this process.
- An index maintains a sorted version of the field with a reference to the record that it points to in the table (via primary key). If we want to find a record based on a field that we have an index for, we can look through this index in a more efficient manner than having to scan through the entire table (generally O(log n) since the index is sorted, instead of O(n) for a sequential scan).
To add an index to a field we can use the following syntax:
CREATE INDEX indexname ON tablename (column_name);
To drop an index we can do the following:
DROP INDEX index_name
- Making an index is not always the best approach. Indices allow for faster lookup, but slow down record insertion and the updating of associated fields, since we not only have to add the information to the table, but also manipulate the index.
- We generally wouldn t care about adding an index if:
- The tables are small
- We are updating the table frequently, especially the associated columns
- The column has many NULL values
Explain what the EXPLAIN command is used for:
- EXPLAIN gives us information about how a query will run (the query plan)
- It gives us an idea of how our database will search for data as well as a qualitative comparitor for how expensive that operation will be. Comparing the cost of two queries will tell us which one is more efficient (lower cost).
- We can also use the ANALYZE command with EXPLAIN, which will actually run the specified query. Doing so gives us more detailed information, such as the milliseconds it took our query to execute as well as specifics like the exact number of rows filtered and returned.
- Demonstrate how to install and use the node-postgres library and its Pool class to query a PostgreSQL-managed database
We can add the node-postgres library to our application with npm install pg. From there we will typically use the Pool class associated with this library. That way we can run many SQL queries with one database connection (as opposed to Client, which closes the connection after a query).
const { Pool } = require('pg');
// If we need to specify a username, password, or database, we can do so when we create a Pool instance, otherwise the default values for logging in to psql are used:
const pool = new Pool({ username: '<
The query method on the Pool instance will allow us to execute a SQL query on our database. We can pass in a string that represents the query we want to run
const allAirportsSql =
SELECT id, city_id, faa_id, name FROM airports;;async function selectAllAirports() {
const results = await pool.query(allAirportsSql);
console.log(results.rows);
pool.end(); // invoking end() will close our connection to the database
}
selectAllAirports();
- The return value of this asynchronous function is an object with a rows key that points to an array of objects, each object representing a record with field names as keys.
Explain how to write prepared statements with placeholders for parameters of the form 1 ,1,2 , and so on
- The prepared statement (SQL string that we wrote) can also be made more dynamic by allowing for parameters to be passed in.
The Pool instance s query function allows us to pass a second argument, an array of parameters to be used in the query string. The location of the parameter substitutions are designated with 1,1,2, etc., to signify the first, second, etc., arguments.
const airportsByNameSql =
SELECT name, faa_id FROM airports WHERE UPPER(name) LIKE UPPER($1);
async function selectAirportsByName(name) {
const results = await pool.query(airportsByNameSql, ParseError: KaTeX parse error: Expected group as argument to '`' at end of input: `%${name}%`);
console.log(results.rows);
pool.end(); // invoking end() will close our connection to the database
}
// Get the airport name from the command line and store it // in the variable "name". Pass that value to the // selectAirportsByName function. const name = process.argv[2]; // console.log(name); selectAirportsByName(name);
ORM
- How to install, configure, and use Sequelize, an ORM for JavaScript
- To start a new project we use our standard npm initialize statement
- npm init -y
- Add in the packages we will need (sequelize, sequelize-cli, and pg)
- npm install sequelize@⁵.0.0 sequelize-cli@⁵.0.0 pg@⁸.0.0
- Initialize sequelize in our project
- npx sequelize-cli init
- Create a database user with credentials we will use for the project
- psql
- CREATE USER example_user WITH PASSWORD 'badpassword'
Here we can also create databases since we are already in postgres
CREATE DATABASE exampleappdevelopment WITH OWNER example_user
CREATE DATABASE exampleapptest WITH OWNER example_user
CREATE DATABASE exampleappproduction WITH OWNER example_user
- If we don t create these databases now, we could also create them after we make our changes to our config file. If we take this approach, we need to make sure our user that we created has the CREATEDB option when we make them, since sequelize will attempt to make the databases with this user. This other approach would look like:
- In psql: CREATE USER example_user WITH PASSWORD 'badpassword' CREATEDB
- In terminal: npx sequelize-cli db:create
Double check that our configuration file matches our username, password, database, dialect, and seederStorage (these will be filled out for you in an assessment scenario):
{
"development": {
"username": "sequelizerecipeboxapp",
"password": "HfKfK79k",
"database": "recipeboxdevelopment",
"host": "127.0.0.1",
"dialect": "postgres",
"seederStorage": "sequelize"
},
"test": {
"username": "sequelizerecipeboxapp",
"password": "HfKfK79k",
"database": "recipeboxtest",
"host": "127.0.0.1",
"dialect": "postgres",
"seederStorage": "sequelize"
},
"production": {
"username": "sequelizerecipeboxapp",
"password": "HfKfK79k",
"database": "recipebox_production",
"host": "127.0.0.1",
"dialect": "postgres",
"seederStorage": "sequelize"
}
}- How to use database migrations to make your database grow with your application in a source-control enabled way
Migrations
In order to make new database tables and sequelize models that reflect them, we want to generate a migration file and model file using model:generate
npx sequelize-cli model:generate --- name Cat --- attributes "firstName:string,specialSkill:string"
- Here we are creating a migration file and a model file for a Cat. We are specifying that we want this table to have fields for firstName and specialSkill. Sequelize will automatically make fields for an id, createdAt, and updatedAt, as well, so we do not need to specify these.
- Once our migration file is created, we can go in and edit any details that we need to. Most often we will want to add in database constraints such as allowNull: false, adding a uniqueness constraint with unique: true, adding in character limits to fields such as type: Sequelize.STRING(100), or specifying a foreign key with references to another table references: { model: 'Categories' }.
After we make any necessary changes to our migration file, we need to perform the migration, which will run the SQL commands to actually create the table.
npx sequelize-cli db:migrate
- This command runs any migration files that have not been previously run, in the order that they were created (this is why the timestamp in the file name is important)
If we realize that we made a mistake after migrating, we can undo our previous migration, or all of our migrations. After undoing them, we can make any changes necessary to our migration files (They won t be deleted from the undo, so we don t need to generate anything! Just make the necessary changes to the files that already exist and save the files.). Running the migrations again will make the tables with the updates reflected.
npx sequelize-cli db:migrate:undo
npx sequelize-cli db:migrate:undo:all
Models Validations and Associations
- In addition to the migration files, our model:generate command also created a model file for us. This file is what allows sequelize to transform the results of its SQL queries into useful JavaScript objects for us.
The model is where we can specify a validation that we want to perform before trying to run a SQL query. If the validation fails, we can respond with a message instead of running the query, which can be an expensive operation that we know won t work.
// Before we make changes, sequelize generates the type that this field represents specification:
DataTypes.TEXT
// We can replace the generated format with an object to specify not only the type, but the validations that we want to implement. The validations can also take in messages the respond with on failure and arguments.
specification: {
type: DataTypes.TEXT,
validate: {
notEmpty: {
msg: 'The specification cannot be empty'
},
len: {
args: [10, 100]
msg: 'The specifcation must be between 10 and 100 characters'
}
}
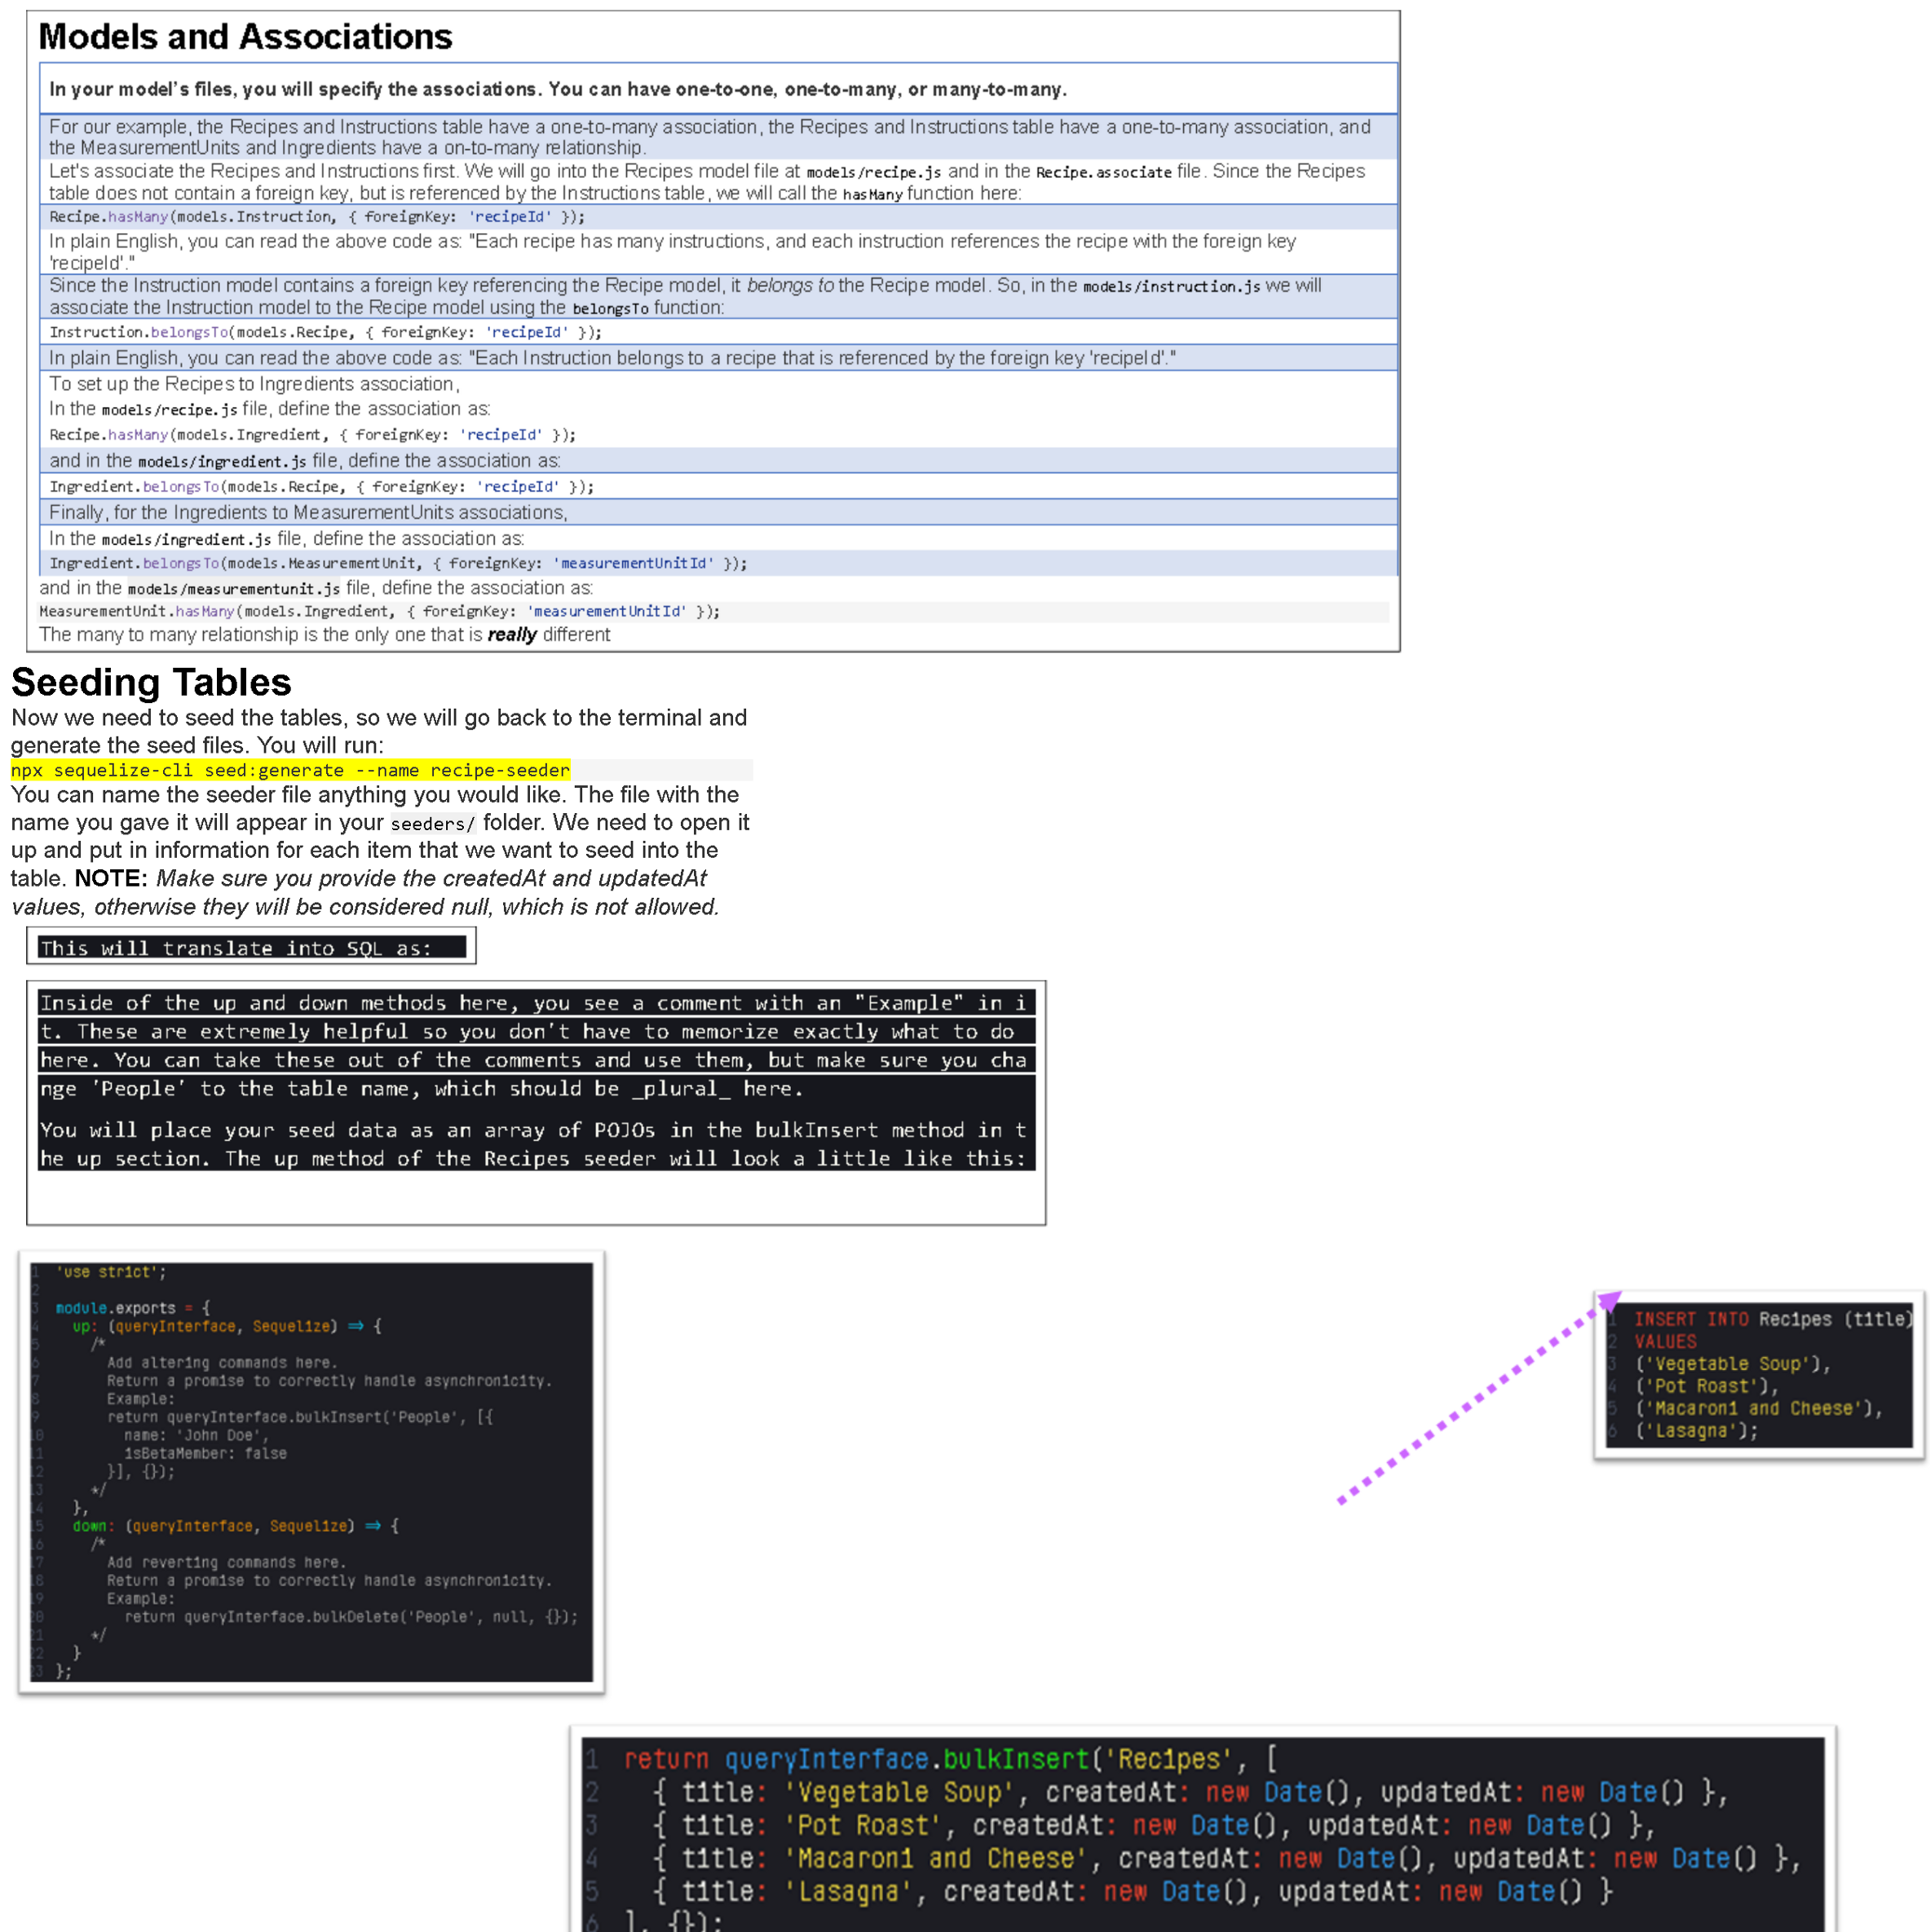
}- Another key part of the model file is setting up our associations. We can use the belongsTo, hasMany, and belongsToMany methods to set up model-level associations. Doing so is what creates the helpful functionality like addOwner that we saw in the pets example, a function that automatically generates the SQL necessary to create a petOwner record and supplies the appropriate petId and ownerId.
- In a one-to-many association, we need to have a belongsTo association on the many side, and a hasMany association on the one side:
- Instruction.belongsTo(models.Recipe, { foreignKey: 'recipeId' });
- Recipe.hasMany(models.Instruction, { foreignKey: 'recipeId' });
In a many-to-many association, we need to have a belongsToMany on each side of the association. We generally specify a columnMapping object to show the association more clearly:
// In our Owner model
// To connect this Owner to a Pet through the PetOwner
const columnMapping = {
through: 'PetOwner',
// joins table
otherKey: 'petId',
// key that connects to other table we have a many association with foreignKey: 'ownerId'
// our foreign key in the joins table
}
Owner.belongsToMany( models.Pet, columnMapping );
// In our Pet model
// To connect this Pet to an Owner through the PetOwner
const columnMapping = { through: 'PetOwner',
// joins table
otherKey: 'ownerId',
// key that connects to other table we have a many association with
foreignKey: 'petId'
// our foreign key in the joins table
}
Pet.belongsToMany( models.Owner, columnMapping );
How to perform CRUD operations with Sequelize
- Seed Files
- Seed files can be used to populate our database with starter data.
- npx sequelize-cli seed:generate --- name add-cats
- up indicates what to create when we seed our database, down indicates what to delete if we want to unseed the database.
For our up, we use the queryInterface.bulkInsert() method, which takes in the name of the table to seed and an array of objects representing the records we want to create:
up: (queryInterface, Sequelize) => {
return queryInterface.bulkInsert('<>', [{
field1: value1a,
field2: value2a
}, {
field1: value1b,
field2: value2b
}, {
field1: value1c,
field2: value2c
}]);
}For our down, we use the queryInterface.bulkDelete() method, which takes in the name of the table and an object representing our WHERE clause. Unseeding will delete all records from the specified table that match the WHERE clause.
// If we want to specify what to remove:
down: (queryInterface, Sequelize) => {
return queryInterface.bulkDelete('<>', {
field1: [value1a, value1b, value1c], //...etc.
});
};
// If we want to remove everything from the table:
down: (queryInterface, Sequelize) => {
return queryInterface.bulkDelete('<>', null, {});
};- Running npx sequelize-cli db:seed:all will run all of our seeder files.
- npx sequelize-cli db:seed:undo:all will undo all of our seeding.
- If we omit the :all we can run specific seed files
- Inserting with Build and Create
- In addition to seed files, which we generally use for starter data, we can create new records in our database by using build and save, or the combined create
Use the .build method of the Cat model to create a new Cat instance in index.js
// Constructs an instance of the JavaScript
Catclass. Does not
// save anything to the database yet. Attributes are passed in as a
// POJO.
const newCat = Cat.build({
firstName: 'Markov',
specialSkill: 'sleeping',
age: 5
});
// This actually creates a newCatsrecord in the database. We must
// wait for this asynchronous operation to succeed.
await newCat.save();
// This builds and saves all in one step. If we don't need to perform any operations on the instance before saving it, this can optimize our code.
const newerCat = await Cat.create({
firstName: 'Whiskers',
specialSkill: 'sleeping',
age: 2
})
Updating Records
- When we have a reference to an instance of a model (i.e. after we have queried for it or created it), we can update values by simply reassigning those fields and using the save method
Deleting Records
- When we have a reference to an instance of a model, we can delete that record by using destroy
- const cat = await Cat.findByPk(1); // Remove the Markov record. await cat.destroy();
- We can also call destroy on the model itself. By passing in an object that specifies a where clause, we can destroy all records that match that query
- await Cat.destroy({ where: { specialSkill: 'jumping' } });
How to query using Sequelize
findAll
const cats = await Cat.findAll(); // Log the fetched cats. // The extra arguments to stringify are a replacer and a space respectively // Here we're specifying a space of 2 in order to print more legibly // We don't want a replacer, so we pass null just so that we can pass a 3rd argument console.log(JSON.stringify(cats, null, 2));
WHERE clause
- Passing an object to findAll can add on clauses to our query
- The where key takes an object as a value to indicate what we are filtering by
{ where: { field: value } } => WHERE field = value
const cats = await Cat.findAll({ where: { firstName: "Markov" } }); console.log(JSON.stringify(cats, null, 2));
OR in the WHERE clause
- Using an array for the value tells sequelize we want to match any of these values
{ where: { field:value1, value2value1,value2} => WHERE field IN (value1, value2)
const cats = await Cat.findAll({ where: { firstName: ["Markov", "Curie"] } });const cats = await Cat.findAll({ where: { firstName: "Markov", age: 4 } }); console.log(JSON.stringify(cats, null, 2));
console.log(JSON.stringify(cats, null, 2));
AND in the WHERE clause
- Providing additional key/value pairs to the where object indicates all filters must match
- { where: { field1: value1, field2: value2 } } => WHERE field1 = value1 AND field2 = value2
Sequelize Op operator
- By requiring Op from the sequelize library we can provide more advanced comparison operators
- const { Op } = require("sequelize");
Op.ne: Not equal operator
const cats = await Cat.findAll({
where: {
firstName: {
// All cats where the name is not equal to "Markov"
// We use brackets in order to evaluate Op.ne and use the value as the key
[Op.ne]: "Markov"
},
},
});
console.log(JSON.stringify(cats, null, 2));
Op.and: and operator
const cats = await Cat.findAll({ where: { // The array that Op.and points to must all be true // Here, we find cats where the name is not "Markov" and the age is 4 [Op.and]: [{ firstName: { [Op.ne]: "Markov" } }, { age: 4 }, ], }, }); console.log(JSON.stringify(cats, null, 2));
Op.or: or operator
const cats = await Cat.findAll({ where: { // One condition in the array that Op.or points to must be true // Here, we find cats where the name is "Markov" or where the age is 4 [Op.or]: [{ firstName: "Markov" }, { age: 4 }, ], }, }); console.log(JSON.stringify(cats, null, 2));
Op.gt and Op.lt: greater than and less than operators
const cats = await Cat.findAll({ where: { // Find all cats where the age is greater than 4 age: {Op.gtOp.gt: 4 }, } }, }); console.log(JSON.stringify(cats, null, 2));
Ordering results
- Just like the where clause, we can pass an order key to specify we want our results ordered
- The key order points to an array with the fields that we want to order by
- By default, the order is ascending, just like standard SQL. If we want to specify descending, we can instead use a nested array with the field name as the first element and DESC as the second element. (We could also specify ASC as a second element in a nested array, but it is unnecessary as it is default)
const cats = await Cat.findAll({ // Order by age descending, then by firstName ascending if cats have the same age order: ParseError: KaTeX parse error: Undefined control sequence: [ at position 1: \̲[̲"age", "DESC", "firstName"], }); console.log(JSON.stringify(cats, null, 2));
// Get a reference to the cat record that we want to update (here just the cat with primary key of 1)
const cat = await Cat.findByPk(1);
// Change cat's attributes.
cat.firstName = "Curie";
cat.specialSkill = "jumping";
cat.age = 123;
// Save the new name to the database.
await cat.save();- Limiting results
We can provide a limit key in order to limit our results to a specified number
const cats = await Cat.findAll({
order: [
["age", "DESC"]
],
// Here we are limiting our results to one record. It will still return an array, just with one object inside. We could have said any number here, the result is always an array.
limit: 1,
});
console.log(JSON.stringify(cats, null, 2));
findOne
- If we only want one record to be returned we can use findOne instead of findAll
- If multiple records would have matched our findOne query, it will return the first record
Unlike findAll, findOne will return the object directly instead of an array. If no records matched the query it will return null.
// finds the oldest cat const cat = await Cat.findOne({ order: "age", "DESC", }); console.log(JSON.stringify(cat, null, 2));
- Querying with Associations
We can include associated data by adding an include key to our options object
const pet = Pet.findByPk(1, { include: [PetType, Owner] }); console.log(pet.id, pet.name, pet.age, pet.petTypeId, pet.PetType.type, pet.Owners
We can get nested associations by having include point to an object that specifies which model we have an association with, then chaining an association on with another include
How to perform data validations with Sequelize
- See the database migrations section above.
In general, we add in a validate key to each field that we want validations for. This key points to an object that specifies all of the validations we want to make on that field, such as notEmpty, notNull, len, isIn, etc.
specification: {
type: DataTypes.TEXT,
validate: {
notEmpty: {
msg: 'The specification cannot be empty'
},
len: {
args: [10, 100]
msg: 'The specifcation must be between 10 and 100 characters'
}
}
}
How to use transactions with Sequelize
- We can create a transaction block in order to make sure either all operations are performed or none of them are
- We use the .transaction method in order to create our block. The method takes in a callback with an argument to track our transaction id (typically just a simple tx variable).
All of our sequelize operations can be passed a transaction key on their options argument which points to our transaction id. This indicates that this operation is part of the transaction block and should only be executed in the database when the whole block executes without error.
async function main() {
try {
// Do all database access within the transaction.
await sequelize.transaction(async (tx) => {
// Fetch Markov and Curie's accounts.
const markovAccount = await BankAccount.findByPk(
1, {
transaction: tx
},
);
const curieAccount = await BankAccount.findByPk(
2, {
transaction: tx
}
);
// No one can mess with Markov or Curie's accounts until the
// transaction completes! The account data has been locked!
// Increment Curie's balance by 5,000. curieAccount.balance += 5000; await curieAccount.save({ transaction: tx }); // Decrement Markov's balance by5,000.curieAccount.balance+=5000;awaitcurieAccount.save(transaction:tx);//DecrementMarkov′sbalanceby5,000.
markovAccount.balance -= 5000;
await markovAccount.save({
transaction: tx
});
});
} catch (err) {
// Report if anything goes wrong.
console.log("Error!");
for (const e of err.errors) {
console.log(${e.instance.clientName}: ${e.message}
);
}
}
await sequelize.close();
}
main();
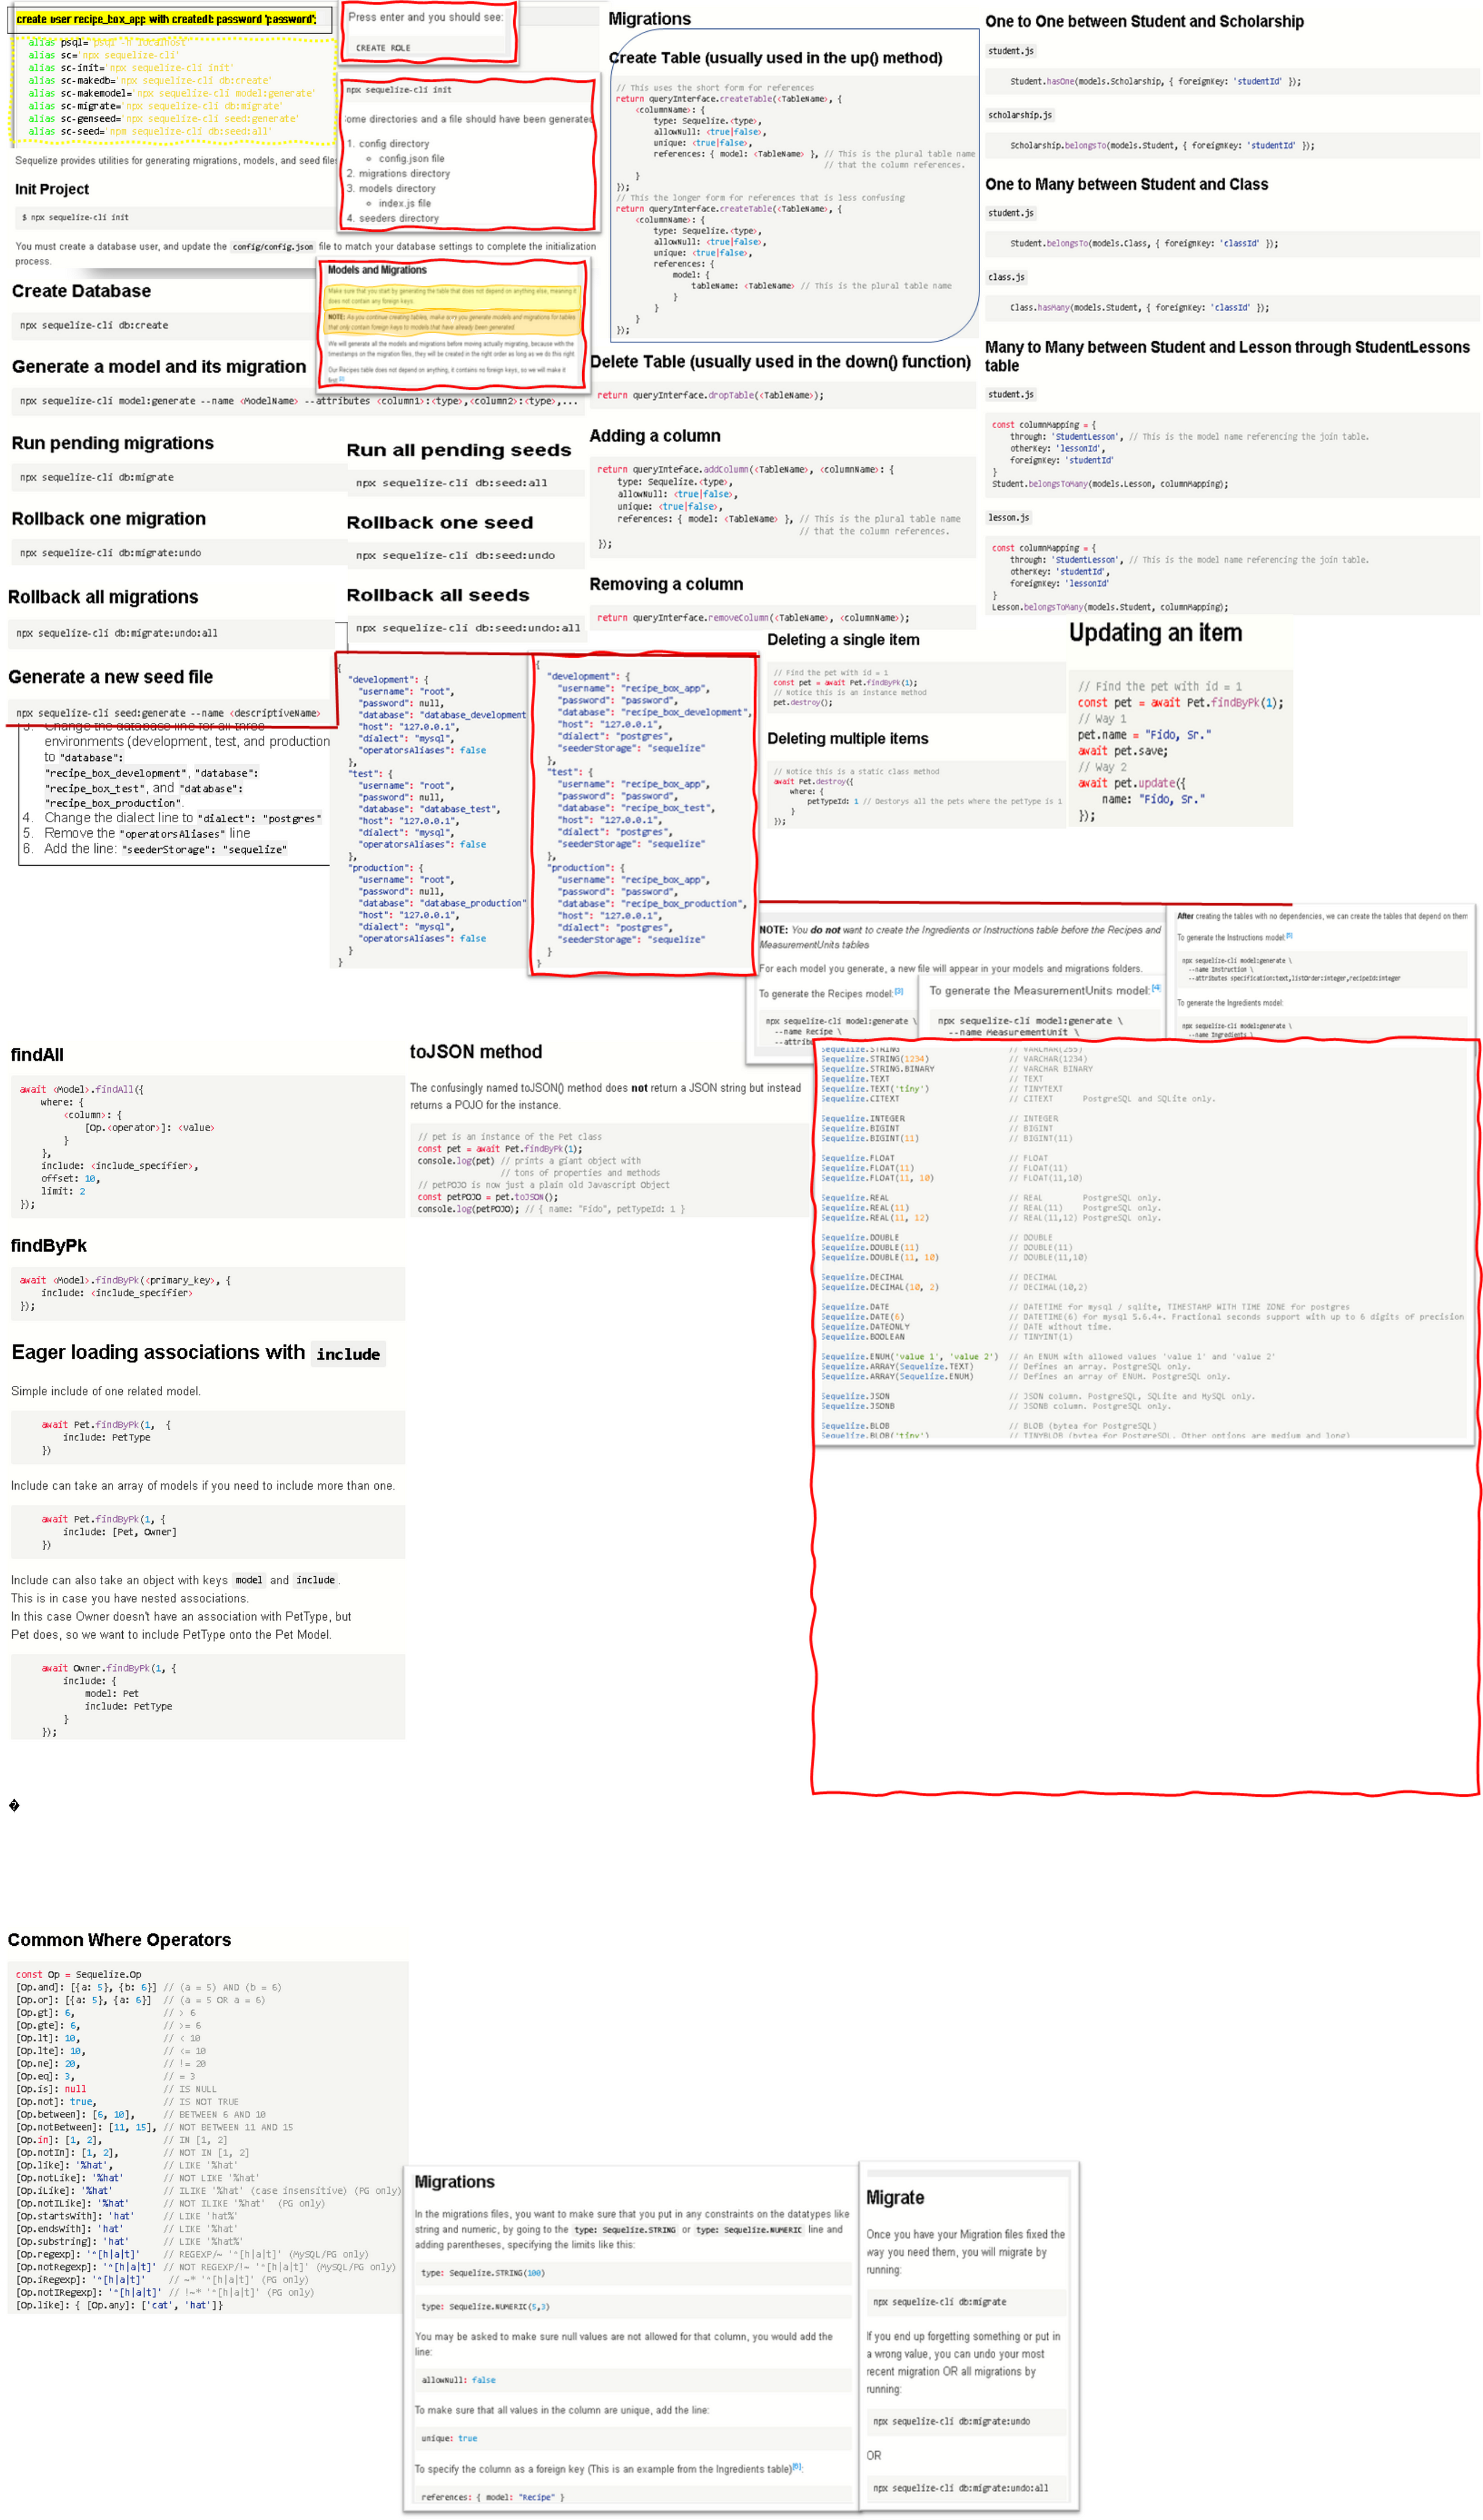
Sequelize Cheatsheet
Command Line
Sequelize provides utilities for generating migrations, models, and seed files. They are exposed through the sequelize-cli command.
Init Project
$ npx sequelize-cli init
You must create a database user, and update the config/config.json file to match your database settings to complete the initialization process.
Create Database
npx sequelize-cli db:create
Generate a model and its migration
npx sequelize-cli model:generate --name
Run pending migrations
npx sequelize-cli db:migrate
Rollback one migration
npx sequelize-cli db:migrate:undo
Rollback all migrations
npx sequelize-cli db:migrate:undo:all
Generate a new seed file
npx sequelize-cli seed:generate --name
Run all pending seeds
npx sequelize-cli db:seed:all
Rollback one seed
npx sequelize-cli db:seed:undo
Rollback all seeds
npx sequelize-cli db:seed:undo:all
Migrations
Create Table (usually used in the up() method)
// This uses the short form for references
return queryInterface.createTable(
Delete Table (usually used in the down() function)
return queryInterface.dropTable(
Adding a column
return queryInteface.addColumn(
Removing a column
return queryInterface.removeColumn(
Model Associations
One to One between Student and Scholarship
student.js
Student.hasOne(models.Scholarship, { foreignKey: 'studentId' });
scholarship.js
Scholarship.belongsTo(models.Student, { foreignKey: 'studentId' });
One to Many between Student and Class
student.js
Student.belongsTo(models.Class, { foreignKey: 'classId' });
class.js
Class.hasMany(models.Student, { foreignKey: 'classId' });
Many to Many between Student and Lesson through StudentLessons table
student.js
const columnMapping = { through: 'StudentLesson', // This is the model name referencing the join table. otherKey: 'lessonId', foreignKey: 'studentId' } Student.belongsToMany(models.Lesson, columnMapping);
lesson.js
const columnMapping = { through: 'StudentLesson', // This is the model name referencing the join table. otherKey: 'studentId', foreignKey: 'lessonId' } Lesson.belongsToMany(models.Student, columnMapping);
Inserting a new item
// Way 1 - With build and save const pet = Pet.build({ name: "Fido", petTypeId: 1 }); await pet.save(); // Way 2 - With create const pet = await Pet.create({ name: "Fido", petTypeId: 1 });
Updating an item
// Find the pet with id = 1 const pet = await Pet.findByPk(1); // Way 1 pet.name = "Fido, Sr." await pet.save; // Way 2 await pet.update({ name: "Fido, Sr." });
Deleting a single item
// Find the pet with id = 1 const pet = await Pet.findByPk(1); // Notice this is an instance method pet.destroy();
Deleting multiple items
// Notice this is a static class method await Pet.destroy({ where: { petTypeId: 1 // Destorys all the pets where the petType is 1 } });
Query Format
findOne
await
findAll
await
findByPk
await
Eager loading associations with include
Simple include of one related model.
await Pet.findByPk(1, { include: PetType })
Include can take an array of models if you need to include more than one.
await Pet.findByPk(1, { include: [Pet, Owner] })
Include can also take an object with keys model and include.
This is in case you have nested associations.
In this case Owner doesn't have an association with PetType, but
Pet does, so we want to include PetType onto the Pet Model.
await Owner.findByPk(1, { include: { model: Pet include: PetType } });
toJSON method
The confusingly named toJSON() method does not return a JSON string but instead
returns a POJO for the instance.
// pet is an instance of the Pet class const pet = await Pet.findByPk(1); console.log(pet) // prints a giant object with // tons of properties and methods // petPOJO is now just a plain old Javascript Object const petPOJO = pet.toJSON(); console.log(petPOJO); // { name: "Fido", petTypeId: 1 }
Common Where Operators
const Op = Sequelize.Op [Op.and]: [{a: 5}, {b: 6}] // (a = 5) AND (b = 6) [Op.or]: [{a: 5}, {a: 6}] // (a = 5 OR a = 6) [Op.gt]: 6, // > 6 [Op.gte]: 6, // >= 6 [Op.lt]: 10, // < 10 [Op.lte]: 10, // <= 10 [Op.ne]: 20, // != 20 [Op.eq]: 3, // = 3 [Op.is]: null // IS NULL [Op.not]: true, // IS NOT TRUE [Op.between]: [6, 10], // BETWEEN 6 AND 10 [Op.notBetween]: [11, 15], // NOT BETWEEN 11 AND 15 [Op.in]: [1, 2], // IN [1, 2] [Op.notIn]: [1, 2], // NOT IN [1, 2] [Op.like]: '%hat', // LIKE '%hat' [Op.notLike]: '%hat' // NOT LIKE '%hat' [Op.iLike]: '%hat' // ILIKE '%hat' (case insensitive) (PG only) [Op.notILike]: '%hat' // NOT ILIKE '%hat' (PG only) [Op.startsWith]: 'hat' // LIKE 'hat%' [Op.endsWith]: 'hat' // LIKE '%hat' [Op.substring]: 'hat' // LIKE '%hat%' [Op.regexp]: '^[h|a|t]' // REGEXP/~ '^[h|a|t]' (MySQL/PG only) [Op.notRegexp]: '^[h|a|t]' // NOT REGEXP/!~ '^[h|a|t]' (MySQL/PG only) [Op.iRegexp]: '^[h|a|t]' // ~'^[h|a|t]' (PG only) [Op.notIRegexp]: '^[h|a|t]' // !~ '^[h|a|t]' (PG only) [Op.like]: { [Op.any]: ['cat', 'hat']}
c7e25372c (broken)
Accessing the Data
You can access and query the data using the findByPk, findOne, and findAll methods. First, make sure you import the models in your JavaScript file. In this case, we are assuming your JavaScript file is in the root of your project and so is the models folder.
const { Recipe, Ingredient, Instruction, MeasurementUnit } = require('./models');
The models folder exports each of the models that you have created. We have these four in our data model, so we will destructure the models to access each table individually. The associations that you have defined in each of your models will allow you to access data of related tables when you query your database using the include option.
If you want to find all recipes, for the recipe list, you would use the findAll method. You need to await this, so make sure your function is async.
async function findAllRecipes() {
return await Recipe.findAll();
}
If you would like to include all the ingredients so you can create a shopping list for all the recipes, you would use include. This is possible because of the association you have defined in your Recipe and Ingredient models.
async function getShoppingList() {
return await Recipe.findAll({ include: [ Ingredient ] });
}
If you only want to find one where there is chicken in the ingredients list, you would use findOne and findByPk.
async function findAChickenRecipe() {
const chickenRecipe = await Ingredient.findOne({
where: {
foodStuff: 'chicken'
}
});
return await Recipe.findByPk(chickenRecipe.recipeId);
}
Data Access to Create/Update/Delete Rows
You have two options when you want to create a row in a table (where you are saving one record into the table). You can either .build the row and then .save it, or you can .create it. Either way it does the same thing. Here are some examples:
Let's say we have a form that accepts the name of the recipe (for simplicity). When we get the results of the form, we can:
const newRecipe = await Recipe.build({ title: 'Chicken Noodle Soup' });
await newRecipe.save();
This just created our new recipe and added it to our Recipes table. You can do the same thing like this:
await Recipe.create({ title: 'Chicken Noodle Soup' });
If you want to modify an item in your table, you can use update. Let's say we want to change the chicken noodle soup to chicken noodle soup with extra veggies, first we need to get the recipe, then we can update it.
const modRecipe = await Recipe.findOne({ where: { title: 'Chicken Noodle Soup' } });
await modRecipe.update({ title: 'Chicken Noodle Soup with Extra Veggies' });
To delete an item from your table, you will do the same kind of process. Find the recipe you want to delete and destroy it, like this:
const deleteThis = await Recipe.findOne({ where: { title: 'Chicken Noodle Soup with Extra Veggies' } });
await deleteThis.destroy();
NOTE: If you do not await these, you will receive a promise, so you will need to use .then and .catch to do more with the items you are accessing and modifying.
Documentation
For the data types and validations in your models, here are the official docs. The sequelize docs are hard to look at, so these are the specific sections with just the lists:
Sequelize Data Types: https://sequelize.org/v5/manual/data-types.html
Validations: https://sequelize.org/v5/manual/models-definition.html#validations
When you access the data in your queries, here are the operators available, again because the docs are hard to navigate, this is the specific section with the list of operators.
Operators: https://sequelize.org/v5/manual/querying.html#operators
The documentation for building, saving, creating, updating and destroying is linked here, it does a pretty good job of explaining in my opinion, it just has a title that we have not been using in this course. When they talk about an instance, they mean an item stored in your table.
Create/Update/Destroy: https://sequelize.org/v5/manual/instances.html