
How to Use JavaScript Collections - Map and Set
Excerpt
In JavaScript, objects are used to store multiple values as a complex data structure. An object is created with curly braces {…} and a list of properties. A property is a key-value pair where the key must be a string and the value can be of any type. On the other

In JavaScript, objects are used to store multiple values as a complex data structure.
An object is created with curly braces {…} and a list of properties. A property is a key-value pair where the key must be a string and the value can be of any type.
On the other hand, arrays are an ordered collection that can hold data of any type. In JavaScript, arrays are created with square brackets [...] and allow duplicate elements.
Until ES6 (ECMAScript 2015), JavaScript objects and arrays were the most important data structures to handle collections of data. The developer community didn't have many choices outside of that. Even so, a combination of objects and arrays was able to handle data in many scenarios.
However, there were a few shortcomings,
- Object keys can only be of type
string. - Objects don't maintain the order of the elements inserted into them.
- Objects lack some useful methods, which makes them difficult to use in some situations. For example, you can't compute the size (
length) of an object easily. Also, enumerating an object is not that straightforward. - Arrays are collections of elements that allow duplicates. Supporting arrays that only have distinct elements requires extra logic and code.
With the introduction of ES6, we got two new data structures that address the shortcomings mentioned above: Map and Set. In this article, we will look at both closely and understand how to use them in different situations.
Map in JavaScript
Map is a collection of key-value pairs where the key can be of any type. Map remembers the original order in which the elements were added to it, which means data can be retrieved in the same order it was inserted in.
In other words, Map has characteristics of both Object and Array:
- Like an object, it supports the key-value pair structure.
- Like an array, it remembers the insertion order.
How to Create and Initialize a Map in JavaScript
A new Map can be created like this:
//const map = new Map();Which returns an empty Map:
//Map(0) {}Another way of creating a Map is with initial values. Here's how to create a Map with three key-value pairs:
//const freeCodeCampBlog = new Map([['name', 'freeCodeCamp'],['type', 'blog'],['writer', 'Tapas Adhikary']]);Which returns a Map with three elements:
//Map(3) {"name" => "freeCodeCamp", "type" => "blog", "writer" => "Tapas Adhikary"}How to Add values to a Map in JavaScript
To add value to a Map, use the set(key, value) method.
The set(key, value) method takes two parameters, key and value, where the key and value can be of any type, a primitive (boolean, string, number, etc.) or an object:
//
js;const map = new Map();

map.set('name', 'freeCodeCamp');
map.set('type', 'blog');
map.set('writer', 'Tapas Adhikary');
Output:
//Map(3) {"name" => "freeCodeCamp", "type" => "blog", "writer" => "Tapas Adhikary"}Please note, if you use the same key to add a value to a Map multiple times, it'll always replace the previous value:
//
map.set('writer', 'Someone else!');
So the output would be:
//Map(3){"name" => "freeCodeCamp", "type" => "blog", "writer" => "Someone else!"}How to Get values from a Map in JavaScript
To get a value from a Map, use the get(key) method:
//
map.get('name');
All About Map Keys in JavaScript
Map keys can be of any type, a primitive, or an object. This is one of the major differences between Map and regular JavaScript objects where the key can only be a string:
//
js;const funMap = new Map();

funMap.set(360, 'My House Number');
funMap.set(true, 'I write blogs!');let obj = { name: 'tapas' };
funMap.set(obj, true);

console.log(funMap);
Here is the output:
//Map(3){360 => "My House Number",true => "I write blogs!",{…} => true}A regular JavaScript object always treats the key as a string. Even when you pass it a primitive or object, it internally converts the key into a string:
//
js;const funObj = {};

funObj[360] = 'My House Number';

console.log(funObj[360] === funObj['360']);
Map Properties and Methods in JavaScript
JavaScript's Map has in-built properties and methods that make it easy to use. Here are some of the common ones:
- Use the
sizeproperty to know how many elements are in aMap: - Search an element with the
has(key)method: - Remove an element with the
delete(key)method: - Use the
clear()method to remove all the elements from theMapat once:
//
console.log('size of the map is', map.size);
//
console.log(map.has('John'));
console.log(map.has('Tapas'));//
map.delete('Sam');//
map.clear();
map.size;MapIterator: keys(), values(), and entries() in JavaScript
The methods keys(), values() and entries() methods return a MapIterator, which is excellent because you can use a for-of or forEach loop directly on it.
First, create a simple Map:
//const ageMap = new Map([['Jack', 20],['Alan', 34],['Bill', 10],['Sam', 9]]);- Get all the keys:
- Get all the values:
- Get all the entries (key-value pairs):
//
console.log(ageMap.keys());
//
console.log(ageMap.values());//
console.log(ageMap.entries());How to Iterate Over a Map in JavaScript
You can use either the forEach or for-of loop to iterate over a Map:
//
ageMap.forEach((value, key) => {
    console.log(`${key} is ${value} years old!`);});for (const [key, value] of ageMap) {
    console.log(`${key} is ${value} years old!`);}
The output is going to be the same in both cases:
//

Jack is 20 years old!
Alan is 34 years old!
Bill is 10 years old!
Sam is 9 years old!
How to Convert an Object into a Map in JavaScript
You may encounter a situation where you need to convert an object to a Map-like structure. You can use the method entries of Object to do that:
//const address = {Tapas: 'Bangalore',James: 'Huston',Selva: 'Srilanka'};const addressMap = new Map(Object.entries(address));How to Convert a Map into an Object in JavaScript
If you want to do the reverse, you can use the fromEntries method:
//
Object.fromEntries(map);
How to Convert a Map into an Array in JavaScript
There are a couple of ways to convert a map into an array:
- Using
Array.from(map): - Using the spread operator:
//const map = new Map();
map.set('milk', 200);
map.set('tea', 300);
map.set('coffee', 500);

console.log(Array.from(map));
//
console.log([...map]);Map vs. Object: When should you use them?
Map has characteristics of both object and array. However, Map is more like an object than array due to the nature of storing data in the key-value format.
The similarity with objects ends here though. As you've seen, Map is different in a lot of ways. So, which one should you use, and when? How do you decide?
Use Map when:
- Your needs are not that simple. You may want to create keys that are non-strings. Storing an object as a key is a very powerful approach.
Mapgives you this ability by default. - You need a data structure where elements can be ordered. Regular objects do not maintain the order of their entries.
- You are looking for flexibility without relying on an external library like lodash. You may end up using a library like lodash because we do not find methods like has(), values(), delete(), or a property like size with a regular object. Map makes this easy for you by providing all these methods by default.
Use an object when:
- You do not have any of the needs listed above.
- You rely on
JSON.parse()as aMapcannot be parsed with it.
Set in JavaScript
A Set is a collection of unique elements that can be of any type. Set is also an ordered collection of elements, which means that elements will be retrieved in the same order that they were inserted in.
A Set in JavaScript behaves the same way as a mathematical set.
How to Create and Initialize a Set in JavaScript
A new Set can be created like this:
//const set = new Set();
console.log(set);
And the output will be an empty Set:
//Set(0) {}Here's how to create a Set with some initial values:
//const fruteSet = new Set(['🍉', '🍎', '🍈', '🍏']);
console.log(fruteSet);
Output:
//Set(4) {"🍉", "🍎", "🍈", "🍏"}Set Properties and Methods in JavaScript
Set has methods to add an element to it, delete elements from it, check if an element exists in it, and to clear it completely:
- Use the
sizeproperty to know the size of theSet. It returns the number of elements in it: - Use the
add(element)method to add an element to theSet:
//
set.size;//const saladSet = new Set();
saladSet.add('🍅');
saladSet.add('🥑');
saladSet.add('🥕');
saladSet.add('🥒');
console.log(saladSet);I love cucumbers! How about adding one more?
Oh no, I can't - Set is a collection of unique elements:
//
saladSet.add('🥒');
console.log(saladSet);
The output is the same as before - nothing got added to the saladSet.
- Use the
has(element)method to search if we have a carrot (🥕) or broccoli (🥦) in theSet: - Use the
delete(element)method to remove the avocado(🥑) from theSet:
//
console.log('Does the salad have a carrot?', saladSet.has('🥕'));

console.log('Does the salad have broccoli?', saladSet.has('🥦'));
//
saladSet.delete('🥑');
console.log('I do not like 🥑, remove from the salad:', saladSet);Now our salad Set is as follows:
//Set(3) {"🍅", "🥕", "🥒"}- Use the
clear()method to remove all elements from aSet:
//
saladSet.clear();**How to Iterate Over a Set** in JavaScript
Set has a method called values() which returns a SetIterator to get all its values:
//
js;const houseNos = new Set([360, 567, 101]);

console.log(houseNos.values());
Output:
//

SetIterator {360, 567, 101}
We can use a forEach or for-of loop on this to retrieve the values.
Interestingly, JavaScript tries to make Set compatible with Map. That's why we find two of the same methods as Map, keys() and entries().
As Set doesn't have keys, the keys() method returns a SetIterator to retrieve its values:
//
console.log(houseNos.keys());
With Map, the entries() method returns an iterator to retrieve key-value pairs. Again there are no keys in a Set, so entries() returns a SetIterator to retrieve the value-value pairs:
//
console.log(houseNos.entries());
How to Enumerate over a Set in JavaScript
We can enumerate over a Set using forEach and for-of loops:
//
houseNos.forEach((value) => {
    console.log(value);});for (const value of houseNos) {
    console.log(value);}
The output of both is:
//360;567;101;Sets and Arrays in JavaScript
An array, like a Set, allows you to add and remove elements. But Set is quite different, and is not meant to replace arrays.
The major difference between an array and a Set is that arrays allow you to have duplicate elements. Also, some of the Set operations like delete() are faster than array operations like shift() or splice().
Think of Set as an extension of a regular array, just with more muscles. The Set data structure is not a replacement of the array. Both can solve interesting problems.
How to Convert a Set into an array in JavaScript
Converting a Set into an array is simple:
//const arr = [...houseNos];
console.log(arr);
Unique values from an array using the Set in JavaScript
Creating a Set is a really easy way to remove duplicate values from an array:
//
js;const mixedFruit = ['🍉', '🍎', '🍉', '🍈', '🍏', '🍎', '🍈'];const mixedFruitSet = new Set(mixedFruit);

console.log(mixedFruitSet);
Output:
//Set(4) {"🍉", "🍎", "🍈", "🍏"}Set and Object in JavaScript
A Set can have elements of any type, even objects:
//
js;const person = {name: 'Alex',age: 32};const pSet = new Set();
pSet.add(person);
console.log(pSet);
Output:

No surprise here - the Set contains one element that is an object.
Let's change a property of the object and add it to the set again:
//
person.name = 'Bob';

pSet.add(person);
console.log(pSet);
What do you think the output will be? Two person objects or just one?
Here is the output:

Set is a collection of unique elements. By changing the property of the object, we haven't changed the object itself. Hence Set will not allow duplicate elements.
Set is a great data structure to use in addition to JavaScript arrays. It doesn't have a huge advantage over regular arrays, though.
Use Set when you need to maintain a distinct set of data to perform set operations on like union, intersection, difference, and so on.
In Summary
Here is a GitHub repository to find all the source code used in this article. If you found it helpful, please show your support by giving it a star: https://github.com/atapas/js-collections-map-set
You may also like some of my other articles:
- My Favorite JavaScript Tips and Tricks
- JavaScript equality and similarity with ==, === and Object.is()
If this article was useful, please share it so others can read it as well. You can @ me on Twitter (@tapasadhikary) with comments, or feel free to follow me.
Learn to code for free. freeCodeCamp's open source curriculum has helped more than 40,000 people get jobs as developers. Get started
Best Books for Data Structures and Algorithms in JavaScript
Excerpt
If you're trying to learn about data structures or algorithms, you're in luck - there are a lot of resources out there. Here are a few book recommendations - along with some other resources at the end - to get you started. Books about data structures and algorithmsData Structures in

If you're trying to learn about data structures or algorithms, you're in luck - there are a lot of resources out there.
Here are a few book recommendations - along with some other resources at the end - to get you started.
Books about data structures and algorithms
Data Structures in JavaScript
- Free book which covers Data Structures in JavaScript (you can find the GitBook here).
Learning JavaScript Data Structures and Algorithms - Second Edition, by Loiane Groner
- Covers object oriented programming, prototypal inheritance, sorting & searching algorithms, quicksort, mergesort, binary search trees and advanced algorithm concepts
Data Structures and Algorithms with JavaScript: Bringing classic computing approaches to the Web by Michael McMillan
- Covers recursion, sorting and searching algorithms, linked lists and binary search trees.
Data Structures by Seymour Lipschutz
- A machine and language agnostic book which explains data structures in a clear and straightforward way. Includes examples, diagrams, and pseudo-code.
Introduction to Algorithms by Thomas H Cormen et al
- Another language agnostic book, contains examples in pseudo-code. Appropriate for both teaching and professional environments. Each chapter covers an algorithm - you don't have to read the whole book straight through from beginning to end.
Data Structures in C, by Noel Kalicharan
- Covers the basics and makes data structures seem easier than other books manage to do. Teaches introductory concepts like linked lists, stacks, sorting, binary trees, and searching. Great beginner's book, but useful to more advanced students as well.
Algorithms in C, by Robert Sedgewick
- Focuses on implementations of algorithms in C in areas of sorting, searching, string processing, graph, geometric, and mathematical algorithms. Discusses why certain algorithms are more effective than others. Numerous figures throughout the book help illustrate how these algorithms work.
Please feel free to add more that you have found useful!
More resources about data structures and algorithms:
Great resources for learning data structures and algorithms
An intro to advanced sorting algorithms in JavaScript
Free video course on data structures and algorithms in JavaScript
Algorithm basics and other book recommendations
Learn to code for free. freeCodeCamp's open source curriculum has helped more than 40,000 people get jobs as developers. Get started
Data Structures - freeCodeCamp.org
Excerpt
Browse thousands of programming tutorials written by experts. Learn Web Development, Data Science, DevOps, Security, and get developer career advice.
freeCodeCamp is a donor-supported tax-exempt 501(c)(3) nonprofit organization (United States Federal Tax Identification Number: 82-0779546)
Our mission: to help people learn to code for free. We accomplish this by creating thousands of videos, articles, and interactive coding lessons - all freely available to the public. We also have thousands of freeCodeCamp study groups around the world.
Donations to freeCodeCamp go toward our education initiatives and help pay for servers, services, and staff.
You can make a tax-deductible donation here.
Binary Search Trees: BST Explained with Examples
Excerpt
What is a Binary Search Tree?A tree is a data structure composed of nodes that has the following characteristics: Each tree has a root node at the top (also known as Parent Node) containing some value (can be any datatype).The root node has zero or more child nodes.

What is a Binary Search Tree?
A tree is a data structure composed of nodes that has the following characteristics:
- Each tree has a root node at the top (also known as Parent Node) containing some value (can be any datatype).
- The root node has zero or more child nodes.
- Each child node has zero or more child nodes, and so on. This creates a subtree in the tree. Every node has its own subtree made up of its children and their children, etc. This means that every node on its own can be a tree.
A binary search tree (BST) adds these two characteristics:
- Each node has a maximum of up to two children.
- For each node, the values of its left descendent nodes are less than that of the current node, which in turn is less than the right descendent nodes (if any).
The BST is built on the idea of the binary search algorithm, which allows for fast lookup, insertion and removal of nodes. The way that they are set up means that, on average, each comparison allows the operations to skip about half of the tree, so that each lookup, insertion or deletion takes time proportional to the logarithm of the number of items stored in the tree, O(log n) . However, some times the worst case can happen, when the tree isn't balanced and the time complexity is O(n) for all three of these functions. That is why self-balancing trees (AVL, red-black, etc.) are a lot more effective than the basic BST.
Worst case scenario example: This can happen when you keep adding nodes that are always larger than the node before (its parent), the same can happen when you always add nodes with values lower than their parents.
Basic operations on a BST
- Create: creates an empty tree.
- Insert: insert a node in the tree.
- Search: Searches for a node in the tree.
- Delete: deletes a node from the tree.
- Inorder: in-order traversal of the tree.
- Preorder: pre-order traversal of the tree.
- Postorder: post-order traversal of the tree.
Create
Initially an empty tree without any nodes is created. The variable/identifier which must point to the root node is initialized with a NULL value.
Search
You always start searching the tree at the root node and go down from there. You compare the data in each node with the one you are looking for. If the compared node doesn't match then you either proceed to the right child or the left child, which depends on the outcome of the following comparison: If the node that you are searching for is lower than the one you were comparing it with, you proceed to the left child, otherwise (if it's larger) you go to the right child. Why? Because the BST is structured (as per its definition), that the right child is always larger than the parent and the left child is always lesser.
Breadth-first search (BFS)
Breadth first search is an algorithm used to traverse a BST. It begins at the root node and travels in a lateral manner (side to side), searching for the desired node. This type of search can be described as O(n) given that each node is visited once and the size of the tree directly correlates to the length of the search.
Depth-first search (DFS)
With a Depth-first search approach, we start with the root node and travel down a single branch. If the desired node is found along that branch, great, but if not, continue upwards and search unvisited nodes. This type of search also has a big O notation of O(n).
Insert
It is very similar to the search function. You again start at the root of the tree and go down recursively, searching for the right place to insert our new node, in the same way as explained in the search function. If a node with the same value is already in the tree, you can choose to either insert the duplicate or not. Some trees allow duplicates, some don't. It depends on the certain implementation.
Deletion
There are 3 cases that can happen when you are trying to delete a node. If it has,
- No subtree (no children): This one is the easiest one. You can simply just delete the node, without any additional actions required.
- One subtree (one child): You have to make sure that after the node is deleted, its child is then connected to the deleted node's parent.
- Two subtrees (two children): You have to find and replace the node you want to delete with its inorder successor (the leftmost node in the right subtree).
The time complexity for creating a tree is O(1) . The time complexity for searching, inserting or deleting a node depends on the height of the tree h , so the worst case is O(h) in case of skewed trees.
Predecessor of a node
Predecessors can be described as the node that would come right before the node you are currently at. To find the predecessor of the current node, look at the right-most/largest leaf node in the left subtree.
Successor of a node
Successors can be described as the node that would come right after the the current node. To find the successor of the current node, look at the left-most/smallest leaf node in the right subtree.
Special types of BT
- Heap
- Red-black tree
- B-tree
- Splay tree
- N-ary tree
- Trie (Radix tree)
Runtime
Data structure: BST
- Worst-case performance:
O(n) - Best-case performance:
O(1) - Average performance:
O(log n) - Worst-case space complexity:
O(1)
Where n is the number of nodes in the BST. Worst case is O(n) since BST can be unbalanced.
Implementation of BST
Here's a definition for a BST node having some data, referencing to its left and right child nodes.
struct node {
   int data;
   struct node *leftChild;
   struct node *rightChild;
};
Search Operation
Whenever an element is to be searched, start searching from the root node. Then if the data is less than the key value, search for the element in the left subtree. Otherwise, search for the element in the right subtree. Follow the same algorithm for each node.
struct node* search(int data){
   struct node *current = root;
   printf("Visiting elements: ");

   while(current->data != data){

      if(current != NULL) {
         printf("%d ",current->data);

         //go to left tree
         if(current->data > data){
            current = current->leftChild;
         }//else go to right tree
         else {
            current = current->rightChild;
         }

         //not found
         if(current == NULL){
            return NULL;
         }
      }
   }
   return current;
}
Insert Operation
Whenever an element is to be inserted, first locate its proper location. Start searching from the root node, then if the data is less than the key value, search for the empty location in the left subtree and insert the data. Otherwise, search for the empty location in the right subtree and insert the data.
void insert(int data) {
   struct node *tempNode = (struct node*) malloc(sizeof(struct node));
   struct node *current;
   struct node *parent;

   tempNode->data = data;
   tempNode->leftChild = NULL;
   tempNode->rightChild = NULL;

   //if tree is empty
   if(root == NULL) {
      root = tempNode;
   } else {
      current = root;
      parent = NULL;

      while(1) {
         parent = current;

         //go to left of the tree
         if(data < parent->data) {
            current = current->leftChild;
            //insert to the left

            if(current == NULL) {
               parent->leftChild = tempNode;
               return;
            }
         }//go to right of the tree
         else {
            current = current->rightChild;

            //insert to the right
            if(current == NULL) {
               parent->rightChild = tempNode;
               return;
            }
         }
      }
   }
}
Delete Operation
void deleteNode(struct node* root, int data){

    if (root == NULL) root=tempnode;

    if (data < root->key)
        root->left = deleteNode(root->left, key);


    else if (key > root->key)
        root->right = deleteNode(root->right, key);

    else
    {
        if (root->left == NULL)
        {
            struct node *temp = root->right;
            free(root);
            return temp;
        }
        else if (root->right == NULL)
        {
            struct node *temp = root->left;
            free(root);
            return temp;
        }

        struct node* temp = minValueNode(root->right);

        root->key = temp->key;

        root->right = deleteNode(root->right, temp->key);
    }
    return root;

}
Binary search trees (BSTs) also give us quick access to predecessors and successors. Predecessors can be described as the node that would come right before the node you are currently at.
- To find the predecessor of the current node, look at the rightmost/largest leaf node in the left subtree. Successors can be described as the node that would come right after the node you are currently at.
- To find the successor of the current node, look at the leftmost/smallest leaf node in the right subtree.
Let's look at a couple of procedures operating on trees.
Since trees are recursively defined, it's very common to write routines that operate on trees that are themselves recursive.
So for instance, if we want to calculate the height of a tree, that is the height of a root node, We can go ahead and recursively do that, going through the tree. So we can say:
- For instance, if we have a nil tree, then its height is a 0.
- Otherwise, We're 1 plus the maximum of the left child tree and the right child tree.
- So if we look at a leaf for example, that height would be 1 because the height of the left child is nil, is 0, and the height of the nil right child is also 0. So the max of that is 0, then 1 plus 0.
Height(tree) algorithm
if tree = nil:
    return 0
return 1 + Max(Height(tree.left),Height(tree.right))
Here is the code in C++
int maxDepth(struct node* node)
{
    if (node==NULL)
        return 0;
   else
   {
       int rDepth = maxDepth(node->right);
       int lDepth = maxDepth(node->left);

       if (lDepth > rDepth)
       {
           return(lDepth+1);
       }
       else
       {
            return(rDepth+1);
       }
   }
}
We could also look at calculating the size of a tree that is the number of nodes.
- Again, if we have a nil tree, we have zero nodes.
- Otherwise, we have the number of nodes in the left child plus 1 for ourselves plus the number of nodes in the right child. So 1 plus the size of the left tree plus the size of the right tree.
Size(tree) algorithm
if tree = nil
    return 0
return 1 + Size(tree.left) + Size(tree.right)
Here is the code in C++
int treeSize(struct node* node)
{
    if (node==NULL)
        return 0;
    else
        return 1+(treeSize(node->left) + treeSize(node->right));
}
Traversal
There are 3 kinds of traversals that are done typically over a binary search tree. All these traversals have a somewhat common way of going over the nodes of the tree.
In-order
This traversal first goes over the left subtree of the root node, then accesses the current node, followed by the right subtree of the current node. The code represents the base case too, which says that an empty tree is also a binary search tree.
void inOrder(struct node* root) {
        // Base case
        if (root == null) {
                return;
        }
        // Travel the left sub-tree first.
        inOrder(root.left);
        // Print the current node value
        printf("%d ", root.data);
        // Travel the right sub-tree next.
        inOrder(root.right);
}
Pre-order
This traversal first accesses the current node value, then traverses the left and right sub-trees respectively.
void preOrder(struct node* root) {
        if (root == null) {
                return;
        }
        // Print the current node value
        printf("%d ", root.data);
        // Travel the left sub-tree first.
        preOrder(root.left);
        // Travel the right sub-tree next.
        preOrder(root.right);
}
Post-order
This traversal puts the root value at last, and goes over the left and right sub-trees first. The relative order of the left and right sub-trees remain the same. Only the position of the root changes in all the above mentioned traversals.
void postOrder(struct node* root) {
        if (root == null) {
                return;
        }
        // Travel the left sub-tree first.
        postOrder(root.left);
        // Travel the right sub-tree next.
        postOrder(root.right);
        // Print the current node value
        printf("%d ", root.data);
}
Relevant videos on freeCodeCamp YouTube channel
And Binary Search Tree: Traversal and Height
Following are common types of Binary Trees:
Full Binary Tree/Strict Binary Tree: A Binary Tree is full or strict if every node has exactly 0 or 2 children.
          18
         /   \
       /       \
     15         30
    /  \       /  \
  40    50   100   40
In Full Binary Tree, number of leaf nodes is equal to number of internal nodes plus one.
Complete Binary Tree: A Binary Tree is complete Binary Tree if all levels are completely filled except possibly the last level and the last level has all keys as left as possible
           18
         /    \
       /        \
     15         30
    /  \       /  \
  40    50   100   40
 /  \   /
8    7 9
Perfect Binary Tree A Binary tree is Perfect Binary Tree in which all internal nodes have two children and all leaves are at the same level.
          18
         /  \
       /      \
     15        30
    /  \      /  \
  40    50  100   40
Augmenting a BST
Sometimes we need to store some additional information with the traditional data structures to make our tasks easier. For example, consider a scenario where you are supposed to find the ith smallest number in a set. You can use brute force here but we can reduce the complexity of the problem to O(lg n) by augmenting a red-black or any self-balancing tree (where n is the number of elements in the set). We can also compute rank of any element in O(lg n) time. Let us consider a case where we are augmenting a red-black tree to store the additional information needed. Besides the usual attributes, we can store number of internal nodes in the subtree rooted at x(size of the subtree rooted at x including the node itself). Let x be any arbitrary node of a tree.
x.size = x.left.size + x.right.size + 1
While augmenting the tree, we should keep in mind, that we should be able to maintain the augmented information as well as do other operations like insertion, deletion, updating in O(lg n) time.
Since, we know that the value of x.left.size will give us the number of nodes which proceed x in the order traversal of the tree. Thus, x.left.size + 1 is the rank of x within the subtree rooted at x.
Learn to code for free. freeCodeCamp's open source curriculum has helped more than 40,000 people get jobs as developers. Get started
How to Implement a Linked List in JavaScript
Excerpt
If you are learning data structures, a linked list is one data structure you should know. If you do not really understand it or how it is implemented in JavaScript, this article is here to help you. In this article, we will discuss what a linked list is, how it
If you are learning data structures, a linked list is one data structure you should know. If you do not really understand it or how it is implemented in JavaScript, this article is here to help you.
In this article, we will discuss what a linked list is, how it is different from an array, and how to implement it in JavaScript. Let's get started.
What is a Linked List?
A linked list is a linear data structure similar to an array. However, unlike arrays, elements are not stored in a particular memory location or index. Rather each element is a separate object that contains a pointer or a link to the next object in that list.
Each element (commonly called nodes) contains two items: the data stored and a link to the next node. The data can be any valid data type. You can see this illustrated in the diagram below.
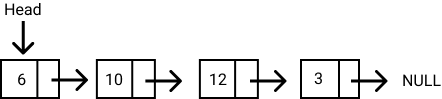
The entry point to a linked list is called the head. The head is a reference to the first node in the linked list. The last node on the list points to null. If a list is empty, the head is a null reference.
In JavaScript, a linked list looks like this:
//const list = {head: {value: 6next: {value: 10next: {value: 12next: {value: 3next: null}}}}}};An advantage of Linked Lists
- Nodes can easily be removed or added from a linked list without reorganizing the entire data structure. This is one advantage it has over arrays.
Disadvantages of Linked Lists
- Search operations are slow in linked lists. Unlike arrays, random access of data elements is not allowed. Nodes are accessed sequentially starting from the first node.
- It uses more memory than arrays because of the storage of the pointers.
Types of Linked Lists
There are three types of linked lists:
- Singly Linked Lists: Each node contains only one pointer to the next node. This is what we have been talking about so far.
- Doubly Linked Lists: Each node contains two pointers, a pointer to the next node and a pointer to the previous node.
- Circular Linked Lists: Circular linked lists are a variation of a linked list in which the last node points to the first node or any other node before it, thereby forming a loop.
Implementing a List Node in JavaScript
As stated earlier, a list node contains two items: the data and the pointer to the next node. We can implement a list node in JavaScript as follows:
//class ListNode {constructor(data) {this.data = data;this.next = null;}}Implementing a Linked List in JavaScript
The code below shows the implementation of a linked list class with a constructor. Notice that if the head node is not passed, the head is initialised to null.
class LinkedList {
    constructor(head = null) {
        this.head = head
    }
}
Putting it all together
Let's create a linked list with the class we just created. First, we create two list nodes, node1 and node2 and a pointer from node 1 to node 2.
let node1 = new ListNode(2)
let node2 = new ListNode(5)
node1.next = node2
Next, we'll create a Linked list with the node1.
let list = new LinkedList(node1)Let's try to access the nodes in the list we just created.
console.log(list.head.next.data)Some LinkedList methods
Next up, we will implement four helper methods for the linked list. They are:
- size()
- clear()
- getLast()
- getFirst()
1. size()
This method returns the number of nodes present in the linked list.
size() {
    let count = 0;
    let node = this.head;
    while (node) {
        count++;
        node = node.next
    }
    return count;
}
2. clear()
This method empties out the list.
clear() {
    this.head = null;
}
3. getLast()
This method returns the last node of the linked list.
getLast() {
    let lastNode = this.head;
    if (lastNode) {
        while (lastNode.next) {
            lastNode = lastNode.next
        }
    }
    return lastNode
}
4. getFirst()
This method returns the first node of the linked list.
getFirst() {
    return this.head;
}
Summary
In this article, we discussed what a linked list is and how it can be implemented in JavaScript. We also discussed the different types of linked lists as well as their overall advantages and disadvantages.
I hope you enjoyed reading it.
Want to get notified when I publish a new article? Click here.
Learn to code for free. freeCodeCamp's open source curriculum has helped more than 40,000 people get jobs as developers. Get started
How to Learn Tree Data Structures the Codeless Way
Excerpt
The tree data structure can form some of the most useful and complex data structures in all of programming. In fact the tree is so powerful that I can make the bold claim: Once you understand trees you'll be able to understand many other data structures and algorithms with ease.
The tree data structure can form some of the most useful and complex data structures in all of programming. In fact the tree is so powerful that I can make the bold claim:
Once you understand trees you'll be able to understand many other data structures and algorithms with ease.
There is one caveat. There are so many types of trees it may be impossible to know where to start! There are B-trees, Red Black Trees, Binary Trees, AVL Trees and many others. There are abundant choices and each seems valuable to learn.
This presents a problem. As someone learning about trees you may find yourself asking, which tree data structure do I learn about first? Which tree is most important for me? There are so many, where do I start?
Learning about trees is like learning about the numerous marvels in our current world. We have a lot of choices, in fact we may even have too much choice.
Psychologists call it Overchoice or "choice overload", that is when faced with many options, people have a difficult choice deciding on what to do. I call it a beginning coder's worst nightmare.
However there is no need to panic. From my knowledge of using the tree data structure, as with most things in life, the Pareto principle (what we call the 80/20 rule) applies.
What this means is that as a programmer, 80% of cases where you will need to use trees will be covered by approximately 20% of the types of trees that you will attempt to learn.
For this reason we will focus only on these 20% which I think are the most important trees you need to understand. Don't get me wrong here, I'm not saying don't learn other types of trees. I'm saying learn these first, then focus on the others to really get that edge.
Even when you do figure out which tree data structure you want to learn, you are faced with another problem.
There are a lot of resources out there that teach you about trees, however they all present you with some code in a particular language be it JavaScript, Java, Python or others as part of the explanation.
In this post I break that status quo and teach you about the essential tree data structures, and all without having you write a single line of code.
Join me on a journey into the world of trees, regardless of which programming language you are using, you will be able to learn all the basics you need to know about the tree data structure.
Getting to the Root of Trees
Let's get to the root of our discussion (pun intended). The way I like to explain trees is by relating it to something we are all familiar with, that of the biological tree. In case you are not familiar, let's look at one right now:

A Biological Tree
Look at our tree, isn't it beautiful!? We see that a tree is a giant plant with a trunk, a branch and leaves. There are also roots hidden beneath the ground that also form part of the organism.
A tree in computer science isn't so different. Let's look at one here:
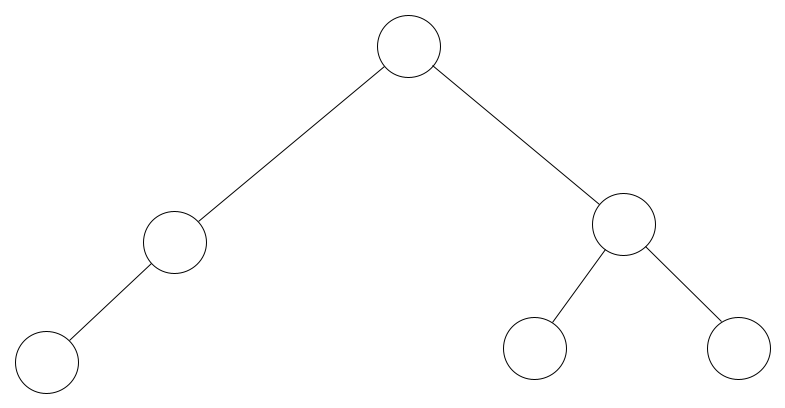
A Computer Science Tree
A computer science tree is very similar to a regular tree - it resembles an upside down biological tree a little doesn't it? It not only looks similar, but it also has parts that are named similar to our good ol' tangible tree.
Before we learn about the types of trees though, there are a few facts about trees you must know.
Here are 5 facts you need to know about trees:
1. Each of the circles in the tree is called a node and each line is called an edge.
2. The root node is the part of the tree that all the other parts are built upon.
3. There are parent nodes connected to other nodes in the direction of the root, and child nodes connected in the direction away from the root.
4. The last nodes of the trees are called leaves
5. The process of navigating a tree is called traversal.
If you like to see things visually, here is a diagram of the tree we looked at earlier identifying the parts:
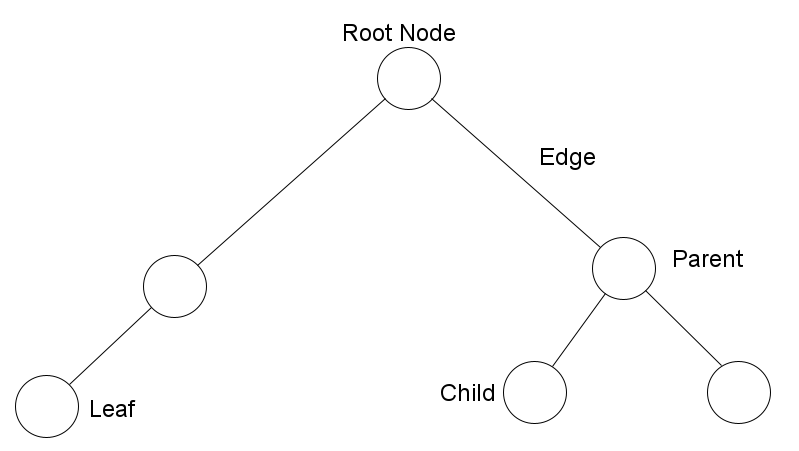
Our Labelled Tree
You should also know that when a tree is the child of a node, it is called a subtree. Look at the diagram above, the node labelled "Parent" along with its two child nodes can be classified as a subtree.
Great, now you have an idea about basic trees. So let's dive into some of the most useful type of trees you will encounter.
The General Tree
The first type of tree we need to know about is the general tree. The general tree is what we call a superset. This is because all other types of trees are derived from the general tree.
Trees are hierarchical in the way they store data. Whereas simpler data structures may store data in a linear manner (think an array), trees are non-linear.
The general tree is the embodiment of a hierarchical tree structure as it has no restrictions on how many children each node can have, and has no restraint imposed on the hierarchy of the tree.
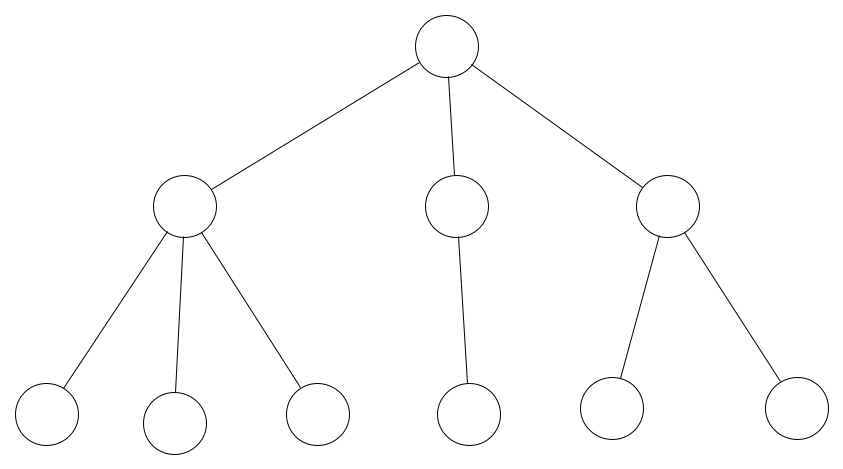
Example of A General Tree
The Binary Tree
It is impossible to talk about trees without talking about the binary tree (okay not totally impossible, but you know what I mean).
Simply put, a binary tree is a type of tree that has a restriction. In the binary tree, each parent can only be linked to two child nodes within the tree.
There is one binary tree type that illustrates this best: the binary search tree. Trees you see aren't just empty circles connected by lines. Each of the node in the tree has a value associated with it and the entirety of the tree is a key-value structure.
Binary search trees keep their keys sorted. They sort it like this: all the nodes are greater that the nodes in their left subtree, but are smaller than the nodes in their right subtree. Confused? Maybe a picture will help:
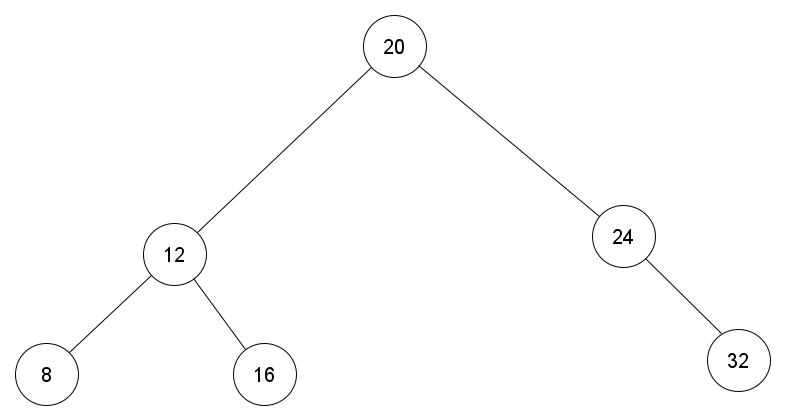
A Binary Search Tree
Look closely at this tree and you will learn a little secret. In the binary tree the smallest node is located at the leftmost subtree stemming from the root node. Wanna guess where we can find the largest node?
Red-Black Tree
Let's look at a variant of the binary search tree that people tend to over-complicate. I'm talking about the Red-Black Tree.
There are many cases of trees where data may be inserted and deleted. So variations of the binary search tree have been created which makes this constant insertion and deletion more efficient.
The Red-Black tree is one such configuration of the binary search tree that makes the insertion and deletion process more efficient.
The tree does this by having a bit that adds an attribute to the node. This attribute that is added on the node is color, and this color can be interpreted as red or black. Hence the name Red-Black tree.
Let's look at how a Red-Black tree many be arranged:

A Red-Black Tree
In the Red-Black tree, the root node is usually black and each red node has children that are black.
If you made it this far, then congratulations! You already understand enough to make a foray into the world of tree data structures.
Where Are Trees Used?
At this point you may be wondering what trees are used for. That's a good question! Trees are used in many facets of development including use in:
- Databases
- Compilers
- Networking
- Heaps
- Machine Learning Algorithms
There are countless uses for trees and the only limit in their use is the imagination of the designer.
Wrapping Up
In this post we began our journey into the world of the tree. Even though we covered some ground, we merely scrapped the surface of this vast and intricate data structure.
We whet our appetite for tree data structures by covering what trees are and looked at their structure. We then discussed three common types of trees including general trees, binary trees and red-black trees. Finally we looked at some places where trees may be used.
By the end of this post you should have a solid foundation to venture into the world of trees!
Where to Go Next?
Want to learn about trees and other data structures without writing a single line of code? The pick up the book "Codeless Data Structures and Algorithms", where you'll learn all you need to know about data structures and algorithms without writing a single line of code!
We will not only greatly expand on what we learned, but we'll cover juicy topics not covered here like tree balancing, AVL trees, B-Trees, Heaps and a ton of topics in the realm of data structures and algorithms!
You can read the book here:
[
Codeless Data Structures and Algorithms - Learn DSA Without Writing a Single Line of Code | Armstrong Subero | Apress
This book brings you a new perspective on algorithms and data structures, completely code free. Learn about data structure algorithms (DSAs) without ever having to open your code editor, use a compiler, or look at an integrated development environment (IDE)....
Armstrong SuberoSearch Menu Cart V Your cart is currently empty. Login AccountBookshelf Login Apress Access

](https://www.apress.com/gp/book/9781484257241)
Learn to code for free. freeCodeCamp's open source curriculum has helped more than 40,000 people get jobs as developers. Get started
Big O Notation Explained with Examples
Excerpt
Big O notation is a way to describe the speed or complexity of a given algorithm. If your current project demands a predefined algorithm, it's important to understand how fast or slow it is compared to other options. What is Big O notation and how does it work?Simply put,
Big O notation is a way to describe the speed or complexity of a given algorithm. If your current project demands a predefined algorithm, it's important to understand how fast or slow it is compared to other options.
What is Big O notation and how does it work?
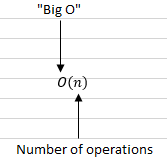
Simply put, Big O notation tells you the number of operations an algorithm will make. It gets its name from the literal "Big O" in front of the estimated number of operations.
What Big O notation doesn't tell you is the speed of the algorithm in seconds. There are way too many factors that influence the time an algorithm takes to run. Instead, you'll use Big O notation to compare different algorithms by the number of operations they make.
Big O establishes a worst-case run time
Imagine that you're a teacher with a student named Jane. You want to find her records, so you use a simple search algorithm to go through your school district's database.
You know that simple search takes O(n) times to run. This means that, in the worst case, you'll have to search through every single record (represented by n) to find Jane's.
But when you run the simple search, you find that Jane's records are the very first entry in the database. You don't have to look at every entry - you found it on your first try.
Did this algorithm take O(n) time? Or did it take O(1) time because you found Jane's records on the first try?
In this case, 0(1) is the best-case scenario - you were lucky that Jane's records were at the top. But Big O notation focuses on the worst-case scenario, which is 0(n) for simple search. It's a reassurance that simple search will never be slower than O(n) time.
Algorithm running times grow at different rates
Assume that it takes 1 millisecond to check each element in the school district's database.
With simple search, if you have to check 10 entries, it will take 10 ms to run. But with the binary search algorithm, you only have to check 3 elements, which takes 3 ms to run.
In most cases, the list or database you need to search will have hundreds or thousands of elements.
If there are 1 billion elements, using simple search will take up to 1 billion ms, or 11 days. On the other hand, using binary search will take just 32 ms in the worst-case scenario:
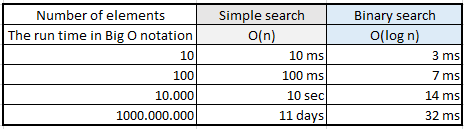
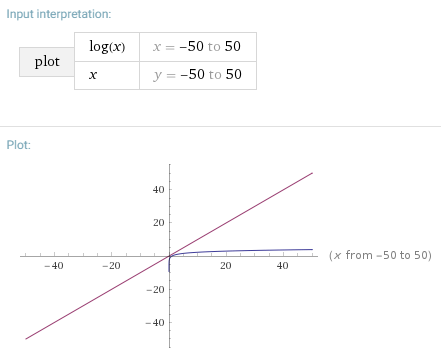
Clearly the run times for simple search and binary search don't grow at nearly the same rate. As the list of entries gets larger, binary search takes just a little more time to run. Simple search's run time grows exponentially as the list of entries increases.
This is why knowing how the running time increases in relation to a list size is so important. And this is exactly where Big O notation is so useful.
Big O notation shows the number of operations
As mentioned above, Big O notation doesn't show the time an algorithm will run. Instead, it shows the number of operations it will perform. It tells you how fast an algorithm grows and lets you compare it with others.
Here are some common algorithms and their run times in Big O notation:
Big O notation
Example algorithm
O(log n)
Binary search
O(n)
Simple search
O(n * log n)
Quicksort
O(n2)
Selection sort
O(n!)
Traveling salesperson
Now you know enough to be dangerous with Big O notation. Get out there and start comparing algorithms.
Learn to code for free. freeCodeCamp's open source curriculum has helped more than 40,000 people get jobs as developers. Get started
Python Dictionary Data Structure Explained
Excerpt
Dictionary is one of the most used data structures in Python. A dictionary is an unordered collection of items and we usually have keys and values stored in a dictionary. Let us look at a few examples for how the dictionary is usually used. # dictionary declaration 1 dict1 = dict() # dictionary

Dictionary is one of the most used data structures in Python. A dictionary is an unordered collection of items and we usually have keys and values stored in a dictionary. Let us look at a few examples for how the dictionary is usually used.
dict1 = dict()


dict2 = {}


key = "X"
value = "Y"
dict1[key] = value


dict1[key] = dict2
Let's now look at some retrieval ways.
value = dict1[key]


value = dict1["random"]
Avoiding KeyError: Use .get function
In case the given key does not exist in the dictionary, Python will throw a KeyError. There is a simple workaround for this. Let's look at how we can avoid KeyError using the in-built .get function for dictionaries.
dict_ = {}


random_key = "random"


if random_key in dict_:
  print(dict_[random_key])
else:
  print("Key = {} doesn't exist in the dictionary".format(dict_))
A lot of times we are ok getting a default value when the key doesn't exist. For e.g. when building a counter. There is a better way to get default values from the dictionary in case of missing keys rather than relying on standard if-else.
arr = [1,2,3,1,2,3,4,1,2,1,4,1,2,3,1]

freq = {}

for item in arr:

  freq[item] = freq.get(item, 0) + 1
So, the get(<key>, <defaultval>) is a handy operation for retrieving the default value for any given key from the dictionary. The problem with this method comes when we want to deal with mutable data structures as values e.g. list or set.
dict_ = {}


random_key = "random"

dict_[random_key] = dict_.get(random_key, []).append("Hello World!")
print(dict_)

dict_ = {}
dict_[random_key] = dict_.get(random_key, set()).add("Hello World!")
print(dict_)
Did you see the problem?
The new set or the list doesn't get assigned to the dictionary's key. We should assign a new list or a set to the key in case of missing value and then append or add respectively. Ley's look at an example for this.
dict_ = {}
dict_[random_key] = dict_.get(random_key, set())
dict_[random_key].add("Hello World!")
print(dict_)
Avoiding KeyError: Use defaultdict
This works most of the times. However, there is a better way to do this. A more pythonic way. The defaultdict is a subclass of the built-in dict class. The defaultdict simply assigns the default value that we specify in case of a missing key. So, the two steps:
//
dict_[random_key] = dict_.get(random_key, set());
dict_[random_key].add('Hello World!');
can now be combined into one single step. For e.g.
from collections import defaultdict


random_key = "random_key"


list_dict_ = defaultdict(list)


set_dict_ = defaultdict(set)


int_dict_ = defaultdict(int)

list_dict_[random_key].append("Hello World!")
set_dict_[random_key].add("Hello World!")
int_dict_[random_key] += 1

"""
  defaultdict(<class 'list'>, {'random_key': ['Hello World!']})
  defaultdict(<class 'set'>, {'random_key': {'Hello World!'}})
  defaultdict(<class 'int'>, {'random_key': 1})
"""
print(list_dict_, set_dict_, int_dict_)Learn to code for free. freeCodeCamp's open source curriculum has helped more than 40,000 people get jobs as developers. Get started
Sign in to freeCodeCamp.org | freeCodeCamp.org
Excerpt
Authentication landing page for freecodecamp.org
or
freeCodeCamp is free and your account is private by default. We use your email address to store your curriculum progress. By continuing, you indicate that you have read and agree to freeCodeCamp.org's Terms of Service and Privacy Policy.
JavaScript Hash Table - Associative Array Hashing in JS
Excerpt
Hash Tables are a data structure that allow you to create a list of paired values. You can then retrieve a certain value by using the key for that value, which you put into the table beforehand. A Hash Table transforms a key into an integer index using a hash
Hash Tables are a data structure that allow you to create a list of paired values. You can then retrieve a certain value by using the key for that value, which you put into the table beforehand.
A Hash Table transforms a key into an integer index using a hash function, and the index will decide where to store the key/value pair in memory:

Hash table for storing phone books (from Wikipedia)
You'll commonly use a Hash Table because of its fast search, insertion, and delete operations:
Hash Table time complexity in Big O Notation
Algorithm
Average
Worst case
Space
O(n)
O(n)
Search
O(1)
O(n)
Insert
O(1)
O(n)
Delete
O(1)
O(n)
Source from Wikipedia
This tutorial will help you understand Hash Table implementation in JavaScript as well as how you can build your own Hash Table class.
First, let's look at JavaScript's Object and Map classes.
How to Use Hash Tables with Object and Map Classes in JavaScript
The most common example of a Hash Table in JavaScript is the Object data type, where you can pair the object's property value with a property key.
In the following example, the key Nathan is paired with the phone number value of "555-0182" and the key Jane is paired with the value "315-0322":
//let obj = {Nathan: '555-0182',Jane: '315-0322'};JavaScript object is an example of Hash Table implementation
But JavaScript's Object type is a special kind of Hash Table implementation for two reasons:
- It has properties added by the
Objectclass. Keys you input may conflict and overwrite default properties inherited from the class. - The size of the Hash Table is not tracked. You need to manually count how many properties are defined by the programmer instead of inherited from the prototype.
For example, the Object prototype has the hasOwnProperty() method which allows you to check if a property is not inherited:
//const obj = {};
obj.name = 'Nathan';

console.log(obj.hasOwnProperty('name'));
JavaScript object inherited method call example
JavaScript doesn't block an attempt to overwrite the hasOwnProperty() method, which may cause an error like this:
//const obj = {};
obj.name = 'Nathan';
obj.hasOwnProperty = true;

console.log(obj.hasOwnProperty('name'));
JavaScript object inherited property gets overwritten
To handle these shortcomings, JavaScript created another implementation of the Hash Table data structure which is called Map
Just like Object, Map allows you to store key-value pairs inside the data structure. Here's an example of Map in action:
//const collection = new Map();

collection.set('Nathan', '555-0182');
collection.set('Jane', '555-0182');

console.log(collection.get('Nathan'));
console.log(collection.size);
JavaScript Map class is another implementation of Hash Table
Unlike the Object type, Map requires you to use the set() and get() methods to define and retrieve any key-pair values that you want to be added to the data structure.
You also can't overwrite Map inherited properties. For example, the following code tried to overwrite the size property value to false:
//const collection = new Map();

collection.set('Nathan', '555-0182');
collection['size'] = false;

console.log(collection.get('size'));
console.log(collection.size);
Map type property can't be overwritten
As you can see from the code above, you can't add a new entry to the Map object without using the set() method.
The Map data structure is also iterable, which means you can loop over the data as follows:
//const myMap = new Map();

myMap.set('Nathan', '555-0182');
myMap.set('Jane', '315-0322');for (let [key, value] of myMap) {
    console.log(`${key} = ${value}`);}
Iterating through a Map object
Now that you've learned how JavaScript implements Hash Tables in the form of Object and Map data structures, let's see how you can create your own Hash Table implementation next.
How to Implement a Hash Table Data Structure in JavaScript
Although JavaScript already has two Hash Table implementations, writing your own Hash Table implementation is one of the most common JavaScript interview questions.
You can implement a Hash Table in JavaScript in three steps:
- Create a
HashTableclass withtableandsizeinitial properties - Add a
hash()function to transform keys into indices - Add the
set()andget()methods for adding and retrieving key/value pairs from the table.
Alright, let's start with creating the HashTable class. The code below will create a table of buckets with the size of 127:
//class HashTable {constructor() {this.table = new Array(127);this.size = 0;}}HashTable class initial properties
All your key/value pairs will be stored inside the table property.
How to write the hash() method
Next, you need to create the hash() method that will accept a key value and transform it into an index.
A simple way to create the hash would be to sum the ASCII code of the characters in the key using the charCodeAt() method as follows. Note that the method is named using _ to indicate that it's a private class:
//_hash(key) {let hash = 0;for (let i = 0; i < key.length; i++) {
    hash += key.charCodeAt(i);}return hash;}
But since the HashTable class only has 127 buckets, this means that the _hash() method must return a number between 0 and 127.
To ensure that the hash value doesn't exceed the bucket size, you need to use the modulo operator as shown below:
//_hash(key) {let hash = 0;for (let i = 0; i < key.length; i++) {
    hash += key.charCodeAt(i);}return hash % this.table.length;}
Now that you have the _hash() method completed, it's time to write the set() and get() methods.
How to write the set() method
To set the key/value pair in your Hash Table, you need to write a set() method that accepts (key, value) as its parameters:
- The
set()method will call the_hash()method to get theindexvalue. - The
[key, value]pair will be assigned to thetableat the specifiedindex - Then, the
sizeproperty will be incremented by one
set(key, value) {
  const index = this._hash(key);
  this.table[index] = [key, value];
  this.size++;
}
Now that the set() method is complete, let's write the get() method to retrieve a value by its key.
How to write the get() method
To get a certain value from the Hash Table, you need to write a get() method that accepts a key value as its parameter:
- The method will call the
_hash()method to once again retrieve the tableindex - Return the value stored at
table[index]
get(key) {
  const index = this._hash(key);
  return this.table[index];
}
This way, the get() method will return either the key/value pair back or undefined when there is no key/value pair stored in the specified index.
So far so good. Let's add another method to delete key/value pair from the Hash Table next.
How to write the remove() method
To delete a key/value pair from the Hash Table, you need to write a remove() method that accepts a key value as its parameter:
- Retrieve the right
indexusing the_hash()method - Check if the
table[index]has a truthy value and thelengthproperty is greater than zero. Assign theundefinedvalue to the rightindexand decrement thesizeproperty by one if it is. - If not, simply return
false
remove(key) {
  const index = this._hash(key);

  if (this.table[index] && this.table[index].length) {
    this.table[index] = undefined;
    this.size--;
    return true;
  } else {
    return false;
  }
}
With that, you now have a working remove() method. Let's see if the HashTable class works properly.
How to Test the Hash Table Implementation
It's time to test the Hash Table implementation. Here's the full code for the Hash Table implementation again:
//class HashTable {constructor() {this.table = new Array(127);this.size = 0;}_hash(key) {let hash = 0;for (let i = 0; i < key.length; i++) {
            hash += key.charCodeAt(i);}return hash % this.table.length;}set(key, value) {const index = this._hash(key);this.table[index] = [key, value];this.size++;}get(key) {const target = this._hash(key);return this.table[target];}remove(key) {const index = this._hash(key);if (this.table[index] && this.table[index].length) {this.table[index] = [];this.size--;return true;} else {return false;}}}
The HashTable implementation in JavaScript
To test the HashTable class, I'm going to create a new instance of the class and set some key/value pairs as shown below. The key/value pairs below are just arbitrary number values paired with country names without any special meaning:
//const ht = new HashTable();
ht.set('Canada', 300);
ht.set('France', 100);
ht.set('Spain', 110);
Testing HashTable set() method
Then, let's try to retrieve them using the get() method:
//
console.log(ht.get('Canada'));
console.log(ht.get('France'));
console.log(ht.get('Spain'));
Testing HashTable get() method
Finally, let's try to delete one of these values with the remove() method:
//
console.log(ht.remove('Spain'));
console.log(ht.get('Spain'));
Testing HashTable remove() method
Alright, all the methods are working as expected. Let's try another insertion with a new HashTable instance and retrieve those values:
//const ht = new HashTable();

ht.set('Spain', 110);
ht.set('ǻ', 192);

console.log(ht.get('Spain'));
console.log(ht.get('ǻ'));
Hash Table index collision
Oops! Looks like we got into some trouble here. 😨
How to Handle Index Collision
Sometimes, the hash function in a Hash Table may return the same index number. In the test case above, the string "Spain" and "ǻ" both return the same hash value because the number 507 is the sum of both of their ASCII code.
The same hash value will cause the index to collide, overwriting the previous entry with the new one.
Right now, the data stored in our Hash Table implementation looks as follows:
//[['Spain', 110],['France', 100]];To handle the index number collision, you need to store the key/value pair in a second array so that the end result looks as follows:
//[[['Spain', 110],['ǻ', 192]],[['France', 100]]];To create the second array, you need to update the set() method so that it will:
- Look to the
table[index]and loop over the array values. - If the key at one of the arrays is equal to the
keypassed to the method, replace the value at index1and stop any further execution with thereturnstatement. - If no matching
keyis found, push a new array of key and value to the second array. - Else, initialize a new array and push the key/value pair to the specified
index - Whenever a
push()method is called, increment thesizeproperty by one.
The complete set() method code will be as follows:
//set(key, value) {const index = this._hash(key);if (this.table[index]) {for (let i = 0; i < this.table[index].length; i++) {if (this.table[index][i][0] === key) {this.table[index][i][1] = value;return;}}this.table[index].push([key, value]);} else {this.table[index] = [];this.table[index].push([key, value]);}this.size++;}Next, update the get() method so that it will also check the second-level array with a for loop and return the right key/value pair:
//get(key) {const target = this._hash(key);if (this.table[target]) {for (let i = 0; i < this.table.length; i++) {if (this.table[target][i][0] === key) {return this.table[target][i][1];}}}return undefined;}Finally, you need to update the remove() method so that it will loop over the second-level array and remove the array with the right key value using the splice() method:
//remove(key) {const index = this._hash(key);if (this.table[index] && this.table[index].length) {for (let i = 0; i < this.table.length; i++) {if (this.table[index][i][0] === key) {this.table[index].splice(i, 1);this.size--;return true;}}} else {return false;}}With that, your HashTable class will be able to avoid any index number collision and store the key/value pair inside the second-level array.
As a bonus, let's add a display() method that will display all key/value pairs stored in the Hash Table. You just need to use the forEach() method to iterate over the table and map() the values to a string as shown below:
//display() {this.table.forEach((values, index) => {const chainedValues = values.map(([key, value]) => `[ ${key}: ${value} ]`);
    console.log(`${index}: ${chainedValues}`);});}
Here's the complete HashTable class code again with the collision avoidance applied for your reference:
//class HashTable {constructor() {this.table = new Array(127);this.size = 0;}_hash(key) {let hash = 0;for (let i = 0; i < key.length; i++) {
            hash += key.charCodeAt(i);}return hash % this.table.length;}set(key, value) {const index = this._hash(key);if (this.table[index]) {for (let i = 0; i < this.table[index].length; i++) {if (this.table[index][i][0] === key) {this.table[index][i][1] = value;return;}}this.table[index].push([key, value]);} else {this.table[index] = [];this.table[index].push([key, value]);}this.size++;}get(key) {const index = this._hash(key);if (this.table[index]) {for (let i = 0; i < this.table.length; i++) {if (this.table[index][i][0] === key) {return this.table[index][i][1];}}}return undefined;}remove(key) {const index = this._hash(key);if (this.table[index] && this.table[index].length) {for (let i = 0; i < this.table.length; i++) {if (this.table[index][i][0] === key) {this.table[index].splice(i, 1);this.size--;return true;}}} else {return false;}}display() {this.table.forEach((values, index) => {const chainedValues = values.map(([key, value]) => `[ ${key}: ${value} ]`);
            console.log(`${index}: ${chainedValues}`);});}}
Complete HashTable class implementation
You can test the implementation by creating a new HashTable instance and do some insertion and deletion:
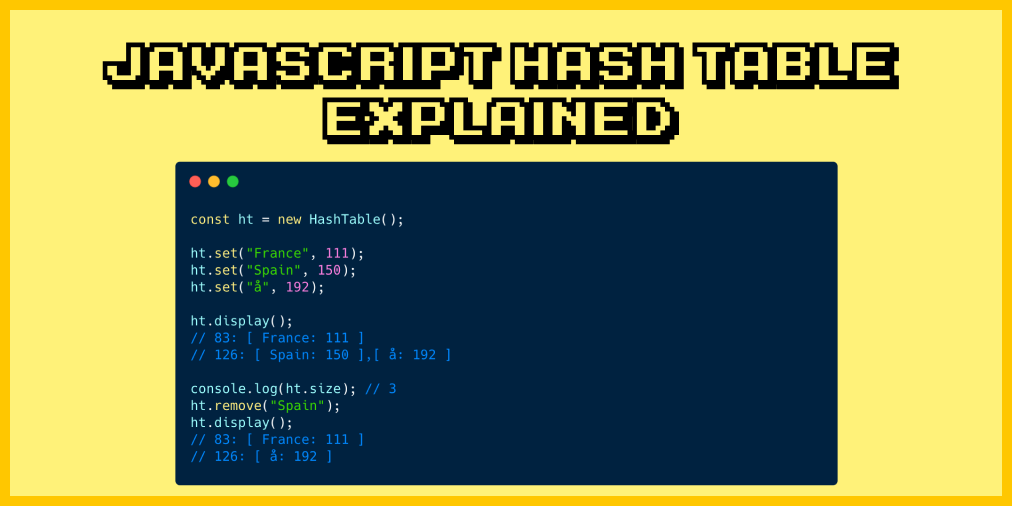
//const ht = new HashTable();

ht.set('France', 111);
ht.set('Spain', 150);
ht.set('ǻ', 192);

ht.display();

console.log(ht.size);
ht.remove('Spain');
ht.display();
Another HashTable test
Now there's no collision inside the HashTable instance. Great work!
Conclusion
In this tutorial, you've learned what a Hash Table is and how JavaScript uses it to create the Object and Map data structure.
You've also learned how to implement your own HashTable class as well as how to prevent the Hash Table's key indices from colliding by using the chaining technique.
By using a Hash Table data structure, you will be able to create an associative array with fast search, insertion, and delete operations. 😉
******Thanks for reading this tutorial******
If you want to learn more about JavaScript, you may want to check out my site at sebhastian.com, where I have published over 100 tutorials about programming with JavaScript, all using easy-to-understand explanations and code examples.
The tutorials include String manipulation, Date manipulation, Array and Object methods, JavaScript algorithm solutions, and many more.
Learn to code for free. freeCodeCamp's open source curriculum has helped more than 40,000 people get jobs as developers. Get started
Binary Search Tree Data Structure Explained with Examples
Excerpt
A tree is a data structure composed of nodes that has the following characteristics: Each tree has a root node (at the top) having some value.The root node has zero or more child nodes.Each child node has zero or more child nodes, and so on. This create a

A tree is a data structure composed of nodes that has the following characteristics:
- Each tree has a root node (at the top) having some value.
- The root node has zero or more child nodes.
- Each child node has zero or more child nodes, and so on. This create a subtree in the tree. Every node has it's own subtree made up of his children and their children, etc. This means that every node on its own can be a tree.
A binary search tree (BST) adds these two characteristics:
- Each node has a maximum of up to two children.
- For each node, the values of its left descendent nodes are less than that of the current node, which in turn is less than the right descendent nodes (if any).
The BST is built up on the idea of the binary search algorithm, which allows for fast lookup, insertion and removal of nodes. The way that they are set up means that, on average, each comparison allows the operations to skip about half of the tree, so that each lookup, insertion or deletion takes time proportional to the logarithm of the number of items stored in the tree, O(log n).
However, some times the worst case can happen, when the tree isn't balanced and the time complexity is O(n) for all three of these functions. That is why self-balancing trees (AVL, red-black, etc.) are a lot more effective than the basic BST.
**Worst case scenario example:** This can happen when you keep adding nodes that are always larger than the node before (it's parent), the same can happen when you always add nodes with values lower than their parents.
Basic operations on a BST
- Create: creates an empty tree.
- Insert: insert a node in the tree.
- Search: Searches for a node in the tree.
- Delete: deletes a node from the tree.
Create
Initially an empty tree without any nodes is created. The variable/identifier which must point to the root node is initialized with a NULL value.
Search
You always start searching the tree at the root node and go down from there. You compare the data in each node with the one you are looking for. If the compared node doesn't match then you either proceed to the right child or the left child, which depends on the outcome of the following comparison: If the node that you are searching for is lower than the one you were comparing it with, you proceed to to the left child, otherwise (if it's larger) you go to the right child. Why? Because the BST is structured (as per its definition), that the right child is always larger than the parent and the left child is always lesser.
Insert
It is very similar to the search function. You again start at the root of the tree and go down recursively, searching for the right place to insert our new node, in the same way as explained in the search function. If a node with the same value is already in the tree, you can choose to either insert the duplicate or not. Some trees allow duplicates, some don't. It depends on the certain implementation.
Delete
There are 3 cases that can happen when you are trying to delete a node. If it has,
- No subtree (no children): This one is the easiest one. You can simply just delete the node, without any additional actions required.
- One subtree (one child): You have to make sure that after the node is deleted, its child is then connected to the deleted node's parent.
- Two subtrees (two children): You have to find and replace the node you want to delete with its successor (the letfmost node in the right subtree).
The time complexity for creating a tree is O(1). The time complexity for searching, inserting or deleting a node depends on the height of the tree h, so the worst case is O(h).
Predecessor of a node
Predecessors can be described as the node that would come right before the node you are currently at. To find the predecessor of the current node, look at the right-most/largest leaf node in the left subtree.
Successor of a node
Successors can be described as the node that would come right after the node you are currently at. To find the successor of the current node, look at the left-most/smallest leaf node in the right subtree.
Special types of BT
- Heap
- Red-black tree
- B-tree
- Splay tree
- N-ary tree
- Trie (Radix tree)
Runtime
**Data structure: Array**
- Worst-case performance:
O(log n) - Best-case performance:
O(1) - Average performance:
O(log n) - Worst-case space complexity:
O(1)
Where n is the number of nodes in the BST.
Implementation of BST
Here's a definiton for a BST node having some data, referencing to its left and right child nodes.
struct node {
   int data;
   struct node *leftChild;
   struct node *rightChild;
};
Search Operation
Whenever an element is to be searched, start searching from the root node. Then if the data is less than the key value, search for the element in the left subtree. Otherwise, search for the element in the right subtree. Follow the same algorithm for each node.
struct node* search(int data){
   struct node *current = root;
   printf("Visiting elements: ");

   while(current->data != data){

      if(current != NULL) {
         printf("%d ",current->data);


         if(current->data > data){
            current = current->leftChild;
         }
         else {
            current = current->rightChild;
         }


         if(current == NULL){
            return NULL;
         }
      }
   }
   return current;
}
Insert Operation
Whenever an element is to be inserted, first locate its proper location. Start searching from the root node, then if the data is less than the key value, search for the empty location in the left subtree and insert the data. Otherwise, search for the empty location in the right subtree and insert the data.
void insert(int data) {
   struct node *tempNode = (struct node*) malloc(sizeof(struct node));
   struct node *current;
   struct node *parent;

   tempNode->data = data;
   tempNode->leftChild = NULL;
   tempNode->rightChild = NULL;


   if(root == NULL) {
      root = tempNode;
   } else {
      current = root;
      parent = NULL;

      while(1) {
         parent = current;


         if(data < parent->data) {
            current = current->leftChild;


            if(current == NULL) {
               parent->leftChild = tempNode;
               return;
            }
         }
         else {
            current = current->rightChild;


            if(current == NULL) {
               parent->rightChild = tempNode;
               return;
            }
         }
      }
   }
}
Binary search trees (BSTs) also give us quick access to predecessors and successors. Predecessors can be described as the node that would come right before the node you are currently at.
- To find the predecessor of the current node, look at the rightmost/largest leaf node in the left subtree. Successors can be described as the node that would come right after the node you are currently at.
- To find the successor of the current node, look at the leftmost/smallest leaf node in the right subtree.
Let's look at a couple of procedures operating on trees.
Since trees are recursively defined, it's very common to write routines that operate on trees that are themselves recursive.
So for instance, if we want to calculate the height of a tree, that is the height of a root node, We can go ahead and recursively do that, going through the tree. So we can say:
- For instance, if we have a nil tree, then its height is a 0.
- Otherwise, We're 1 plus the maximum of the left child tree and the right child tree.
So if we look at a leaf for example, that height would be 1 because the height of the left child is nil, is 0, and the height of the nil right child is also 0. So the max of that is 0, then 1 plus 0.
Height(tree) algorithm
if tree = nil:
return 0
return 1 + Max(Height(tree.left),Height(tree.right))
Here is the code in C++
int maxDepth(struct node* node)
{
    if (node==NULL)
        return 0;
   else
   {
       int rDepth = maxDepth(node->right);
       int lDepth = maxDepth(node->left);

       if (lDepth > rDepth)
       {
           return(lDepth+1);
       }
       else
       {
            return(rDepth+1);
       }
   }
}
We could also look at calculating the size of a tree that is the number of nodes.
- Again, if we have a nil tree, we have zero nodes.
Otherwise, we have the number of nodes in the left child plus 1 for ourselves plus the number of nodes in the right child. So 1 plus the size of the left tree plus the size of the right tree.
Size(tree) algorithm
if tree = nil
return 0
return 1 + Size(tree.left) + Size(tree.right)
Here is the code in C++
int treeSize(struct node* node)
{
    if (node==NULL)
        return 0;
    else
        return 1+(treeSize(node->left) + treeSize(node->right));
}
Relevant videos on freeCodeCamp YouTube channel
Following are common types of Binary Trees:
Full Binary Tree/Strict Binary Tree: A Binary Tree is full or strict if every node has exactly 0 or 2 children.
           18
       /       \
     15         30
    /  \        /  \
  40    50    100   40
In Full Binary Tree, number of leaf nodes is equal to number of internal nodes plus one.
Complete Binary Tree: A Binary Tree is complete Binary Tree if all levels are completely filled except possibly the last level and the last level has all keys as left as possible
           18
       /       \
     15         30
    /  \        /  \
  40    50    100   40
 /  \   /
8   7  9
Learn to code for free. freeCodeCamp's open source curriculum has helped more than 40,000 people get jobs as developers. Get started
Learn Data Structures from a Google Engineer - A Free 8-hour Course
Excerpt
Learn and master the most common data structures in this free 8-hour video course from Google engineer William Fiset. This course teaches data structures using animations to represent the data structures visually. And it's designed with beginners in mind. You'll learn how to code various data structures and combine them

[
Learn to code — free 3,000-hour curriculum
](https://www.freecodecamp.org/)

Learn and master the most common data structures in this free 8-hour video course from Google engineer William Fiset.
This course teaches data structures using animations to represent the data structures visually. And it's designed with beginners in mind.
You'll learn how to code various data structures and combine them through Finet's step-by-step instructions.
Each data structure comes with working source code to help solidify your understanding. The code snippets are in Java, but if you know JavaScript or Python you will probably be able to understand these just fine on a conceptual level.
You will learn about these data structures:
- Static and dynamic arrays
- Singly and doubly linked lists
- Stacks
- Queues
- Heaps/Priority Queues
- Binary Trees/Binary Search Trees
- Union find/Disjoint Set
- Hash tables
- Fenwick trees
- AVL trees
You can watch the full video on the freeCodeCamp.org YouTube channel (8 hour watch). As always, it's free, and there are no ads to interrupt you.
Learn to code for free. freeCodeCamp's open source curriculum has helped more than 40,000 people get jobs as developers. Get started
Data Structures Explained with Examples - Linked List
Excerpt
Just like a garland is made with flowers, a linked list is made up of nodes. We call every flower on this particular garland to be a node. And each of the node points to the next node in this list as well as it has data (here it is
Just like a garland is made with flowers, a linked list is made up of nodes. We call every flower on this particular garland to be a node. And each of the node points to the next node in this list as well as it has data (here it is type of flower).
Types
Singly Linked List
Singly linked lists contain nodes which have a data field as well as a next field, which points to the next node in the sequence. Operations that can be performed on singly linked lists are insertion, deletion and traversal.
   head
    |
    |
  +-----+--+      +-----+--+      +-----+------+
  |  1  |o----->  |  2  |o----->  |  3  | NULL |
  +-----+--+      +-----+--+      +-----+------+
Internal implementation of CPython, the frames and evaluated variables are kept on a stack.
For this we need to iterate only forward aur get the head, therefore singly linked-list is used.
Doubly Linked List
Doubly linked lists contain node which have data field, next field and another link field prev pointing to the previous node in the sequence.
          head
           |
           |
  +------+-----+--+    +--+-----+--+       +-----+------+
  |      |     |o------>  |     |o------>  |     |      |
  | NULL |  1  |          |  2  |          |  3  | NULL |
  |      |     |  <------o|     |  <------o|     |      |
  +------+-----+--+    +--+-----+--+       +-----+------+
The browser cache which allows you to hit the BACK and FORWARD button. Here we need to maintain a doubly linked list, with URLs as data field, to allow access in both direction. To go to previous URL we will use prev field and to go to next page we will use next field.
Circular Linked List
Circular linked lists is a singly linked list in which last node, next field points to first node in the sequence.
     head
      |
      |
    +-----+--+      +-----+--+      +-----+--+
    —> | 1 |o-----> | 2 |o----->    | 3 |o----|
    +-----+--+      +-----+--+      +-----+--+
Timesharing problem solved by the operating system.
In a timesharing environment, the operating system must maintain a list of present users and must alternately allow each user to use a small portion of CPU time, one user at a time. The operating system will pick a user, let him/her use a small amount of CPU time and then move on to the next user.
For this application, there should be no NULL pointers unless there is absolutely no one requesting CPU time, i.e list is empty.
Basic Operations
Insertion
To add a new element to the list.
Insertion at the beginning:
- Create a new node with given data.
- Point new node's
nextto oldhead. - Point
headto this new node.
Insertion in the middle/end.
Insertion after node X.
- Create a new node with given data.
- Point new node's
nextto old X'snext. - Point X's
nextto this new node.
**Time Complexity: O(1)**
Deletion
To delete existing element from the list.
Deletion at the beginning
- Get the node pointed by
headas Temp. - Point
headto Temp'snext. - Free memory used by Temp node.
Deletion in the middle/end.
Deletion after node X.
- Get the node pointed by
Xas Temp. - Point X's
nextto Temp'snext. - Free memory used by Temp node.
**Time Complexity: O(1)**
Traversing
To travel across the list.
Traversal
- Get the node pointed by
headas Current. - Check if Current is not null and display it.
- Point Current to Current's
nextand move to above step.
**Time Complexity: O(n) // Here n is size of link-list**
Implementation
C++ implementation of singly linked list
// Header files
#include <iostream>

struct node
{
    int data;
    struct node *next;
};

// Head pointer always points to first element of the linked list
struct node *head = NULL;
Printing data in each node
// Display the list
void printList()
{
    struct node *ptr = head;

    // Start from the beginning
while(ptr != NULL)
{
    std::cout << ptr->data << " ";
    ptr = ptr->next;
}

std::cout << std::endl;
}
Insertion at the beginning
// Insert link at the beginning
void insertFirst(int data)
{
    // Create a new node
    struct node *new_node = new struct node;

    new_node->data = data;

// Point it to old head
new_node->next = head;

// Point head to new node
head = new_node;

std::cout << "Inserted successfully" << std::endl;
}
Deletion at the beginning
// Delete first item
void deleteFirst()
{
    // Save reference to head
    struct node *temp = head;

    // Point head to head's next
head = head->next;

// Free memory used by temp
temp = NULL:
delete temp;

std::cout << "Deleted successfully" << std::endl;
}
Size
// Find no. of nodes in link list
void size()
{
    int length = 0;
    struct node *current;

    for(current = head; current != NULL; current = current->next)
{
    length++;
}

std::cout << "Size of Linked List is " << length << std::endl;
}
Searching
// Find node with given data
void find(int data){

    // Start from the head
struct node* current = head;

// If list is empty
if(head == NULL)
{
    std::cout << "List is empty" << std::endl;
    return;
}

// Traverse through list
while(current->data != data){

    // If it is last node
    if(current->next == NULL){
        std::cout << "Not Found" << std::endl;
        return;
    }
    else{
        // Go to next node
        current = current->next;
    }
}

// If data found
std::cout << "Found" << std::endl;
}
Deletion after a node
// Delete a node with given data
void del(int data){

    // Start from the first node
struct node* current = head;
struct node* previous = NULL;

// If list is empty
if(head == NULL){
    std::cout << "List is empty" << std::endl;
    return ;
}

// Navigate through list
while(current->data != data){

    // If it is last node
    if(current->next == NULL){
        std::cout << "Element not found" << std::endl;
        return ;
    }
    else {
        // Store reference to current node
        previous = current;
        // Move to next node
        current = current->next;
    }

}

// Found a match, update the node
if(current == head) {
    // Change head to point to next node
    head = head->next;
}
else {
    // Skip the current node
    previous->next = current->next;
}

// Free space used by deleted node
current = NULL;
delete current;
std::cout << "Deleted succesfully" << std::endl;
}
Python Implementation of Singly Linked List
class Node(object):
    # Constructor
    def __init__(self, data=None, next=None):
        self.data = data
        self.next = next

    # Function to get data
def get_data(self):
    return self.data

# Function to get next node
def get_next(self):
    return self.next

# Function to set next field
def set_next(self, new_next):
    self.next = new_next
class LinkedList(object):
    def __init__(self, head=None):
        self.head = head
Insertion
    # Function to insert data
def insert(self, data):
    # new_node is a object of class Node
    new_node = Node(data)
    new_node.set_next(self.head)
    self.head = new_node
    print("Node with data " + str(data) + " is created succesfully")
Size
    # Function to get size
def size(self):
    current = self.head
    count = 0
    while current:
        count += 1
        current = current.get_next()
    print("Size of link list is " + str(count))
Searching
    # Function to search a data
def search(self, data):
    current = self.head
    found = False
    while current and found is False:
        if current.get_data() == data:
            found = True
        else:
            current = current.get_next()
    if current is None:
        print("Node with data " + str(data) + " is not present")
    else:
        print("Node with data " + str(data) + " is found")
Deletion after a node
    # Function to delete a node with data
def delete(self, data):
    current = self.head
    previous = None
    found = False
    while current and found is False:
        if current.get_data() == data:
            found = True
        else:
            previous = current
            current = current.get_next()
    if current is None:
        print("Node with data " + str(data) + " is not in list")
    elif previous is None:
        self.head = current.get_next()
        print("Node with data " + str(data) + " is deleted successfully")
    else:
        previous.set_next(current.get_next())
print("Node with data " + str(data) + " is deleted successfully")**Advantages**
- Linked lists are a dynamic data structure, which can grow and shrink, allocating and deallocating memory while the program is running.
- Insertion and deletion of node are easily implemented in a linked list at any position.
**Disadvantages**
- They use more memory than arrays because of the memory used by their pointers (
nextandprev). - Random access is not possible in linked list. We have to access nodes sequentially.
- It's more complex than array. If a language supports array bound check automatically, Arrays would serve you better.
Note
We have to use free() in C and delete in C++ to free the space used by deleted node, whereas, in Python and Java free space is collected automatically by garbage collector.
Learn to code for free. freeCodeCamp's open source curriculum has helped more than 40,000 people get jobs as developers. Get started