
React Class Components Demo
React Demo
- ex1 — A Basic React Component
- ex2 — A Basic React Class Component
- ex3 — A Class Component with State
- ex4 — A Class Component that Updates State
- ex5 — A Class Component that Iterates through State
- ex6 — An Example of Parent and Child Components
With regards to converting an existing HTML, CSS, and JS site into React, first you'll want to think about how to break up your site into components,
- as well as think about what the general hierarchical component structure of your site will look like.
- From there, it's a simple matter of copying the relevant HTML for that component and throwing it into the render method of your component file.
- Any methods that are needed for that component to function properly can added onto your new component.
Once you've refactored your HTML components into React components, you'll want to lay them out in the desired hierarchical structure
- with children components being rendered by their parents, as well as ensuring that the parent components are passing down the necessary data as props to their children components.
ex.)
//<!-- Hello world --><div class="awesome" style="border: 1px solid red"><label for="name">Enter your name: </label><input type="text" id="name" /></div><p>Enter your HTML here</p>Is equivalent to:
//xlet NewComponent = React.createClass({render: function () {return (<div>{/* Hello world */}<div className="awesome" style={{ border: '1px solid red' }}><label htmlFor="name">Enter your name: </label><input type="text" id="name" /></div><p>Enter your HTML here</p></div>);}});A Basic Component
Acomponent is some thing that is being rendered in the browser. It could be a button, a form with a bunch of fields in it…etc.…
React doesn't place any restrictions on how large or small a component can be.
You could have an entire static site encapsulated in a single React component, but that would defeat the purpose of using React.
So the first thing to remember about a component is that a component must render something.
If nothing is being rendered from a component, then React will throw an error.
Inside of BasicComponent.js , first import React at the top of the file. Our most basic of components looks like this:
//ximport React from 'react';const BasicComponent = () => <div>Hello World!</div>;export default BasicComponent;This is a component that simply returns a div tag with the words Hello World! inside.
The last line simply exports our component so that it can be imported
by another file.
Notice that this component looks exactly like an anonymous arrow function that we've named BasicComponent .
In fact, that is literally what this is.
The arrow function then is simply returning the div tag. When a component is written as a function like this one is, it is called a functional component.
A Basic Class Component
The above component is an example of a functional component, which is appropriate since that component is literally nothing more than a function that returns some HTML.
Functional components are great when all you want a component to do is to render some stuff.
Components can also be written as classes (although this paradigm is becoming outdated and you should strive to write your components functionally!
For this exercise, we're going to write a class component that does exactly the same thing as the functional component we just wrote.
We'll again need to import React at the top of the file, but we'll also need to add a little something. Our import statement will look like this:
import React, { Component } from 'react';So, in addition to importing React, we're also importing the base Component class that is included in the React library.
React lets you define components as classes or functions.
Components defined as classes currently provide more features . To define a React component class, you need to extend React.Component:
//class Welcome extends React.Component {render() {return <h1>Hello, {this.props.name}</h1>;}}The only method you must define in a React.Component subclass is called [``](https://reactjs.org/docs/react-component.html#render).
render()
The render() method is the only required method in a class component.
When called, it should examine this.props and this.state and return one of the following types:
- React elements. Typically created via [JSX](https://reactjs.org/docs/introducing-jsx.html). For example,
<div />and<MyComponent />are React elements that instruct React to render a DOM node, or another user-defined component, respectively. - Arrays and fragments. Let you return multiple elements from render. See the documentation on [fragments](https://reactjs.org/docs/fragments.html) for more details.
- Portals. Let you render children into a different DOM subtree. See the documentation on [portals](https://reactjs.org/docs/portals.html) for more details.
- String and numbers. These are rendered as text nodes in the DOM.
- Booleans or
null. Render nothing. (Mostly exists to supportreturn test && <Child />pattern, wheretestis boolean.)
The render() function should be pure, meaning that it does not modify component state, it returns the same result each time it's invoked, and it does not directly interact with the browser.
If you need to interact with the browser, perform your work in componentDidMount() or the other lifecycle methods instead. Keeping render() pure makes components easier to think about.
Note
* will not be invoked if* [](https://reactjs.org/docs/react-component.html#shouldcomponentupdate) returns false.
The export statement at the bottom of the file also stays, completely unchanged. Our class component will thus look like this:
//ximport React, { Component } from 'react';class BasicClassComponent extends Component {render() {return <div>Hello World!</div>;}}export default BasicClassComponent;Notice that our BasicClassComponent inherits from the base Component class that we imported from the React library, by virtue of the 'extends' keyword.
That being said, there's nothing in this minimal component that takes advantage of any of those inherited methods.
All we have is a method on our component class called render that returns the same div tag.
If we really were deciding between whether to use a functional component versus a class component to render a simple div tag, then the functional style is more appropriate to use.
This is because class components are much better suited for handling component state and triggering events based on the component's [lifecycle.](https://projects.wojtekmaj.pl/react-lifecycle-methods-diagram/)
The important takeaways at this point are that there are two types of components, functional and class components, and that functional components are well-suited if you're just looking to render some HTML.
Class components, on the other hand, are much better suited for handling components that require more complex functionality, need to exhibit more varied behavior, and/or need to keep track of some state that may change throughout said component's lifecycle.
A Class Component with Some State
Component state is any dynamic data that we want the component to keep track of.
For example, let's say we have a form component. This form has some input fields that we'd like users to fill out. When a user types characters into an input field, how is that input persisted from the point of view of our form component?
The answer is by using component state!
There are a few important concepts regarding component state, such as how to update it, pass it to another component, render it, etc.
Only class components have the ability to persist state, so if at any time you realize that a component needs to keep track of some state, you know that you'll automatically need a class component instead of a functional component.
It is possible to handle state with functional components but that requires the use of something called the [useState() hook](https://reactjs.org/docs/hooks-state.html). Hooks were added in React 16.8; prior to this release, there was no mechanism to add state to functional components.
Here's what the above component looks like as a functional component:
Our class component with state will look a lot like the basic class component we just wrote, but with some exceptions:
//ximport React, { Component } from 'react';class ClassComponentWithState extends Component {constructor() {super();this.state = {};}render() {return <div>Hello World!</div>;}}export default ClassComponentWithState;So far, the only new thing going on here is the constructor block. If you recall how classes in JavaScript work, classes need constructors.
Additionally, if a class is extending off of another class and wants access to its parent class's methods and properties, then the super function needs to be called inside the class's constructor function.
Point being, the constructor function and the call to the super function are not associated with React, they are associated with all JavaScript classes.
- Then there is the ``** property inside the constructor function that is set as an empty object**.
- We're adding a property called
stateto our class and setting it to an empty object.
State objects in React are always just plain old objects.
So why is it that the basic class component we wrote in the previous exercise had no constructor function within its body?
That is because we had no need for them since all our class component was doing was rendering some HTML.
The constructor is needed here because that is where we need to initialize our state object.
The call to super is needed because we can't reference this inside of our constructor without a call to super first.
Ok, now let's actually use this state object.
One very common application of state objects in React components is to render the data being stored inside them within our component's render function.
Refactoring our component class to do that:
//xclass ClassComponentWithState extends Component {constructor() {super();this.state = {someData: 8};}render() {return <div>{`Here's some data to render: ${this.state.someData}`}</div>;}}export default ClassComponentWithState;We added a key-value pair to our state object inside our constructor.
- Then we changed the contents of the render function.
- Now, it's actually rendering the data that we have inside the state object.
- Notice that inside the div tags we're using a template string literal so that we can access the value of
this.state.someDatastraight inside of our rendered content.
With Reacts newest version, we can actually now add state to a component without explicitly defining a constructor on the class. We can refactor our class component to look like this:
//xclass ClassComponentWithState extends Component {
    state = {someData: 8};render() {return <div>{`Here's some data to render: ${this.state.someData}`}</div>;}}export default ClassComponentWithState;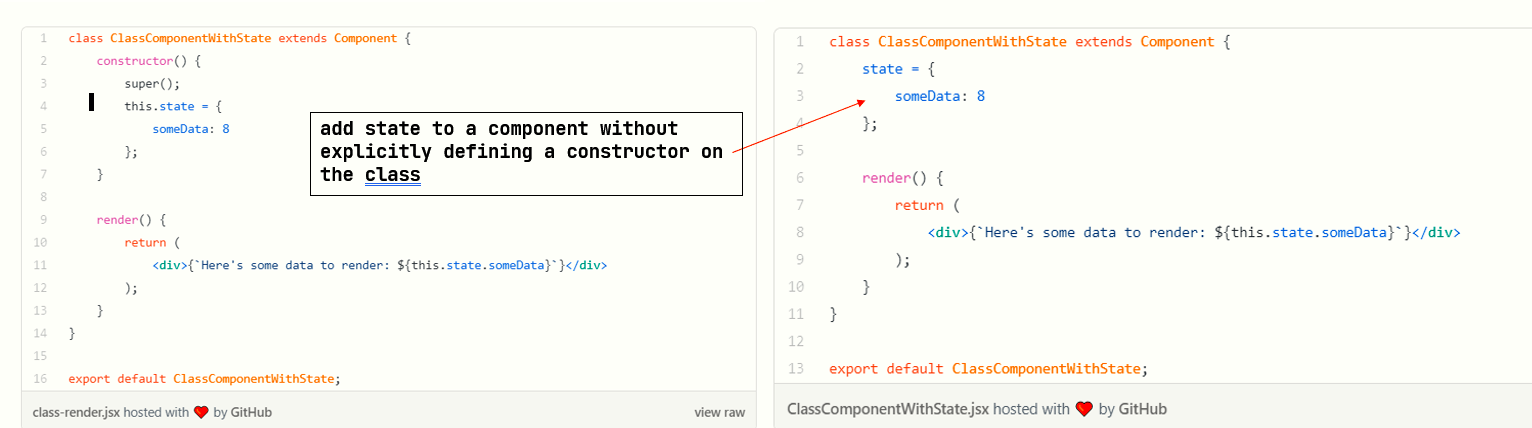
This new syntax is what is often referred to as 'syntactic sugar': under the hood, the React library translates this back into the old constructor code that we first started with, so that the JavaScript remains valid to the JavaScript interpreter.
The clue to this is the fact that when we want to access some data from the state object, we still need to call it with this.state.someData ; changing it to just state.someData does not work.
Class Component Updating State
Great, so we can render some state that our component persists for us.
However, we said an important use case of component state is to handle dynamic data.
A single static number isn't very dynamic at all.
So now let's walk through how to update component state.
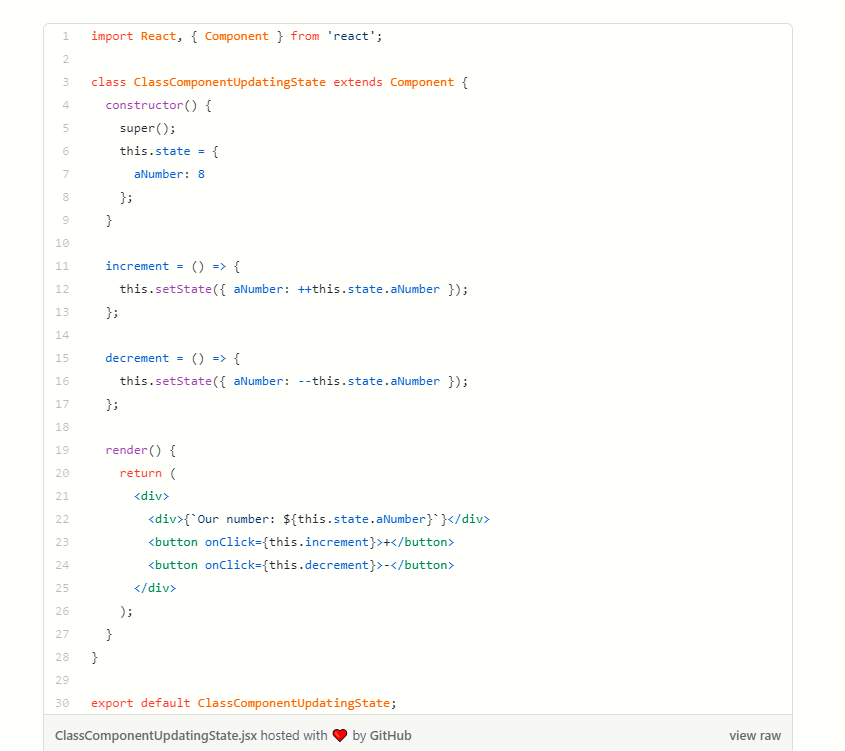
//ximport React, { Component } from 'react';class ClassComponentUpdatingState extends Component {constructor() {super();this.state = {aNumber: 8};}increment = () => {this.setState({ aNumber: ++this.state.aNumber });};decrement = () => {this.setState({ aNumber: --this.state.aNumber });};render() {return (<div><div>{`Our number: ${this.state.aNumber}`}</div><button onClick={this.increment}>+</button><button onClick={this.decrement}>-</button></div>);}}export default ClassComponentUpdatingState;Notice that we've added two methods to our class: increment and decrement .
increment and decrement are methods that we are adding to our class component.
Unlike the render method, increment and decrement were not already a part of our class component.
This is why increment and decrement are written as arrow functions, so that they are automatically bound to our class component.
The alternative is using a declaration syntax function with the bind method to bind the context of our methods to the class component.
The more interesting thing is what is going on within the bodies of these methods.
Each calls the setState function.
setStatein fact is provided to us by React.
It is the standard way to update a component's state.
It's the only way you should ever update a component's state. It may seem more verbose than necessary, but there are good reasons for why you should be doing it this way.
Unlike the lifecycle methods above (which React calls for you), the methods below are the methods you can call from your components.
There are just two of them: setState() and forceUpdate().
setState()
setState(updater, [callback])setState() enqueues changes to the component state and tells React that this component and its children need to be re-rendered with the updated state. This is the primary method you use to update the user interface in response to event handlers and server responses.
Think of setState() as a request rather than an immediate command to update the component. For better perceived performance, React may delay it, and then update several components in a single pass. React does not guarantee that the state changes are applied immediately.
setState() does not always immediately update the component. It may batch or defer the update until later. This makes reading this.state right after calling setState() a potential pitfall. Instead, use componentDidUpdate or a setState callback (setState(updater, callback)), either of which are guaranteed to fire after the update has been applied. If you need to set the state based on the previous state, read about the updater argument below.
setState() will always lead to a re-render unless shouldComponentUpdate() returns false. If mutable objects are being used and conditional rendering logic cannot be implemented in shouldComponentUpdate(), calling setState() only when the new state differs from the previous state will avoid unnecessary re-renders.
The first argument is an updater function with the signature:
(state, props) => stateChangestate is a reference to the component state at the time the change is being applied. It should not be directly mutated. Instead, changes should be represented by building a new object based on the input from state and props. For instance, suppose we wanted to increment a value in state by props.step:
this.setState((state, props) => {
  return {counter: state.counter + props.step};
});
Both state and props received by the updater function are guaranteed to be up-to-date. The output of the updater is shallowly merged with state.
The second parameter to setState() is an optional callback function that will be executed once setState is completed and the component is re-rendered. Generally we recommend using componentDidUpdate() for such logic instead.
You may optionally pass an object as the first argument to setState() instead of a function:
setState(stateChange[, callback])This performs a shallow merge of stateChange into the new state, e.g., to adjust a shopping cart item quantity:
this.setState({quantity: 2})This form of setState() is also asynchronous, and multiple calls during the same cycle may be batched together. For example, if you attempt to increment an item quantity more than once in the same cycle, that will result in the equivalent of:
Object.assign(
  previousState,
  {quantity: state.quantity + 1},
  {quantity: state.quantity + 1},
  ...
)
Subsequent calls will override values from previous calls in the same cycle, so the quantity will only be incremented once. If the next state depends on the current state, we recommend using the updater function form, instead:
this.setState((state) => {
  return {quantity: state.quantity + 1};
});
So the way to use setState to update a component's state is to pass it an object with each of the state keys you wish to update, along with the updated value.
In our increment method we said "I would like to update the aNumber property on my component state by adding one to it and then setting the new value as my new aNumber ".
The same thing happens in our decrement method, only we're subtracting instead of adding.
Then the other new concept we're running into here is how to actually call these methods we've added to our class.
We added two HTML button tags within our render function, then in their respective onClick handlers, we specify the method that should be called whenever this button gets clicked. So whenever we click either of the buttons, our state gets updated appropriately and our component will re-render to show the correct value we're expecting.
Class Component Iterating State
Another common state pattern you'll see being used in React components is iterating over an array in our state object and rendering each array element in its own tag.
This is often used in order to render lists.
Additionally, we want to be able to easily update lists and have React re-render our updated list.
We'll see how both of these are done and how they work together within a single component in order to create the behavior of a dynamic list.
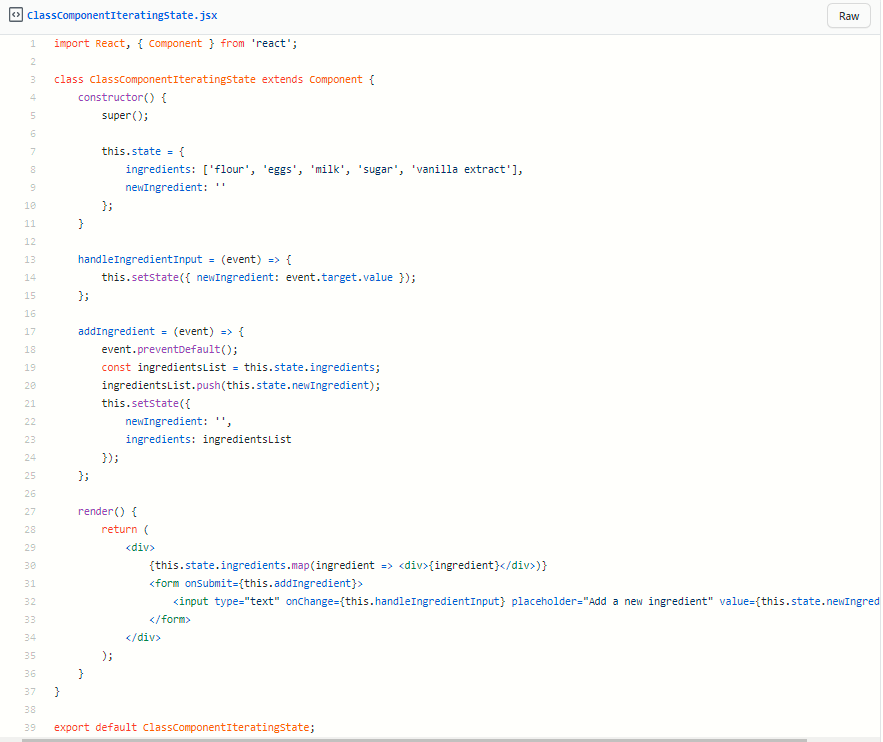
//ximport React, { Component } from 'react';class ClassComponentIteratingState extends Component {constructor() {super();this.state = {ingredients: ['flour', 'eggs', 'milk', 'sugar', 'vanilla extract'],newIngredient: ''};}handleIngredientInput = (event) => {this.setState({ newIngredient: event.target.value });};addIngredient = (event) => {
        event.preventDefault();const ingredientsList = this.state.ingredients;
        ingredientsList.push(this.state.newIngredient);this.setState({newIngredient: '',ingredients: ingredientsList
        });};render() {return (<div>{this.state.ingredients.map((ingredient) => (<div>{ingredient}</div>))}<form onSubmit={this.addIngredient}><input type="text" onChange={this.handleIngredientInput} placeholder="Add a new ingredient" value={this.state.newIngredient} /></form></div>);}}export default ClassComponentIteratingState;
The first change to note is that our state object now has an 'ingredients' array, and a 'newIngredient' field that has been initialized to an empty string.
The ingredients array contains the elements that we'll want to render in our list.
The addIngredient and handleIngredientInput methods we've added to our class receives a parameter called 'event'.
This event object is part of the browser's API.
When we interact with some DOM element, such as clicking on an HTML button, the function that is invoked upon that button being clicked actually receives the event object.
- So when we type some input into an input tag, we're able grab each character that was typed into the input field through the event object parameter.
- The
handleIngredientInputmethod is what gets invoked every time the user presses a key to enter text in the input box for adding a new ingredient. - Every character the user types gets persisted in the
newIngredientfield on the state object.
We're able to grab the text in the input box using event.target.value
Which holds the value of the string text that is currently in the input box.
We use that to update our
newIngredientstring field.
Breaking down the addIngredient method, we see this event.preventDefault() invocation.
This is because this method will be used upon submitting a form, and it turns out that submitting a form triggers some default form behavior that we don't want to trigger when we submit the form (namely refreshing the entire page).
event.preventDefault()will prevent this default form behavior, meaning our form will only do what we want it to do when it is submitted.
Next, we store a reference to this.state.ingredients in a variable called ingredientsList .
So we now have a copy of the array that is stored in our state object.
We want to update the copy of the ingredients array first instead of directly updating the actual array itself in state.
Now we push whatever value is being stored at our newIngredient field onto the ingredientsList array so that our ingredientsList array is now more up-to-date than our this.state.ingredients array.
So all we have to do now is call setState appropriately in order to update the value in our state object.
Additionally, we also set the newIngredient field back to an empty string in order to clear out the input field once we submit a new ingredient.
Now it's ready to accept more user input!

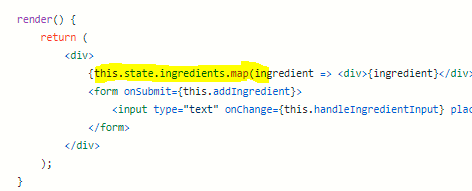
Looking at our render function, first note the this.state.ingredients.map call.
This is looping through each ingredient in our ingredients array and returning each one within its own div tag.
This is a very common pattern for rendering everything inside an array.
Then we have an HTML form which contains an input field.
The purpose of this form is to allow a user to add new ingredients to the list. Note that we're passing our addIngredient method to the form's onSubmit handler.
This means that our addIngredient method gets invoked whenever our form is submitted.
Lastly, the input field has an onChange handler that invokes our handleIngredientInput method whenever there is some sort of change in the input field, namely when a user types into it.

Notice that the value field in our input tag reads off of this.state.newIngredient in order to know what value to display.
So when a user enters text into the input field, the onChange handler is invoked every time, which updates our this.state.newIngredient field, which the input field and then renders.
Parent and Child Components
A single isolated component isn't going to do us much good.
The beauty of React lies in the fact that it allows us to compose modular components together.
Let's start off with the component we just saw, but let's change its name to `` .
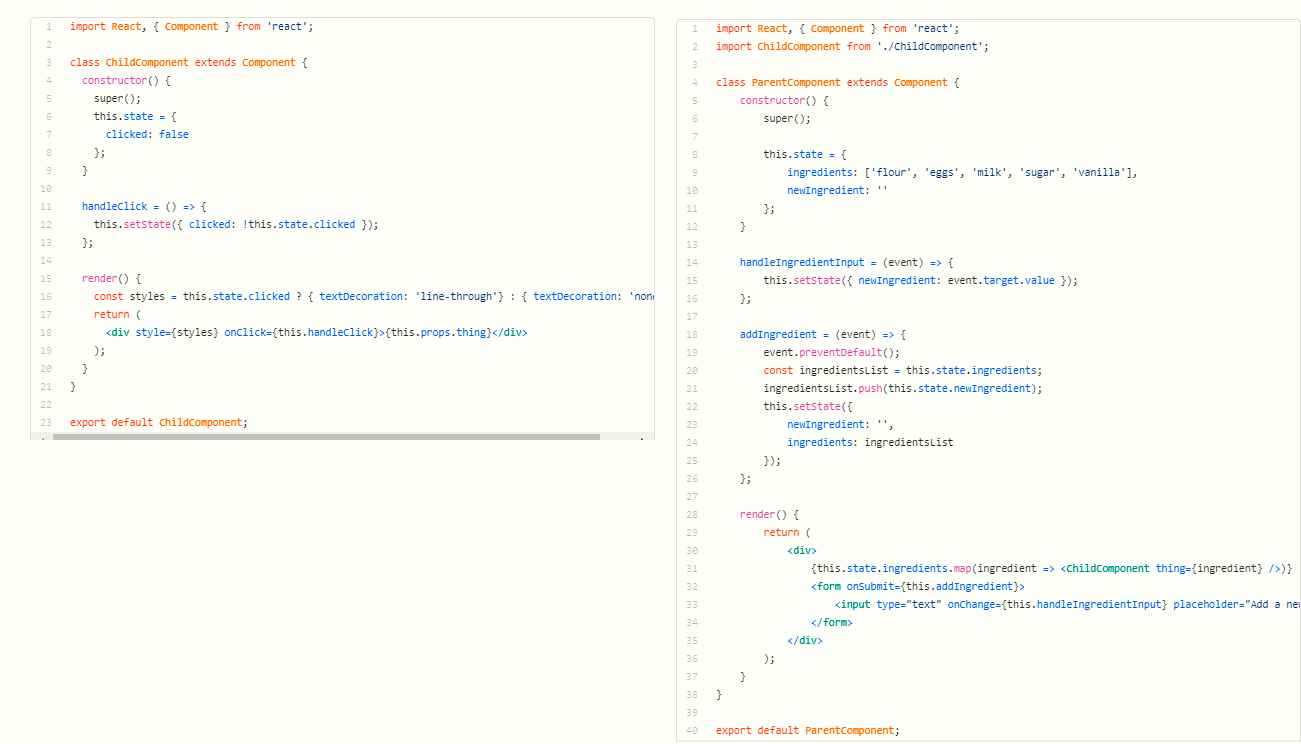
//ximport React, { Component } from 'react';import ChildComponent from './ChildComponent';class ParentComponent extends Component {constructor() {super();this.state = {ingredients: ['flour', 'eggs', 'milk', 'sugar', 'vanilla'],newIngredient: ''};}handleIngredientInput = (event) => {this.setState({ newIngredient: event.target.value });};addIngredient = (event) => {
        event.preventDefault();const ingredientsList = this.state.ingredients;
        ingredientsList.push(this.state.newIngredient);this.setState({newIngredient: '',ingredients: ingredientsList
        });};render() {return (<div>{this.state.ingredients.map((ingredient) => (<ChildComponent thing={ingredient} />))}<form onSubmit={this.addIngredient}><input type="text" onChange={this.handleIngredientInput} placeholder="Add a new ingredient" value={this.state.newIngredient} /></form></div>);}}export default ParentComponent;
The only two other differences in this component are that we're importing a ChildComponent and then using it inside our this.state.ingredients.map call.
ChildComponent is another React component.
Notice that we're using it just as if it were any other HTML tag.
This is how we lay out our component hierarchy: the ChildComponent is rendered within the ParentComponent.
We can see this to be the case if we open up the developer console and inspect these elements.child-left: parent-right
Note also that we're passing each ingredient as a 'thing' to the ChildComponent component.
This is how a parent component passes data to a child component. It doesn't need to be called 'thing'; you can call it whatever you want.
Conceptually though, every piece of data that a parent component passes down to a child component is called a 'prop' in React lingo.
Let's take a look now at the Child Component. It serves two purposes:
- to render the props data that it gets from a parent component,
- to add the ability for a user to click on it and have it toggle a strikethrough, indicating that the item is 'complete'.
//ximport React, { Component } from 'react';class ChildComponent extends Component {constructor() {super();this.state = {clicked: false};}handleClick = () => {this.setState({ clicked: !this.state.clicked });};render() {const styles = this.state.clicked ? { textDecoration: 'line-through' } : { textDecoration: 'none' };return (<div style={styles} onClick={this.handleClick}>{this.props.thing}</div>);}}export default ChildComponent;The overall structure of the child component is nothing we haven't seen. It's just another class component with its own state object and a method called handleClick .
A component accesses its props via the this.props object.
Any prop a parent component passes down to a child component is accessible inside the child component's this.prop object.
So our child component keeps its own state that tracks whether the component has been clicked or not.
Then at the top of the render function, it uses a ternary condition to determine whether the div tag that is being rendered should have a strikethrough or not.
The handleClick method is then invoked via an onClick handler on the div tag; it does the work of toggling the this.state.clicked Boolean.
The overall structure of React applications can be represented as a hierarchical tree structure, just like how the DOM itself is structure. There is an overarching root component at the top of the hierarchy that every other component sits underneath. Specifying that a component should be a child of some parent component is as simple as throwing it in the parent component's render function, just like how we did it in this example
Core Concepts:
1. What is react?
React is a declarative, efficient, and flexible JavaScript library for building user interfaces. It uses components to update and render as your data changes.
React manages the creation and continuous updating of DOM nodes in your Web page.
- It does not handle [AJAX ](https://skillcrush.com/blog/what-is-ajax/)requests, Local Storage or style your website. IT is just a tool to dynamically render content on a webpage as a result of changes in 'state'. Because it's function is so limited in scope you may hear it referred to as a library… (not a framework … like Angular for example) and you may also hear it described as unopinionated.
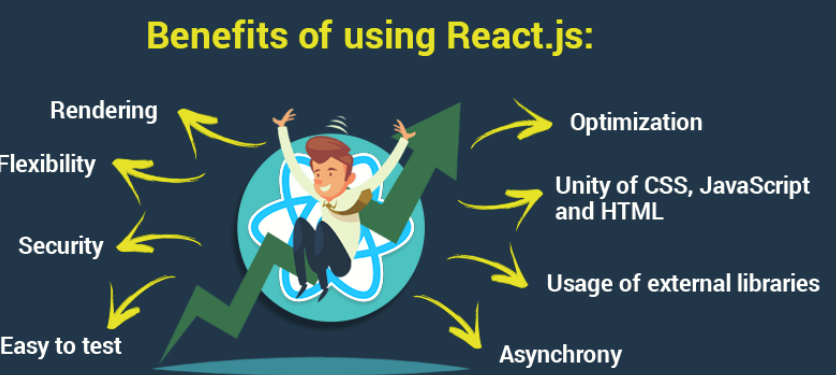
2. Why use react?
- Works for teams and helps UI workflow patterns
- The components can be reusable
- Componentized UI is the future of web dev

Declarative programming
In the same way that you use HTML to declare what the user interface should
look like, React provides the same mechanism in its `` method or the higher-level language known as JSX.
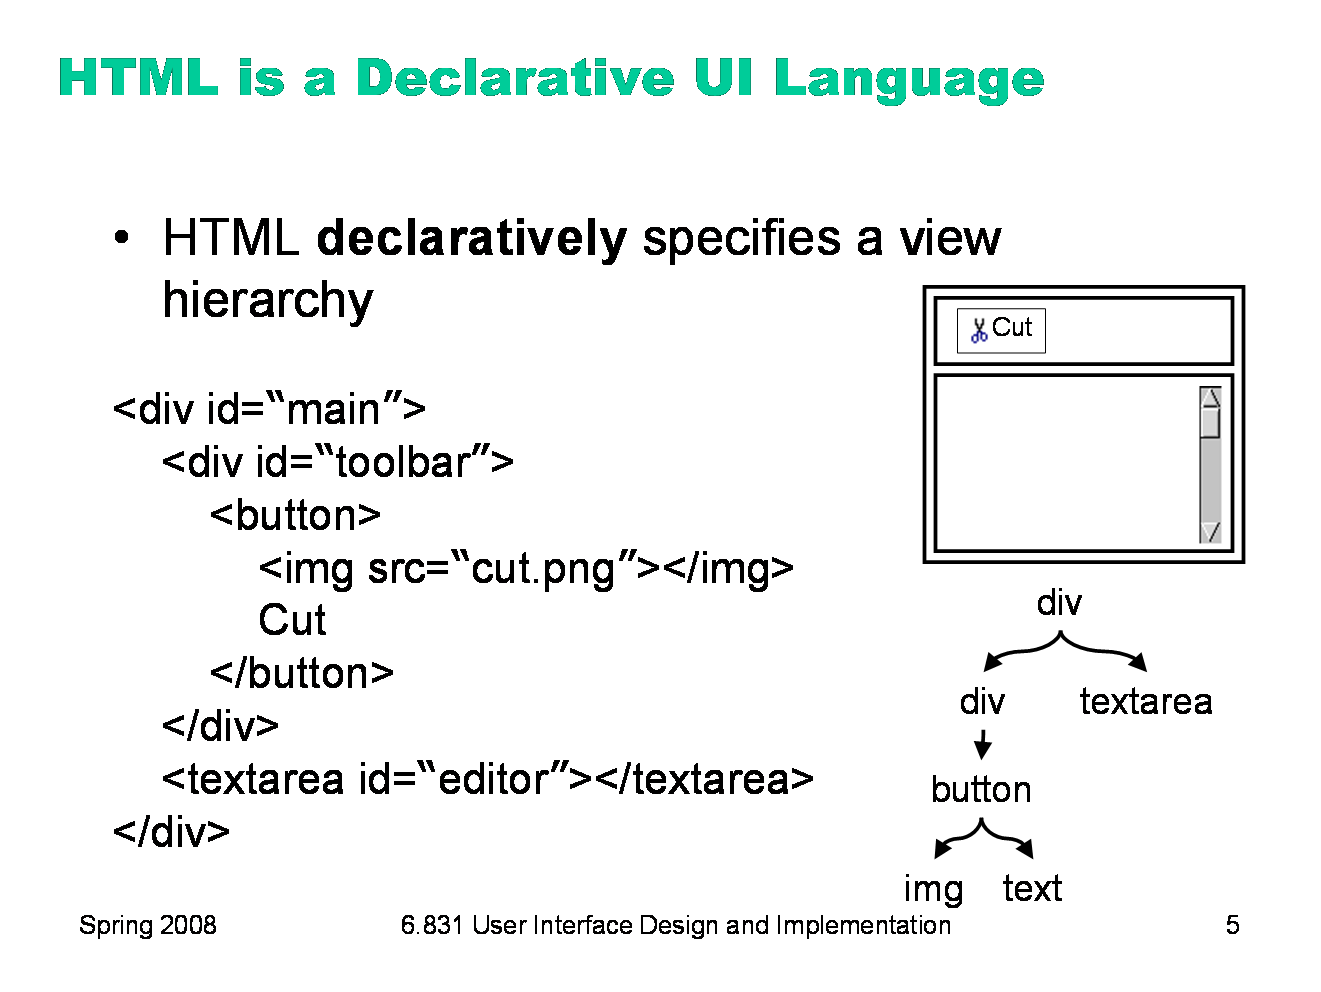 React… like HTML is Declarative
[Declarative programming](https://en.wikipedia.org/wiki/Declarativeprogramming) is often defined as any style of programming that is not [imperative](https://en.wikipedia.org/wiki/Imperativeprogramming).
A number of other common definitions attempt to define it by simply contrasting it with imperative programming. For example:
- A high-level program that describes what a computation should perform.
- Any programming language that lacks [side effects](https://en.wikipedia.org/wiki/Sideeffect%28computer_science%29)
- A language with a clear correspondence to [mathematical logic](https://en.wikipedia.org/wiki/Mathematicallogic).[[5]](https://en.wikipedia.org/wiki/Declarativeprogramming#cite_note-5)
These definitions overlap substantially.
Declarative programming is a non-imperative style of programming in which programs describe their desired results without explicitly listing commands or steps that must be performed.
[Functional](https://en.wikipedia.org/wiki/Functionalprogramming) and [logical programming](https://en.wikipedia.org/wiki/Logicalprogramming) languages are characterized by a declarative programming style.
In a [pure functional language](https://en.wikipedia.org/wiki/Purefunctionallanguage), such as [Haskell](https://en.wikipedia.org/wiki/Haskell%28programminglanguage%29), all functions are [without side effects](https://en.wikipedia.org/wiki/Purefunction), and state changes are only represented as functions that transform the state, which is explicitly represented as a_ [first-class](https://en.wikipedia.org/wiki/First-classcitizen) _object in the program.
— Wikipedia
What is a React pure component?
[Based on the concept of purity in functional programming paradigms, a function is said to be pure if:](https://blog.logrocket.com/react-pure-components-functional/#whatisareactpurecomponent)
- Its return value is only determined by its input values
- Its return value is always the same for the same input values
A React component is considered pure if it renders the same output for the same state and props. For class components like this, React provides the PureComponent base class. Class components that extend the React.PureComponent class are treated as pure components.
Pure components have some performance improvements and render optimizations since React implements the shouldComponentUpdate() method for them with a shallow comparison for props and state.
Are React functional components pure?
Functional components are very useful in React, especially when you want to isolate state management from the component. That's why they are often called stateless components.
However, functional components cannot leverage the performance improvements and render optimizations that come with React.PureComponent since they are not classes by definition.
If you want React to treat a functional component as a pure component, you'll have to convert the functional component to a class component that extends React.PureComponent.
//xfunction PercentageStat({ label, score = 0, total = Math.max(1, score) }) {return (<div><h6>{label}</h6><span>{Math.round((score / total) * 100)}%</span></div>);}// CONVERTED TO PURE COMPONENTclass PercentageStat extends React.PureComponent {render() {const { label, score = 0, total = Math.max(1, score) } = this.props;return (<div><h6>{label}</h6><span>{Math.round((score / total) * 100)}%</span></div>);}}Reusability
React encourages you to think in terms of reusability as you construct the user
interface from elements and components that you create. When you
make a list or a button, you can then reuse those components to show different data 'state' in the same UI structure as you have built for different data previously.
Component-Based
Build encapsulated components that manage their own state, then compose them to make complex UIs.
Since component logic is written in JavaScript instead of templates, you can easily pass rich data through your app and keep state out of the DOM.
Learn Once, Write Anywhere
We don't make assumptions about the rest of your technology stack, so you can develop new features in React without rewriting existing code.
React can also render on the server using Node and power mobile apps using [React Native](https://reactnative.dev/).
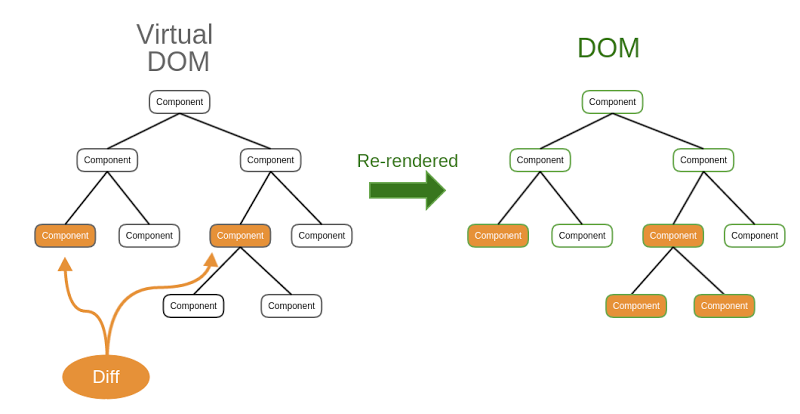
Speed
Due to the use of a virtual DOM, React handles changes to a Web page more
intelligently than just string manipulation. It is constantly monitors the
virtual DOM for changes. It very efficiently reconciles changes in the virtual
DOM with what it has already produced in the real DOM. This is what
makes React one of the speediest front-end libraries available.
3. Who uses react?
- Companies such as Facebook app for android and Instagram
- [Here](https://facebook.github.io/react-native/showcase.html) is a link to a list of other companies who use react.

 Who uses react
4. Setting up react
- React can be set up in CodePen for quick practice development by adding react.js, react-dom and babel.
- It can also be set up by downloading a react starter project from GitHub installing node and following these [instructions](https://github.com/hjb23/ReduxSimpleStarter).
- Alternatively it can be set up through NPM like [this](https://www.codementor.io/tamizhvendan/beginner-guide-setup-reactjs-environment-npm-babel-6-webpack-du107r9zr).
5. Intro to eco system
- Composition, being able to wrap up sections of code into there own containers so they can be re used.
- How to make a large application? by combining small components to create a larger complex application.
6. Imperative vs Declarative [(React is Declarative)](https://medium.com/trabe/why-is-react-declarative-a-story-about-function-components-aaae83198f79)
- Imperative, 'telling to computer HOW to do something' e.g looping over an array of numbers using a for loop.
- Declarative, is concerned about WHAT we want to happen. e.g using a reduce method on an array.
- Benefits of using declarative code:
- Reduce side effects
- Minimize mutability
- Less Bugs
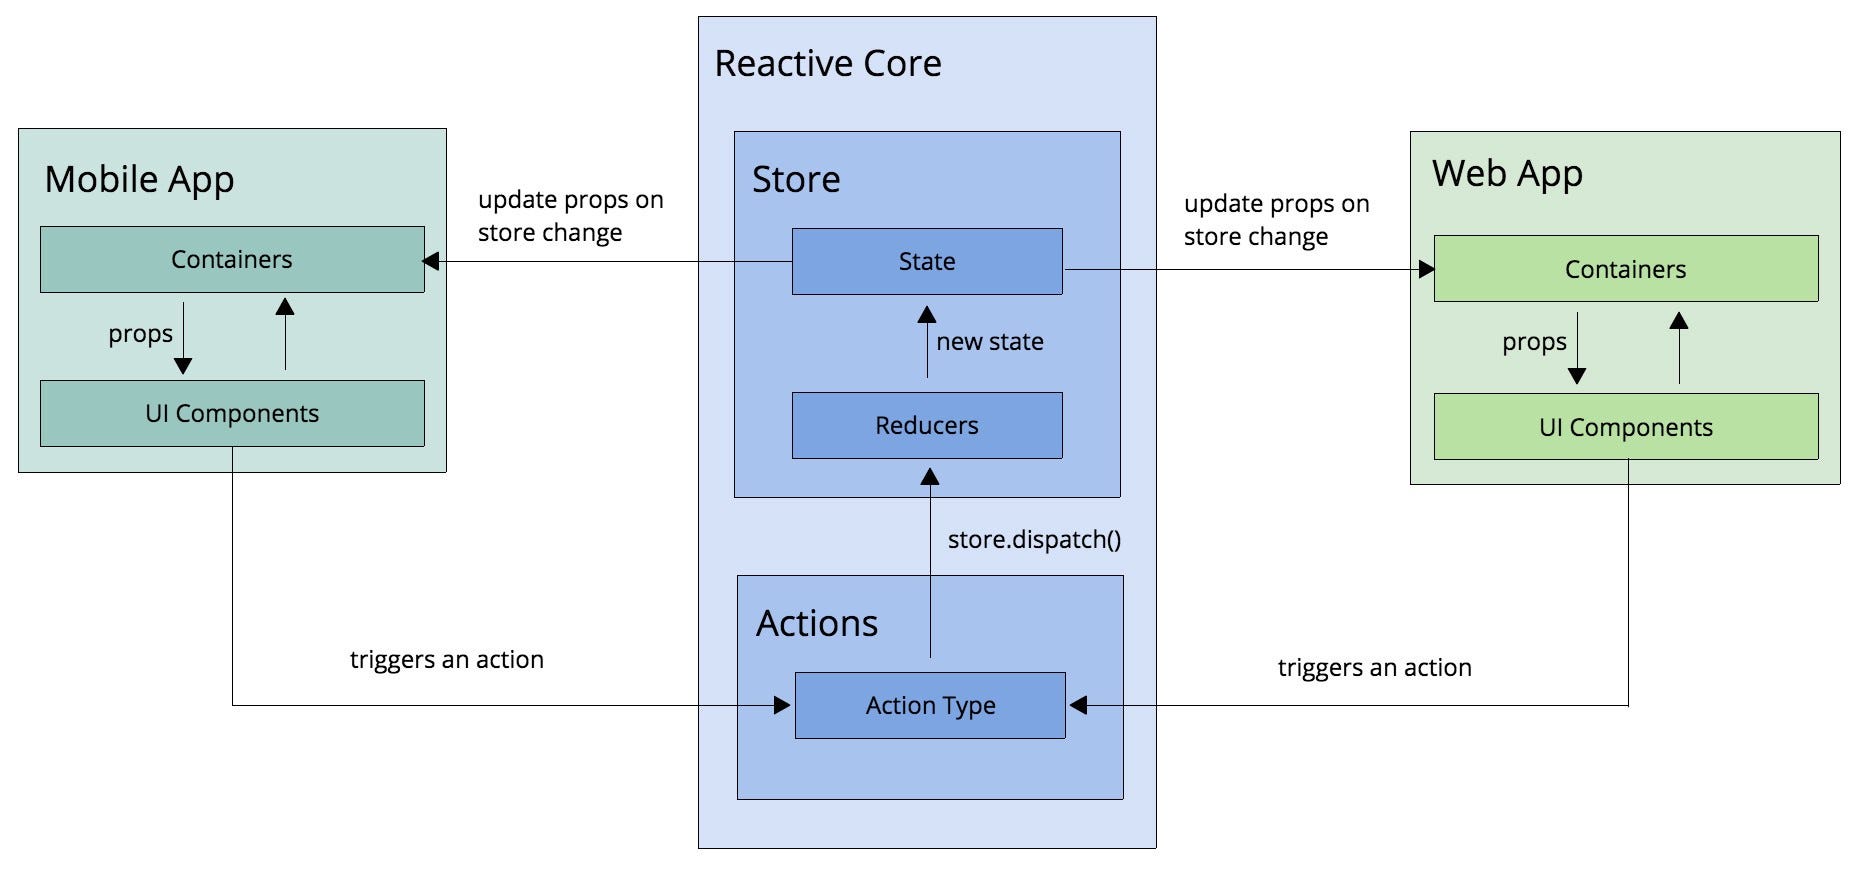
7. Unidirectional Data Flow
- As the state collects from user interaction, the UI gets updated.
- Explicit Mutations
- Whenever the state needs to be updated in our application setState has to be called.
this.setState({
  highlight: !this.state.highlight,
})
7.1. First component
- Components are the building blocks of React.
- They are similar to a collection of HTML,CSS, JS and data specific to that component.
- They can be defined in pure JavaScript or JSX.
- Data is either received from a component's parent component, or it's contained in the component itself.
- Applications can be separated into smaller components like this…
- React components can be created using ES6 class like this.
import React from 'react';class Hello extends React.Component {
  render () {
    return <h1>Hello, {this.props.name}!</h1>;
  }
}export default Hello;- At the top with have the code to bring react and react dom libraries in.
- React library is used for the react syntax.
- React DOM is used to update the DOM.
- We then have the Class section which creates the component.
- Render() describes the specific UI for the component.
- Return is used to return the JSX
- And Finally ReactDOM.render is used to update the DOM.
8. Data flow with props
Small examples of data flow, see if you can get the code to work.
<https://codepen.io/bgoonz/embed/WNpoLbg?default-tab=&theme-id=>
{% embed url="https://codepen.io/bgoonz/embed/BaWQGQp?default-tab=&theme-id=" %}
9. Creating lists with map
{% embed url="https://codepen.io/bgoonz/embed/XWMNoJr?default-tab=&theme-id=" %}
The parent component passes down to the child component as props.
Using props to access names and map to loop through each list item. Then passing this by using props.
{% embed url="https://codepen.io/bgoonz/embed/gOmLZbX?default-tab=&theme-id=" %}
Checking data to see if Boolean is true then adding detail to the list.
{% embed url="https://codepen.io/bgoonz/embed/WNpoLbg?default-tab=&theme-id=" %}
10. Prop types
PropTypes allow you to declare the type (string, number, function, etc) of each prop being passed to a component. Then if a prop passed in isn't of the declared type you'll get a warning in the console.
Excerpt from the React website:
React — A JavaScript library for building user interfaces
A JavaScript library for building user interfaces
Declarative
React makes it painless to create interactive UIs. Design simple views for each state in your application, and React will efficiently update and render just the right components when your data changes.
Declarative views make your code more predictable and easier to debug.
A Simple Component
React components implement a render() method that takes input data and returns what to display. This example uses an XML-like syntax called JSX. Input data that is passed into the component can be accessed by render() via this.props.
JSX is optional and not required to use React. Try the [Babel REPL](https://babeljs.io/repl/#?presets=react&codelz=MYewdgzgLgBApgGzgWzmWBeGAeAFgRgD4AJRBEAGhgHcQAnBAEwEJsB6AwgbgChRJYKAEMAlmDh0YWRiGABXVOgB0AczhQAokiVQAQgE8AkowAUAcjogQUcwEpeAJTjDgUACIB5ALLK6aRklTRBQ0KCohMQk6Bx4gA) to see the raw JavaScript code produced by the JSX compilation step.
In addition to taking input data (accessed via this.props), a component can maintain internal state data (accessed via this.state). When a component's state data changes, the rendered markup will be updated by re-invoking render().
An Application
Using props and state, we can put together a small Todo application. This example uses state to track the current list of items as well as the text that the user has entered. Although event handlers appear to be rendered inline, they will be collected and implemented using event delegation.
A Component Using External Plugins
React allows you to interface with other libraries and frameworks. This example uses remarkable, an external Markdown library, to convert the <textarea>'s value in real time.