- Create a new site
It’ll ask for a site title and the name of the project’s directory. Continue following the prompts to choose your preferred language (JavaScript or TypeScript), CMS, styling tools and additional features.
- Once everything is downloaded you will see a message with instructions for navigating to your site and running it locally.
The CLI created the site as a new folder with the name you chose in step 1.
Start by going to the directory with
Start the local development server with
Gatsby will start a hot-reloading development environment accessible by default at http://localhost:8000.
- Now you’re ready to make changes to your site!
Try editing the home page in src/pages/index.js. Saved changes will live reload in the browser.
What’s next?
Use flags
The CLI also supports two flags:
-yskips the questionnaire-tsinitializes your project with the minimal TypeScript starter instead of the minimal JavaScript starter
Flags are not positional, so these commands are equivalent:
npm init gatsby -y -ts my-site-namenpm init gatsby my-site-name -y -ts
Create a Gatsby site
To create your first Gatsby site, you're going to use a command from the Gatsby command line interface (CLI): gatsby new. This command brings up an interactive prompt that asks you questions about the site you want to build. After you enter all the information, the CLI uses your answers to automatically generate your new Gatsby site.
Note: For this Tutorial, your Gatsby CLI should be v4.8 or newer. To check what version you have installed, run the following command:
Copycopy code to clipboard`
gatsby --version
`
Need to update? Run the command below to get the latest version of the Gatsby CLI:
Copycopy code to clipboard`
npm install -g gatsby-cli
`
Let's take a closer look at the process:
- Open the command line, and use the
cdcommand to change directories into the folder where you want to create your new Gatsby site. For example, if you wanted to create your new site on your desktop, you might type:
Copycopy code to clipboard`
cd Desktop
`
- Run the following command from the command line. This will start up the interactive prompt to help you create a new Gatsby site.
Desktop
CopyDesktop: copy code to clipboard`
gatsby new
`
Having trouble with gatsby new? If you had trouble globally installing gatsby-cli in Part 0, you can also create a new site by running npm init gatsby from the command line instead of gatsby new.
- When the prompt asks, "What would you like to call your site?" enter a name for your site.
Copycopy code to clipboard`
What would you like to call your site?
✔ - My First Gatsby Site
`
- When the prompt asks, "What would you like to name the folder where your site will be created?" use the default folder name, which will be based on the site name you chose.
Copycopy code to clipboard`
What would you like to name the folder where your site will be created?
✔ Desktop/ my-first-gatsby-site
`
- When the prompt asks, "Will you be using JavaScript or TypeScript?" choose JavaScript.
Copycopy code to clipboard`
Will you be using JavaScript or TypeScript?
❯ JavaScript
TypeScript
`
This tutorial doesn't require any prior TypeScript knowledge as it uses JavaScript. If you're familiar with TypeScript you can read the Gatsby and TypeScript guide to learn about typings, files, and conventions. If you want to use TypeScript we recommend going through the tutorial first and then only afterwards convert the project to TypeScript.
- When the prompt asks, "Will you be using a CMS?" select "No (or I'll add it later)".
Copycopy code to clipboard`
✔ Will you be using a CMS?
- No (or I'll add it later)
`
In the future, you can use these options to tell gatsby new what features you want to add to your site, and gatsby new will automatically configure them for you. It's a much quicker way to set up new projects.
But in this first site, you'll set things up manually to learn about how Gatsby's pieces fit together.
- When the prompt asks, "Would you like to install a styling system?" select "No (or I'll add it later)". (You'll add styles manually later.)
Copycopy code to clipboard`
✔ Would you like to install a styling system?
- No (or I'll add it later)
`
- When the prompt asks, "Would you like to install additional features with other plugins?" use the arrow and Enter keys to select "Done".
Copycopy code to clipboard`
✔ Would you like to install additional features with other plugins?
- Done
`
- The prompt will show you a summary of what
gatsby newwill do. It should look something like the output below.
Copycopy code to clipboard`
Thanks! Here's what we'll now do:
🛠 Create a new Gatsby site in the folder my-first-gatsby-site
? Shall we do this? (Y/n) › Yes
`
- When the prompt asks, "Shall we do this?" enter "Y". The
gatsby newcommand will start building your site. Your internet download speed will affect how long this command takes to run. After it finishes, you should see a message like this:
Copycopy code to clipboard`
🎉 Your new Gatsby site My First Gatsby Site has been successfully
created at ~/Desktop/my-first-gatsby-site.
Start by going to the directory with
cd my-first-gatsby-site
Start the local development server with
npm run develop
See all commands at
https://www.gatsbyjs.com/docs/gatsby-cli/
`
Congratulations, you're now the owner of a brand-new Gatsby site!
Run your site locally
So far, you've generated the code for your site, but what does it actually look like in a web browser like Firefox or Google Chrome? To find out, you'll first need to start up your site's local development server.
The development server is a useful tool for when you're working on your site locally (from your own computer). When your development server is running, you can use a web browser to interact with your local copy of your site. That way, you can test out changes to your code, to make sure they work before you actually publish a new version of your site to the internet.
To start up your development server, do the following:
- In the command line, change into the directory you created for your site:
~/Desktop
Copy~/Desktop: copy code to clipboard`
cd my-first-gatsby-site
`
Tip: Whenever you want to run any commands for your site, you need to be in the context for that site. That is, your command line needs to be pointed at the directory where your site's code lives.
- From your site directory, start the development server by running the following command:
~/Desktop/my-first-gatsby-site
Copy~/Desktop/my-first-gatsby-site: copy code to clipboard`
gatsby develop
`
If you weren't able to install the Gatsby command line interface globally, you can start your development server using the following command instead:
Copycopy code to clipboard`
npm run develop
`
- After a few moments, the command line should output a message like the following, telling you your development server is ready to go!
Copycopy code to clipboard`
You can now view my-first-gatsby-site in the browser.
⠀
⠀
View GraphiQL, an in-browser IDE, to explore your site's data and
schema
⠀
http://localhost:8000/___graphql
`
- Open your favorite web browser and navigate to
http://localhost:8000.
And there it is: your very first Gatsby site! 🎉
You'll be able to visit the site locally at http://localhost:8000/ for as long as your development server is running. (That's the process you started by running the gatsby develop command.) To stop running that process (or to "stop running the development server"), go back to your terminal window, hold down the "control" key, and then hit "c" (ctrl-c). To start it again, run gatsby develop again!
Note: If you are using VM setup like vagrant and/or would like to listen on your local IP address, run gatsby develop --host=0.0.0.0. Now, the development server listens on both http://localhost and your local IP.
Set up a GitHub repo for your site
GitHub is a website that many developers use to back up and share their code online. By uploading your code to GitHub, you'll be able to work on the same codebase from multiple computers. You'll also be able to use Gatsby Cloud to build and host your site.
Each codebase on GitHub is stored in its own repository (also called a "repo", for short). To create a new repository for your blog, click the plus icon in the top-right corner of the navigation bar. Select "New repository".
When filling out the form for your new repo, you can make it public or private. (This only affects the visibility of your code on GitHub. Your site will still be visible to everyone once you deploy it with Gatsby Cloud.) Leave the initialization option checkboxes unchecked.
To push your existing code from your computer to your new GitHub repository, enter the commands below in the command line. Be sure to swap out
YOUR_GITHUB_USERNAMEfor your actual username andYOUR_GITHUB_REPO_NAMEwith the name you gave your GitHub repo (likemy-first-gatsby-site).Copycopy code to clipboard`
git remote add origin https://github.com/YOUR_GITHUB_USERNAME/YOUR_GITHUB_REPO_NAME.git
git branch -M main
git push -u origin main
`
Using GitHub for the first time?
If you get an error about permissions when you try to push your code to GitHub for the first time, you might need to set up a personal access token for your GitHub account. This lets GitHub know that your computer has permission to push code changes to your remote repos.
For instructions on how to set up a personal access token, follow GitHub's guide: Creating a personal access token. Your personal access token will need the repo scope to be able to push changes to your repository.
Now you have a copy of your code saved on GitHub's servers. In the next step, you'll connect your Gatsby Cloud account to the GitHub repo you just created.
Build your site with Gatsby Cloud
Gatsby Cloud is an infrastructure platform that is specifically optimized for building, deploying, and hosting Gatsby sites. Once you connect your Gatsby Cloud account to your GitHub repository, Gatsby Cloud will build your site and make it available for others on the internet to see.
To connect your code on GitHub to your Gatsby Cloud account, do the following:
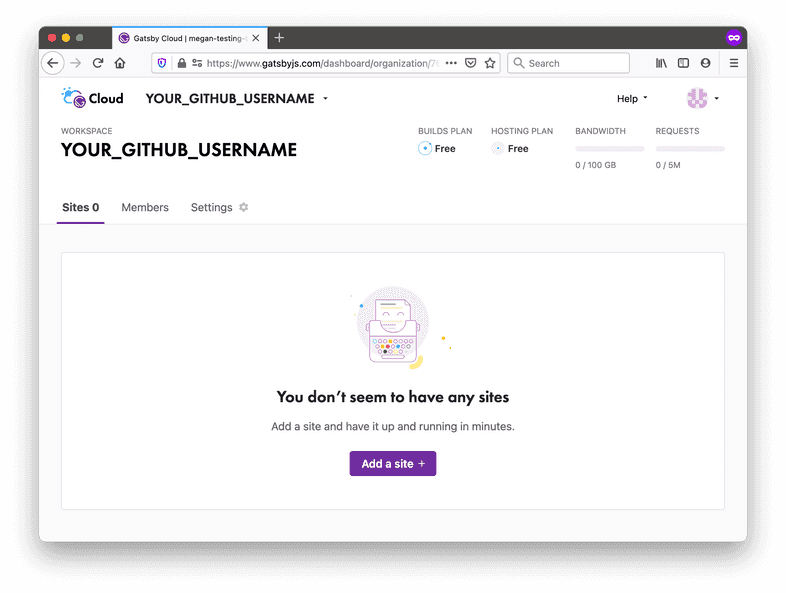
Go to your Gatsby Cloud Dashboard. Click on the "Add a site" button.
The next few steps will help you add your site to Gatsby Cloud. First, in the "Import from a Git repository" card click the "GitHub" icon to select GitHub as your Git provider.
If this is your first time connecting GitHub to Gatsby Cloud, you'll need to give Gatsby Cloud permission to access your GitHub account.
Note: If you are part of more than one GitHub organization, you will need to first select the organization with which the repository resides at this step before selecting the repository itself.
A new browser window should open, where GitHub will ask you whether you want to give Gatsby Cloud permission to your GitHub repositories. You can choose whether to give Gatsby Cloud access to all of your GitHub repositories or to only the repository you created (
my-first-gatsby-site). Then click "Install".Now, when you go back to the Gatsby Cloud window, the repository list should contain your GitHub repository. Select it.
Once you select your repo, you'll be navigated to the configuration step which presents you with a few more inputs. These let you tell Gatsby Cloud where to look in your GitHub repo for your Gatsby site. You can also change what Gatsby Cloud will name your site. Leave the default settings and click the "Next" button.
Gatsby Cloud will ask you if you want to add any integrations to your site. For future projects, this might be useful if you want to use a CMS. Gatsby Cloud will also ask if you want to add any environment variables. Again, this may useful for future projects, but for now, scroll past and click the "Build Site" button.
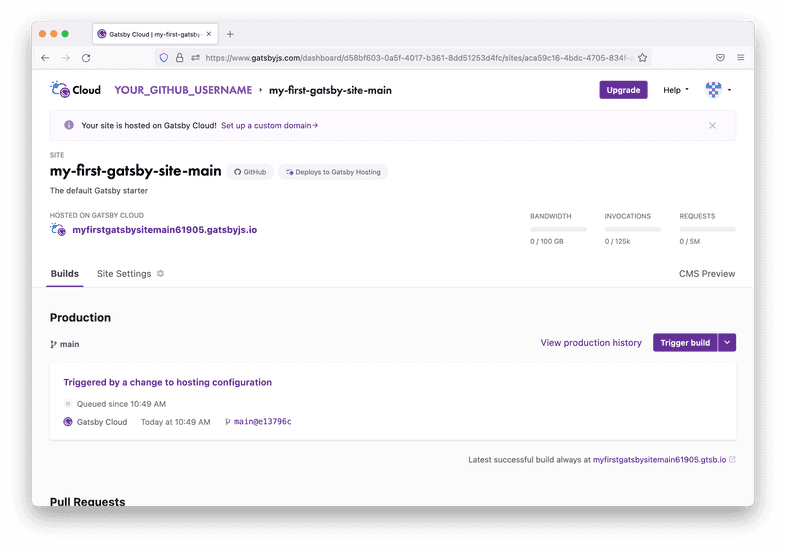
Now that your site has been created, you'll be taken to a site dashboard where you can see the status of your builds. Gatsby Cloud should start building your site automatically. You'll see a link to your new site, which is automatically hosted on Gatsby Cloud. You can share this link with anyone, and they'll be able to see your site online!
You did it! Your Gatsby site is now online! 👏
Every time you push a new change to the main branch of your GitHub repo, Gatsby Cloud will see the changes and automatically start a build for the new version of your site.
Tip: There will be a unique URL for each build (like https://build-49535320-b3ae-4761-bbeb-f8f7fa07e0fc.gtsb.io/), and a URL that always has the latest build (like my-first-gatsby-site-main.gatsbyjs.io). You'll mostly want to share the human-readable URL, so that people can always see the most up-to-date version of your site. But in some cases (like when you're trying to debug a specific build of your site) it can be helpful to use the unique build URL.
Summary
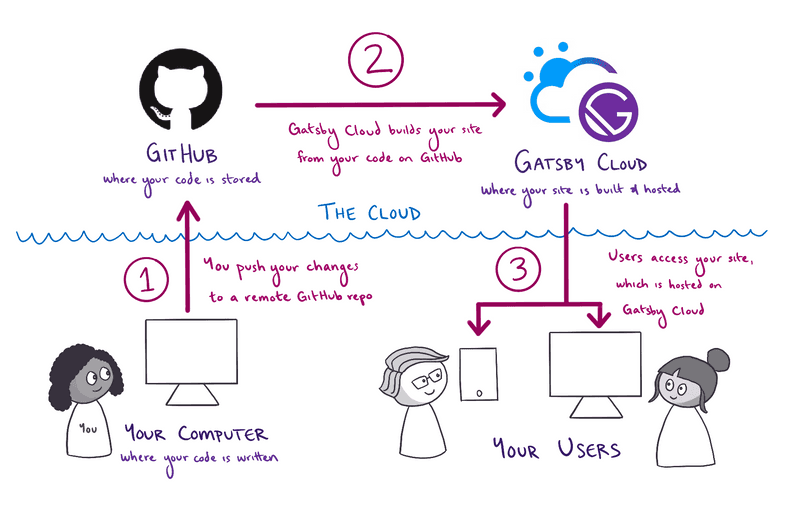
In this section, you learned how to create a new Gatsby site and deploy it online using Gatsby Cloud. As a quick review, here's the diagram outlining the process:
Expand for detailed description
Key takeaways
- To create a new Gatsby site from the command line, you can run the
gatsby newcommand. - To run your site locally, use the
gatsby developcommand. You can view your site in a web browser atlocalhost:8000. Gatsby Cloud is an infrastructure platform specifically optimized for building, deploying, and hosting Gatsby sites.
- When you push a new commit to the
mainbranch of the GitHub repository for your site, Gatsby Cloud will detect the changes, rebuild a new version of your site, and then redeploy it.
- When you push a new commit to the


