
React In Depth
Random Things to Remember
- Using () implictly returns components.
- -
- Role of index.js is to render your application.
- -
- The reference to root comes from a div in the body of you
- -
- State of a component is simply
- -
- Class Components require render() method to return JSX.
- Functional Components directly return JSX.
- Class is className in React.
- When parsing for an integer just chain Number.parseInt("123")
- Use ternary operator if you want to make a conditional inside a fragment.
- Purpose of React.Fragment is to allow you to create groups of children without adding an extra dom element.
Front-End History
- React makes it easier for you to make front-end elements. A front-end timeline
- -
- Some noteworthy front e
- -
- 2005: Scrip
- -
- 2005: Dojo
- -
- 2006: YUI
- -
- 2010: Knockout
- -
- 2011:
- -
- 2012: Elm
- -
- 2013: React (Considered
- -
- React manages the creation and updating of DOM nodes in your Web page.
- -
- All it does is dynamically render stuff into your DOM.
- What it doesn't do:
- Ajax
- Services
- Local Storage
- Provide a CSS framework
- React is unopinionated
- Just contains a few rules for developers to follow, and it just works.
- JSX : Javascript Extension is a language invented to help write React Applications (looks like a mixture of JS and HTML)
- Here is an overview of the difference between rendering out vanilla JS to create elements, and JSX:
- This may seem like a lot of code but when you end up building many components, it becomes nice to put each of those functions/classes into their own files to organize your code. Using tools with React
- -
- React DevTools : New tool in your browser to see ow React is working in the browser
- -
- create-react-app : Extensible command-line tool to help generate standard React applications.
- Webpack : In between tool for dealing with the extra build step involved.
- HMR : (Hot Module Replacement) When you make changes to your source code the changes are delivered in real-time.
- -
- React Developers created something called Flux Architecture to moderate how their web page consumes and modifies data received from back-end API's.
- Choosing React
- -
- Basically, React is super important to learn and master.
React Concepts and Features
There are many benefits to using React over just Vanilla JavaScript.
- Modularity
- -
- To avoid the me
- -
- Easy to start
- -
- No specials tools are needed to use Basic React.
- -
- You can start working directly with createElement method in React.
- -
- Declarative Programming
- -
- React is declarative in nature, utilizing either it's built-in createElement method or the higher-level language known as JSX.
- -
- Reusability
- Create elements that can be re-used over and over. One-flow of data
- React apps are built as a combination of parent and child components.
- Parents can have one or more child components, all children have parents.
- Data is never passed from child to the parent.
- Virtual DOM : React provides a Virtual DOM that acts as an agent between the real DOM and the developer to help debug, maintain, and provide general use.
- Due to this usage, React handles web pages much more intelligently; making it one of the speediest Front End Libraries available.
ES6 Refresher
Exporting one item per file
- Use export default statement in ES6 to export an item. ES6
CommonJS (Equivalent)
Exporting multiple items per file
- Use just thw export keyword (without default) to export multiple items per file. ES6 (Better to export them individually like this, rather than bunching them all into an object)
CommonJS (Equivalent)
Importing with ES6 vs CommonJS
- Import statements in ES6 modules must always be at the top of the file, because all imports must occur before the rest of the file's code runs. ES6
CommonJS
Unnamed default imports
- You can name unnamed items exported with export default any name when you import them.
- Just remember if you use export instead of export default then your import is already named and cannot be renamed.
Aliasing imports
- Use as asterisk to import an entire module's contents.
- -
- Keep in mind you must use an as keyword to refer to it later.
- You can also name identically named functions or items from different files.
Browser support for ES6 Modules
- ES6 Modules can only be used when a JS file is specified as a module. <script type="module" src="./wallet.js"></script>
- -
- You can get browser support for ES6 modules by adding module into your script tag.
Notes
JSX In Depth
- Remember that JSX is just syntactic sugar for the built in React.createElement(component, props, ...children)
- -
- React Library must always be in
- -
- Use Dot Notation for JSX Type
- User-Defined Components Must Be Capitalized <Foo /> vs <div>
- Cannot use a general expression as the React element type. (Incorrect)
(Corrected)
Props in JSX
- Several ways to specify props in JSX.
- -
- Javascript Expressions as Props
- String Literals
- Props Default to "True"
- Spread Attributes
Children in JSX
- props.children : The content between opening and closing tag. JavaScript Expressions as Children
Functions as Children
- props.children works like any other prop, meaning it can pass any sort of data.
Booleans, Null, and Undefined Are Ignored
- false, null, undefined, and true are all valid children.
- -
- They will not render.
- You can use these to conditionally render items.
- In this example, the component will only render if showHeader evals to True.
- Note that certain falsy values such as zero will still be rendered by React, you can work around this by ensuring situations like the above eval. into a boolean.
- -
- In the times you want booleans to be rendered out, simply convert it into a string first.
Reconciliation
The Diffing Algorithm
- Diffing : When the state of a component changes React creates a new virtual DOM tree.
- -
- Elements of Different Types
- -
- Every time the root elements have different types, React tears down the old tree and builds the new tree from scratch.
- DOM Elements Of the Same Type
- When comparing two DOM elements of the same type, React keeps the same underlying DOM node and only updates the changes attributes.
- Component Elements Of The Same Type
- -
- When components update, instances will remain the same, so th
- -
- React will only update the props, to match the new element.
- -
- Recursing On Children
- -
- React will iterate both lists of children and generate a mutation whenever there's a
- -
- This is why we use keys.
- Makes it easier for React to match children in the original tree with children in the subsequent tree.
- Tradeoffs
- Important to remember that reconciliation algorithm is an implementation detail.
- Re-rendering only to apply the differences following the rules stated in the previous sections.
Typechecking With PropTypes

- As your application grows, you can use React's typechecking to catch bugs.
- -
- propTypes is a special property to run typechecking.
- -
- exports range of built in validators to ensure your received data is valid.
- propTypes is only checked in development mode.
Requiring Single Child
- Use PropTypes.element to specify only a single child can be passed to a component as children.
Default Prop Values
- Use defaultProps to assign default values for props.
Notes
React Router Introduction
- React Router is the answer for rendering different components for different pages.
- -
- A front-end library that allows you to control whi
- -
- Client-side Routing Getting started with ro
- -
- Install React Router with:
- -
- npm install — save react-rou
- -
- Import Browser Router from package.
- -
- import { BrowserRouter } from "react-ro
- -
- BrowserRouter is the primary component of the r
- -
- Wrap it around components.
- Creates a React Context that passes routing information down to all its descendant components.
- You can also use HashRouter, where it would generate a hash before the endpoint. Creating frontend routes
- React Router helps your app render specific components based on the URL.
- The most common component is <Route>
- Wrapped around another component, causing the comp. to only render if the a certain URL is matched.
- Props : path, component, exact, and [render]
- Browser Router can only have a single child component.
- The Browser Router wraps all routes within a parent div element.
- component
- -
- Indica
- -
- path
- -
- Indicate
- -
- exact
- -
- Tells route to not pattern match and only render a certain route exclusively to it's associated component.
- -
- render
- -
- Optional prop that takes in a function to be called.
- Causes extra work for React.
- Preferred for inline rendering of simple functional components.
- Difference between component and render is that component returns new JSX that be re-mounted, but render returns the JSX that will be mounted only once.
- // This inline rendering will work, but is unnecessarily slow. <Route path="/hello" component={() => <h1>Hello!</h1>} /> // This is the preferred way for inline rendering. <Route path="/hello" render={() => <h1>Hello!</h1>} />
- Also useful if you need to pass in specific props to a component.
- // `users` to be passed as a prop: const users = { 1: { name: "Andrew" }, 2: { name: "Raymond" }, }; <Route path="/users" render={() => <Users users={users} />} />;
Route path params
- Your component's props can hold information about URL's parameters.
- -
- Will match segments starting at : to the next /, ?, #.
- {...props} spreads out the router's props.
- -
- props.match.params is used to acce
- -
- Useful keys on the mat
- -
- isExact : boolean that tells you whether or not the URL exactly matches the path.
- url : the currentURL
- path : Route path it matched against (w/o wildcards)
- params : Matches for the individual wildcard segments.
Navigation
React Router Navigation
- Link, NavLink, Redirect, history props of React Router are used to help your user navigate routes. Adding links for navigation
- -
- Issues on-click navigation event to a route defined in app.
- Usage renders an anchor tag with a correctly set href attribute.
- Link takes two properties: to and onClick.
- -
- to : route location that
- -
- onClick : clickHandler.
- -
- NavLink works just l
- -
- Adds extra styling, when the path it links to matches the current path.
- -
- As it's name suggests, it is used to Nav Bars.
- -
- Takes three props:
- -
- activeClassName : allows you to set a CSS class name for styling. (default set to 'active')
- activeStyle : style object that is applied inline when it's to prop. matches the current URL.
- exact prop is a boolean that defaults to false; you can set it to true to apply requirement of an exact URL match.
- exact can also be used as a flag instead of a reg. property value.
- benefit of adding this is so that you don't trigger other matches. Switching between routes
- <Switch> : Component allows you to only render one route even if several match the current URL.
- You may nest as many routes as you wish but only the first match of the current URL will be rendered.
- Very useful if we want a default component to render if none of our routes match.
- DefaultComponent will only render if none of the other URLs match up.
- -
- <Redirect> : Helps redirect users.
- Only takes a single prop: to.
History
- History allows you to update the URL programmatically.
- -
- Contains two useful methods:
- -
- push : Adds a new URL to the end of the history stack.
- replace : Replaces the current URL on the history stack, so the back button won't take you to it.
Nested Routes
Why nested routes?
- Create routes that tunnel into main components vs getting rendered on the main page as it's own thing. What are nested routes?
Alt. version using props.match
- As you can see above, our end URL isn't even defined until we apply those flexible values in.
React Builds
- Build : Process of converting code into something that can actually execute or run on the target platform.
- -
- In regards to React, the minimum a build should do is convert JSX to something that browsers can understand.
- -
- Linting : Process of using a tool to analyze your code to catch common errors
- -
- Transpilation : Process of converting source code, like JS, from one version to another.
- -
- Minification : Process of removing all unnecessary characters in your code.
- -
- Bundling : Process of combining multiple code files into a single file.
- -
- Tree Shaking : Process of removing unused or dead code from your application before it's bundled. Configuration or code?
- Configuration allows developers to create build tasks by declaring either JSON, XML, or YAML without explicitly writing every step in the process.
- Coding or Scripting simply requires code. Babel and webpack (yes, that's intentionally a lowercase 'w')
- Babel : Code Transpiler that allows you to use all of the latest features and syntax wihtout worrying about what browsers support what.
- webpack : Allows developers to use JS modules w/o requiring users to use a browser that natively supports ES modules.
- Create React App uses webpack and Babel under the hood to build applications. The Create React App build process
- What happens when you run npm start:
- .env variables are loaded.
- list of browsers to support are checked.
- config'd HTTP port checked for availability.
- application compiler is configured and created.
- webpack-dev-starter is started
- webpack-dev-starter compiles app.
- index.html is loaded into browser
- file watcher is started to watch for changes. Ejecting
- There is a script in Create React App called eject that allows you to 'eject' your application and expose all the hidden stuff. Preparing to deploy a React application for production
- -
- Defining Env Variables
Configuring the supported browsers
- If you specify older browsers it will affect how your code get's transpiled. Creating a production build
- -
- Run npm run build to create a production build.
- Bundles React in production mode and optimizes the build for the best performance.
Notes
Introduction to React
- Simply a nice library that turns data into DOM.
- -
- Tree Diffing : Fast comparison and patching of data by comparing the current virtual DOM and new virtual DOM - updating only the pieces that change.
- It's just a tree with some fancy diffing
Create Element
From JavaScript To DOM
- The React.createElement function has the following form:
- Type : Type of element to create, i.e. a string for an HTML element or a reference to a function or class that is a React component.
- -
- Props : Object that contains data to render the element.
- -
- Children : Children of the elemet, as many as you want. Creating elements
- Our rendering goal:
- There are five tags to create:
- -
- One ul
- -
- Two li
- -
- Two a
- -
- There are certain attributes
- -
- Each li has a class (or className in React)
- Both a ele's have href attributes
- Also keep in mind the parent child relationships happening between the tags.
- ul is the parent of both li
- Each li has an a element as a child
- Each a has a text content child
Converting to virtual DOM
- After you set up your React.createElement, you use React.render to take the value returned from cE and a DOM node to insert into the conversion of the real DOM.
- JS Code => Virtual DOM => Real Dom Updates
- -
- If you call React.render a second or multiple times i
- -
- Components are pieces of reusable front-end pieces.
- Components should be Single Responsibility Principle compliant.
Create Element
React.createElement Demo
- Can import non-local dependencies with import 'package-link'
- Remember when importing modules from other files you have to denote the file type in the import statement. HTML Original
React Version
- Because class is a reserved keyword in JS, in React we can use className to assign a class to an element.
- -
- Remember the data tha
- -
- props : Properties;
- To handle certain values that are initially undefined, we can use defaultProps.
- You can change in the devTools Network tab the internet speed to check for values that may be undefined to hangle with defaultProps.
- -
- If we fetch multiple pieces of data, we can render many
- -
- You need to assign a unique key to each of the clues.
- We need to keep track of them individually so that React can easily refer to a specific one if there is an issue. clue => { key:clue.id, ...clue }
- Note: JSX is preferred over React.createElement;
Notes from Hello Programmer Exercise
- When you import modules from websites they must have CORs activated.
- -
- These import statements, import global variables.
- When we want to move our code into production we need to change the imports into the production minified versions.
- While we will never actually be creating full apps with just React.createElement => it is the enginer that is running under the hood!
Introduction to JSX
- JSX : Javascript Extension, a new language created by React developers to have an easier way of interacting with the React API. How to use JSX
- -
- We will use babel to convert version of modern JS into an older version of JS. React Create Element
JSX Version
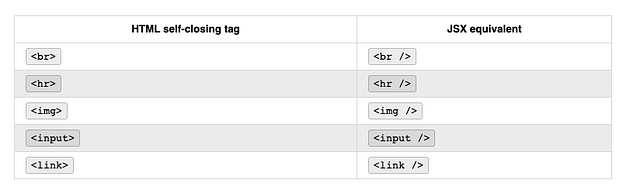
- Keep in mind that self closing tags in React must have a forward slash to close it.
- Properties and Data
- Comments in JSX have the following syntax:
- Property Names:
- -
- checked : Attribute of input components su
- -
- className : Used to specify a CSS class.
- -
- dangerouslySetInnerHTML : React's equivalent of innerHTML because it is risky to
- -
- htmlFor : Because for is protected keyword, React elements use this instead.
- onChange : Event fired whenever a form field is changed.
- style : Accepts a JS object with camelCase properties rather than a CSS string.
- value : Supported by Input, Select, and TextArea components; use it to set the value of the component.
- Note: React uses camel-case!!! The JSX semicolon gotcha
create Element equivalent
- We wrap what want to return in parenthesis so JS doesn't auto add semi-colons after every line and run the code incorrectly.
- -
- Just remember if you decided to use the return keyword in a function to 'return some JSX', then make sure you wrap the JSX in parenthesis.
npx create-react-app my-app
- Single line used to initiate a React application.
- -
- React has a great toolchain where you can see changes live as you
- -
- React errors will be rendered directly onto the browser window.
- A downside is that it installs a lot of bloat files.
- Examples of React create Element and JSX equivalent
More Complex JSX Example
Notes
Using Custom CRA Templates
Using a Custom Template npx create-react-app my-app --template @appacademy/simple
- Keep in mind that using create-react-app automatically initializes a git repository for you!
- -
- App Academy custom template for creating a react app.
- -
- If using the
- -
- favicon.ico
- -
- robots.txt
- logo192.png
- logo512.png
- manifest.json
- You can also simplify the html file into:
Simplifying the src folder
- Remove: App.css App.test.js logo.svg serviceWorker.js setupTests.js
- -
- Update the Following Files:
React Class Components
Class Components
- You can write React components using ES2015 Classes: Function Component
ES2015 Version
- We can access props within a class component by using this.props
- -
- Keep in mind Class Components are used just like function components.
Setting and accessing props
- If we define a constructor method in our Class Component, we have to define the super method with props passed through it.
- -
- Side Note: Before React used ES2015 Classes, it used React.createclass function, if you ever need to use this antiquated method make sure you install a module cal
- -
- One of the major reasons why you would choose to use a Class Component over a
- -
- Second of the major reasons is to be able to use a
- -
- Props are data that are provided by the consumer o
- -
- Not meant to be changed by a component.
- -
- State is data that is internal to the component.
- -
- Intended to be updated or mutated. When to use state
- Only Use State when it is absolutely necessary
- If the data never changes, or if it's needed through an entire application use props instead.
- State is more often used when creating components that retrieve data from APIs or render forms.
- The general rule of thumb: If a component doesn't need to use state or lifecyle methods, it should be prioritized as a function component.
- Functional:Stateless || Class:Stateful Initializing state
- Use a class constructor method to initialize this.state object. // Application Entry Point
// Class Component: RandomQuote
Updating State
- Let's say we want to update our state with a new quote.
- -
- We can set up event listeners in React similarly to how we did them before.
- -
- <button type="button" onClick={this.changeQuote}
- -
- onClick is the event listener.
- {this.changeQuote} is the event handler method.
- Our Class Component File should now look like this with the new additions:
Don't modify state directly
- It is important to never modify your state directly!
- -
- ALWAYS use this.setState method to update state.
- -
- This is because when you only use this.state to re-assign, no re-rendering will occur => leaving our component out of sync. Properly updating state from the previ
- -
- In our current example, the way we have changeQuote set up leaves us with occasionally producing the same index twice in a row.
- One solution is to design a loop but keep in mind that state updates are handled asynchronously in React (your current value is not guaranteed to be the latest)
- A safe method is to pass an anonymous method to this.setState (instead of an object literal) Previous
Passing w/ Anon Method
Providing default values for props
- In our current example, we pass in a static array of predefined quotes in our constructor.
- -
- The way it is set up right now leaves our list of quotes unchanged after initialization.
- -
- We can make quotes more dynamic by replacing our static array with a props argument passed into super.
- constructor(props) { super(props); }
- We can now move our quotes array to our application entry point and pass it in as a prop. // Application Entry Point
- One thing to note about this workaround is that the caller of the component must set the quotes prop or the component will throw an error => so use defaultProps!
- A good safety net in case the consumer/caller doesn't provide a value for the quotes array.
- -
- We can even remove it from our index.js now and an error will not be thrown.
Handling Events


- To add an event listener to an element, just define a method to handle the event and associate that method with the element event you are listening for. Example
- Note that when refering the handler method in onClick we're not invoking showAlert simply just passing a reference. Preventing default behavior
- -
- HTML Elements in the browser often have a lot of default behavior.
- -
- I.E. Clicking on an <a> element navigates so a resource denoted by <href> property.
- Here is an example of where using e.preventDefault() could come in handy.
- The button contained within the form will end up refreshing the page before this.submitForm method can be completed.
- -
- We can stick an e.preventDefault() into the actual method to get around this problem.
- e : Parameter that references a Synthetic Event object type. Using this in event handlers
- When we console log this we see the AlertButton object.
- -
- If we were to write the showAlert method with a regular class method like:
- We would get undefined => remember that fat arrow binds to the current context! Reviewing class methods and the this keyword
- -
- Let's refresh on binding.
- The first time we use our displayMethod call, it is called directly on the instance of the boyfriend class, which is why Momato Riruru was printed out.
- -
- The second time it was called, the ref of the method is
- -
- Remember we can use the bind method to rebind context!
- -
- We can refactor to get the second call working like this:
- const displayAgain = Ming.displayName.bind(Ming); displayAgain(); // => Now Momato Riruru will be printed out.
- To continue using function declarations vs fat arrow we can assign context in a constructor within a class component.
- Experimental Syntax : Syntax that has been proposed to add to ECMAScript but hasn't officially been added to the language specification yet.
- -
- It's good to pick one approach and use it consistently, either:
- Class Properties & Arrow Functions
- Bind Method & This Keyword The SyntheticEvent object
- Synthetic Event Objects: Cross Browser wrappeds around the browser's native event.
- -
- Includes the use of stopPropagation() and preventDefault();
- -
- Attributes of the Synthetic Event Object:Attributesboolean bubblesboolean cancelableDOMEventTarget currentTargetboolean defaultPreventednumber eventPhaseboolean isTrustedDOMEvent nativeEventvoid preventDefault()boolean isDefaultPrevented()void stopPropagation()boolean isPropagationStopped()void persist()DOMEventTarget targetnumber timeStampstring type
- nativeEvent : property defined in a synthetic event object that gives you access to the underlying native browser event (rarely used!)
Forms in React
Exercise being done in a separate file Random Notes
- onChange : detects when a value of an input element changes.
- -
- Assigning onChange to our input fields makes our component's state update in real time during user input.
- -
- Dont forget to add prev
- -
- submittedOn: new Date(), Can be added to a form, most likely will persist into a DB.
- -
- Controlled Components
- We use the onChange event handlers on form fields to keep our component's state as the "one source of truth"
- Adding an onChange event handler to every single input can massively bloat your code.
- Try assiging it to it's own method to apply everywhere.
- textarea is handled differently in react: it takes in a value property to handle what the inner text will be.
- We can use validation libraries like validate to make our validation functions more complex.
Note About Client-side vs server-side validation
- Server-side validation is not optional.
- -
- Tech-savvy users can manipulate client-side validations.
- Sometimes the 'best approach' is to skip implementing validations on the client-side and rely completely on the server-side validation.
Component Lifecycle
- Component Lifecycle is simply a way of describing the key moments in the lifetime of a component.
- Loading (Mounting)
- Updating
- Unloading (Unmounting) The lifecycle of a React component
- Each Class Component has several lifecycle methods that you can add to run code at specific times.
- -
- componentDidMount : Method called after your component has been added to th
- -
- componentDidUpdate : Method called after your component has been updated.
- componentWillUnmount : Method called just before your component is removed from the component tree.
- Mounting
- constructor method is called
- render method is called
- React updates the DOM
- componentDidMount is called
- Updating
- -
- When component receives new props
- render method is called
- React updates the DOM
- componentDidUpdate is called
- When setState is called
- render method is called
- React updates the DOM
- componentDidUpdate is called
- Unmounting
- -
- The moment before a class component is removed from the component tree:
- -
- componentDidMount will be c
- -
- Occasionally you will encoun
- -
- UNSAFE_componentW
- -
- UNSAFE_componentWillReceiveProps
- UNSAFE_componentWillUpdate
- Just know they will be removed soon from React's API, peace. Using the class component lifecycle methods Exercise done in sep. directory
- Assorted Notes:
- Common Use for componentDidMount lifecycle method is for fetching data from an API.
—
Notes
React Context
- You can use React Context to pass data through a component tree without having to manually thread props.
- -
- Convenient way to share & update global data. Creating a Context
- We use React.createContext to create context.
- -
- Keep in mind if you invoke this method with aruguments, those arguments will be set as default co
- -
- In order to pass context over to child components we need to wrap them in a provider component.
- The provider component takes in a value property that points to the information that needs to be passed to the children.
Setting up a Consumer
- Keep in mind that Context.Consumer expects a function as a child.
- -
- The function has a value prop passed in from Context.Provider
Notes
Redux Explained
- JS Framework for managing the frontend state of a web application.
- -
- Gives u
- -
- Redux
- -
- Client Side Data Mana
- -
- Controls "Frontend State"
- NOT Your Database
- NOT Component State
- Just used for managing Data
- Visual of how an app without React manages it's data.
- -
- A lot of prop threading happening.
- -
- Data stored in a sep. loca
- -
- Store
- -
- Holds the Frontend State
- -
- Provides an
- -
- Action
- POJOs
- Outline Changes to Frontend State
- Reducers
- Functions
- Make Changes to Frontend State Where did Redux come from?
- There are three central philosophies of Redux:
- A Single Source of Truth : state is stored in a POJO
- State is Read Only : State is immutable, modified by dispatching actions.
- Changes are Made with Pure Functions : Reducers that receive the actions and return updated state are pure functions of the old state and action. When is it appropriate to use Redux?
- When doing a project with simpler global state requirements, it may be better to choose React's Context API over Redux.
- -
- Redux o
- -
- State
- -
- _Redux
- -
- State is all the information stored by that program at a particular point i
- -
- Redux's m
- -
- Store
- -
- Redux stores state in a single store.
- -
- Redux store is a single JS object wit
- -
- Methods include: getState, dispatch(action), and s
- -
- Actions
- -
- _Redux store is updated by dispatching
- -
- Action is ju
- -
- Contain info to update the store.
- -
- We dispatch actions in res
- -
- Pure Functions
- -
- Redux Reducers are Pure Functions
- -
- Functions are pure when their behavior depends only on it's arguments as has no side effects.
- Simply takes in an argument and outputs a value.
- Reducer
- Redux handles actions using reducers
- A function that is called each time an action is dispatched.
- Takes in an action and current state
- Required to be pure functions so their behavior is predictable.
- Middleware
- Customize response to dispatch actions by using Middleware
- Middleware is an optional component of Redus that allows custom responses to dispatched actions.
- Most common use is to dispatch async requests to a server.
- Time Traveling Dev Tools
- Redux can time travel wow
- Time travel refers to Redux's ability to revert to a previous state because reducers are all pure functions.
- Thunks
- Convenient format for taking async actions in Redux
- General concept in CS referring to a function who's primary purpose is to call another function.
- Most commonly used to make async API requests.
Flux and Redux
What is Flux?
- Front-end application architecutre.
- -
- A pattern in which to structure an application.
- -
- Unidirectional Data Flow — offers more predictability.
- -
- Actions : Begins the data flow of data, simple object that contains a type; type indicates the type of change to be performed.
- Dispatcher : Mechanism for distributing actions to the store.
- Store : The entire state of the application, responsible for updating the state of your app.
- View : Unit of code that's responsible for rendering the user interface. Used to re-render the application when actions and changes occur.
- Redux
- Library that facilitates the implementation of Flux.
- -
- Redux Three Principles
- -
- Single Source of Truth
- State is Read-Only
- Only Pure Functions Change State
Store
- Simply an object that holds the application state wrapped in an API.
- -
- Three methods:
- -
- getState() : Returns the store's current state.
- dispatch(action) : Passes an action into the store's reducer to tell it what info to update.
- subscribe(callback) : Registers a callback to be triggered whenever the store updates. Updating the Store
Subscribing to the store
- Whenever a store process a dispatch(), it triggers all its subscribers.
- -
- Subscribers : callbacks that can be added to the store via subscribe().
Reviewing a simple example
Reducers
- Reducer function receives the current state and action, updates the state appropriately based on the action.type and returns the following state.
- -
- You can bundles different action types and ensuing logic by using a switch/case statement.
Reviewing how Array#slice works
- Approach that can be used to remove an element without mutating the original array. Avoiding state mutations
- -
- Your reducer must always return a new object if the state changes. GOOD
BAD
Actions
- Actions are the only way to trigger changes to the store's state. Using action creators
- fruit is the payload key and orange is the state data
- -
- Action Creators : Functions created from extrapolating the creation of an action object.
- Use parenthesis for implicit return value.
- -
- We can now add whatever fruit we'd like.
Preventing typos in action type string literals
- Using constant variables helps reduce simple typos in a reducer's case clauses.
Debugging Arrow Functions
- It is important to learn how to use debugger statements with arrow functions to effectively debug Redux cycle. Understanding the limitations of implicit return values
- You must use explicit return statement arrow function to use a debugger.
React Router Introduction
Now that you know how to render components in a React app, how do you handle rendering different components for different website pages? React Router is the answer!
Think of how you have created server-side routes in Express. Take the following URL and server-side route. Notice how the /users/:userId path corresponds with the http://localhost:3000/users/2 URL to render a specific HTML page.
In the default React setup, you lose the ability to create routes in the same manner as in Express. This is what React Router aims to solve!
React Router is a frontend routing library that allows you to control which components to display using the browser location. A user can also copy and paste a URL and email it to a friend or link to it from their own website.
When you finish this article, you should be able to use the following from the react-router-dom library:
- <BrowserRouter> to provide your application access to the react-router-dom library; and
- -
- <Route> to connect specific URL paths to specific components you want rendered; and
- -
- <Switch> to wrap several Route elements, rendering only one even if several match the current URL; and
- React Router's match prop to access route path parameters.
Getting started with routing
Since you are writing single page apps, you don't want to refresh the page each time you change the browser location. Instead, you want to update the browser location and your app's response using JavaScript. This is known as client-side routing. You are using React, so you will use React Router to do this.
Create a simple react project template:
Then install React Router:
Now import BrowserRouter from react-router-dom in your entry file:
BrowserRouter
BrowserRouter is the primary component of the router that wraps your route hierarchy. It creates a React context that passes routing information down to all its descendent components. For example, if you want to give <App> and all its children components access to React Router, you would wrap <App> like so:
Now you can route the rendering of certain components to certain URLs (i.e https://www.website.com/profile).
HashRouter
Alternatively, you could import and use HashRouter from react-router-dom. Links for applications that use <HashRouter> would look like https://www.website.com/#/profile (with an # between the domain and path).
You'll focus on using the <BrowserRouter>.
Creating frontend routes
React Router helps your React application render specific components based on the URL. The React Router component you'll use most often is <Route>.
The <Route> component is used to wrap another component, causing that component to only be rendered if a certain URL is matched. The behavior of the <Route> component is controlled by the following props: path, component, exact, and render (optional).
Create a simple Users component that returns <h1>This is the users index!</h1>. Now let's refactor your index.js file so that you can create your routes within the component:
Note that BrowserRouter can only have a single child component, so the snippet above wraps all routes within parent a <div> element. Now let's create some routes!
component
Begin with the component prop. This prop takes a reference to the component to be rendered. Let's render your App component:
Now you'll need to connect a path to the component!
path
The wrapped component will only be rendered when the path is matched. The path matches the URL when it matches some initial portion of the URL. For example, a path of / would match both of the following URLs: / and /users. (Because /users begins with a / it matches the path /)
Take a moment to navigate to http://localhost:3000/users to see how both the App component and Users component are rendering.
exact
If this exact flag is set, the path will only match when it exactly matches the URL. Then browsing to the /users path would no longer match / and only the Users component will be rendered (instead of both the App component and Users component).
render
This is an optional prop that takes in a function to be called. The function will be called when the path matches. The function's return value is rendered. You could also define a functional component inside the component prop, but this results in extra, unnecessary work for React. The render prop is preferred for inline rendering of simple functional components.
The difference between using component and render is that component returns new JSX to be re-mounted every time the route renders, while render simply returns to JSX what will be mounted once and re-rendered. For any given route, you should only use either the component prop, or the render prop. If both are supplied, only the component prop will be used.
It can be helpful to use render instead of component in your <Route> when you need to pass props into the rendered component. For example, imagine that you needed to pass the users object as a prop to your Users component. Then you could pass in props from Root to Users by returning the Users component like so:
As a reminder, BrowserRouter can only have a single child component. That's why you have wrapped all your routes within parent a <div> element.
With this Root component, you will always render the <h1>Hi, I'm Root!</h1>, regardless of the path. Because of the first <Route>, you will only render the App component if the path exactly matches /. Because of the second <Route>, you will only render the Users component if the path matches /users.
Route path params
A component's props can also hold information about a URL's parameters. The router will match route segments starting at : up to the next /, ?, or #. Those matched values are then passed to components via their props. Such segments are wildcard values that make up your route parameters.
For example, take the route below:
The router would break down the full /users/:userId/photos path to two parts: /users, :userId.
The Profile component's props would have access to the :userId part of the http://localhost:3000/users/:userId/photos URL through the props with router parameter information. You would access the the match prop's parameters (props.match.params). If you are using the render prop of the Route component, make sure to spread the props back into the component if you want it to know about the "match" parameters.
The params object would then have a property of userId which would hold the value of the :userId wildcard value. Let's render the userId parameter in a user profile component. Take a moment to create a Profile.js file with the following code:
Notice how it uses the match prop to access the :userId parameter from the URL. You can use this wildcard to make and AJAX call to fetch the user information from the database and render the return data in the Profile component. Recall that your Profile component was rendered at the path /users/:userId. Thus you can use your userId parameters from match.params to fetch a specific user:
Match
Now that you've seen your React Router's match prop in action, let's go over more about route props! React Router passes information to the components as route props, accessible to all components with access to the React Router. The three props it makes available are location, match and history. You've learned about props.match.params, but now let's review the other properties of the match prop!
This is an object that contains important information about how the current URL matches the route path. Here are some of the more useful keys on the match object:
- isExact: a boolean that tells you whether or not the URL exactly matches the path
- -
- url: the current URL
- -
- path: the route path it matched against (without wildcards filled in)
- params: the matches for the individual wildcard segments, nested under their names
When you use React Router, the browser location and history are a part of the state of your app. You can store information about which component should be displayed, which user profile you are currently viewing, or any other piece of state, in the browser location. You can then access that information from anywhere your Router props are passed to in your app.
Now that you've learned about parameters and route props, let's revisit your Root component to add an exact flag to your /users route so that it does not render with your /users/:userId route. Your component should look something like this:
What you learned
In this article, you learned how to:
- Use components from the React Router library; and
- -
- Create routes to render specific component
- -
- Manage the order of rendered routes; and
- Use the exact flag to ensure that a specific path renders a specific component; and
- Use the React Router match prop to access Router params.
React Router Navigation
Now that you know how to create front-end routes with React Router, you'll need to implement a way for your users to navigate the routes! This is what using React Router's Link, NavLink, Redirect, and history prop can help you do.
In this article, you'll be working off of the demo project you built in the React Router Intro reading. When you finish this article, you should be able to use the following components from the react-router-dom library:
- <Link> or <NavLink> to create links with absolute paths to routes in your application (like "/users/1"); and,
- -
- <Redirect> to redirect a user to another path (i.e. a login page when the user is not logged in); and
- React Router's history prop to update a browser's URL programmatically.
Adding links for navigation
React Router's <Link> is one way to simplify navigation around your app. It issues an on-click navigation event to a route defined in your app's router. Using <Link> renders an anchor tag with a correctly set href attribute.
Link
To use it, update your imports from the react-router-dom package to include Link:
Note that <Link> can take two props: to and onClick.
The to prop is a route location description that points to an absolute path, (i.e. /users). Add the following Link components in your index.js file above your routes:
The onClick prop is just like any other JSX click handler. You can write a function that takes in an event and handles it. Add the following Link before your routes and the following click handler function within your Root component:
Now, test your routes and links! If you inspect the page, you'll see that your links are now rendered as <a> elements. Notice that clicking the App with click handler link logs a message in your console while directing your browser to render the App component.
NavLink
The <NavLink> works just like a <Link>, but with a little extra functionality. It has the ability to add extra styling when the path it links to matches the current path. This makes it an ideal choice for a navigation bar, hence the name. This styling can be controlled by three extra props: activeClassName, activeStyle, and exact. To begin using NavLink, update your imports from the react-router-dom package:
The activeClassName prop of the NavLink component allows you to set a CSS class name for styling the NavLink when its route is active. By default, the activeClassName is already set to active. This means that you simply need to add an .active class to your CSS file to add active styling to your link. A NavLink will be active if its to prop path matches the current URL.
Let's change your "Users", "Hello", and "Andrew's Profile" links to be different colors and have a larger font size when active.
For example, this is what the rendered HTML <a> tag would look like when when the browser is navigated to the / path or the /users path:
Import NavLink into your index.js file and take a moment to update all your Link elements to NavLink elements. Set an activeClassName prop to an active class. Add the following .active class to your index.css file:
Test your styled links! Notice how the App and App with click handler links are always bolded. This is because all of your links include the / path, meaning that the link to / will be active when browsing to /users and /users/1 because of how users and users/1 are both prefaced by a /.
The activeStyle prop is a style object that will be applied inline to the NavLink when its to prop matches the current URL. Add the following activeStyle to your App link and comment out the .active class in your CSS file.
The following html is rendered when at the / path:
Notice how your App with click handler is not bolded anymore. This is because the default active class being applied does not have any CSS stylings set to the class. Uncomment your .active class in your CSS file to bring back bolding to this NavLink.
The exact prop is a boolean that defaults to false. If set to true, then the activeStyle and activeClassName props will only be applied when the current URL exactly matches the to prop. Update your App and App with click handler links with an exact prop set. Just like in your routes, you can use the exact flag instead of exact={true}.
Now your App and App with click handler links will only be bolded when you have navigated precisely to the / path.
Switching between routes
You came across styling issues when the /users and /users/1 paths matched the / path. Routing can have this issue as well. This is why you need to control the switching between routes.
React Router's <Switch> component allows you to only render one <Route> even if several match the current URL. You can nest as many Routes as you wish between the opening and closing Switch tags, but only the first one that matches the current URL will be rendered.
This is particularly useful if you want a default component that will only render if none of our other routes match. View the example below. Without the Switch, DefaultComponent would always render. Since there isn't set a path in the DefaultComponent route, it will simply use the default path of /. Now the DefaultComponent will only render when neither of the preceding routes match.
Import Switch from react-router-dom and add <Switch> tags around your routes to take care of ordering and switching between your routes! Begin by adding the following route to the bottom of your routes to render that a 404: Page not found message:
This is what your Root component should look like at this point:
Now you have control over the precedence of rendered components! Try navigating to http://localhost:3000/asdf or any other route you have not defined. The <h1>404: Page not found</h1> JSX of the last <Route> will be rendered whenever the browser attempts to visit an undefined route.
Redirecting users
But what if you want to redirect users to a login page when they aren't logged in? The <Redirect> component from React Router helps you redirect users!
The component takes only one prop: to. When it renders, it replaces the current URL with the value of its to prop. Typically you conditionally render <Redirect> to redirect the user away from some page you don't want them to visit. The example below checks whether there is a defined currentUser prop. If so, the <Route> will render the Home component. Otherwise, it will redirect the user to the /login path.
Note: you will learn how to use a more flexible auth pattern — don't directly imitate this example.
History
You know how to redirect users with a <Redirect> component, but what if you need to redirect users programmatically? You've learned about the React Router's match prop, but now let's go over another one of the route props: history!
This prop lets you update the URL programmatically. For example, suppose you want to push a new URL when the user clicks a button. It has two useful methods:
- push - This adds a new URL to the end of the history stack. That means that clicking the back button will take the browser to the previous URL. Note that pushing the same URL multiple times in a row will have no effect; the URL will still only show up on the stack once. In development mode, pushing the same URL twice in a row will generate a console warning. This warning is disabled in production mode.
- -
- replace - This replaces the current URL on the history stack, so the back button won't take you to it. For example:
What you learned
In this article, you learned how to:
- Create navigation links for your route paths; and
- -
- Redirect users through using the <Redirect> component; and
- Update a browser's URL programmatically by using React Router's history prop.
React Router Nested Routes


Now you know how to create front-end routes and add navigation with React Router. When initializing Express projects, you declare static routes. Static routes are routes that are declared when an application is initialized. When using React Router in your application's initialization, you can declare dynamic routes. React Router introduces dynamic routing, where your routes are created as your application is rendering. This allows you to create nested routes within components!
In this article, let's dive into nested routes! When you finish the article, you should:
- Describe what nested routes are; and
- -
- Be able to use React Router to create and navigate nested routes; and
- Know how to use the React Router match prop to generate links and routes.
Why nested routes?
Let's begin with why you might need nested routes. As you remember, you are using React to create a single-page application. This means that you'll be organizing your application into different components and sub-components.
For example, imagine creating a simple front-end application with three main pages: a home welcome page (path of /), a users index page (path of /users), and user profile pages (path of /users/:userId). Now imagine if every user had links to separate posts and photos pages.
You can create those routes and links within the user profile component, instead of creating the routes and links where the main routes are defined.
What are nested routes?
Now let's dive into a user profile component to understand what are nested routes! Imagine you have a route in your application's entry file to each user's profile like so:
This means that upon navigating to http://localhost:3000/users/1, you would render the following Profile component and the userId parameter within props.match.params would have the value of "1".
Since this route is not created until the Profile component is rendered, you are dynamically creating your nested /users/:userId/posts and /users/:userId/photos routes. Remember that your match prop also has other helpful properties. You can use match.url instead of /users/${id} in your profile links. You can also use match.path instead of /users/:userId in your profile routes. Remember that you can destructure url, path, and params from your match prop!
In tomorrow's project, you'll build a rainbow of routes as well as define nested routes. In the future, you may choose to implement nested routes to keep your application's routes organized within related components.
What you learned
In this article, you learned:
- What nested routes are; and
- -
- About creating and navigating nested routes with React Router; and
- How to use the React Router props to generate nested links and routes.
React Builds
A "build" is the process of converting code into something that can actually execute or run on the target platform. A "front-end build" is a process of preparing a front-end or client-side application for the browser.
With React applications, that means (at a minimum) converting JSX to something that browsers can actually understand. When using Create React App, the build process is automatically configured to do that and a lot more.
When you finish this article, you should be able to:
- Describe what front-end builds are and why they're needed;
- -
- Describe at a high level what happens in a Create React App when you run npm start; and
- Prepare to deploy a React application into a production environment.
Understanding front-end builds
The need for front-end builds predates React. Over the years, developers have found it helpful to extend the lowest common denominator version of JavaScript and CSS that they could use.
Sometimes developers extend JavaScript and CSS with something like TypeScript or Sass. Using these non-standard languages and syntaxes require you to use a build process to convert your code into standard JavaScript and CSS that can actually run in the browser.
Browser-based applications also require a fair amount of optimization to deliver the best, or at least acceptable, experience to end users. Front-end build processes could be configured to lint code, run unit tests, optimize images, minify and bundle code, and more — all automatically at the press of a button (i.e. running a command at the terminal).
JavaScript versions and the growth of front-end builds
Developers are generally an impatient lot. When new features are added to JavaScript, we don't like to wait for browsers to widely support those features before we start to use them in our code. And we really don't like when we have to support older, legacy versions of browsers.
In recent years, JavaScript has been updated on a yearly basis and browser vendors do a decent job of updating their browsers to support the new features as they're added to the language. Years ago though, there was an infamous delay between versions 5 and 6 of JavaScript. It took years before ES6 (or ES2015 as it eventually was renamed to) to officially be completed and even longer before browsers supported all of its features.
In the period of time before ES2015 was broadly supported by browsers, developers used front-end builds to convert or transpile ES2015 features and syntax to an older version of the language that was more broadly supported by browsers (typically ES5). The transpilation from ES2015/ES6 down to ES5 was one of the major drivers for developers to add front-end builds to their client-side projects.
Reviewing common terminology
When learning about front-end or React builds, you'll encounter a lot of terminology that you may or may not be familiar with. Here's some of the terminology that you'll likely encounter:
Linting is process of using a tool to analyze your code to catch common programming errors, bugs, stylistic inconsistencies, and suspicious coding patterns. ESLint is a popular JavaScript linting tool.
Transpilation is the process of converting source code, like JavaScript, from one version to another version. Usually this means converting newer versions of JavaScript, ES2019 or ES2021, to a version that's more widely supported by browsers, like ES2015, or even ES5 or ES3 (if you need to support the browser that your parents or grandparents use).
Minification is the process of removing all unnecessary characters in your code (e.g. white space characters, new line characters, comments) to produce an overall smaller file. Minification tools will often also rename identifers in your code (i.e. parameter and variable names) in the quest for smaller and smaller file sizes. Source maps can also be generated to allow debugging tools to cross reference between minified code and the original source code.
Bundling is the process of combining multiple code files into a single file. Creating a bundle (or a handful of bundles) reduces the number of requests that a client needs to make to the server.
Tree shaking is the process of removing unused (or dead) code from your application before it's bundled. Tree shaking external dependencies can sometimes have a dramatic positive impact on overall bundled file sizes.
Configuration or code?
Front-end build tools have come and gone over the years; sometimes very quickly, which helped bring about the phenomenon known as JavaScript fatigue.
Configuration based tools allow you to create your build tasks by declaring (usually using JSON, XML, or YAML) what you want to be done, without explicitly writing every step in the process. In contrast, coding or scripting based tools allow you to, well, write code to create your build tasks. Configuration based tools can sometimes feel simpler to use while giving up some control (at least initially) while coding based tools can feel more familiar and predictable (since you're describing tasks procedurally). Every generalization is false though (including this one), so there are plenty of exceptions.
Grunt is a JSON configuration based task runner that can be used to orchestrate the various tasks that make up your front-end build. Grunt was very quickly supplanted by Gulp, which allowed developers to write JavaScript to define front-end build tasks. After Gulp, the front-end tooling landscape became a bit more muddled. Some developers preferred the simplicity of using npm scripts to define build tasks while others preferred the power of configuration based bundlers like webpack.
Babel and webpack (yes, that's intentionally a lowercase 'w')
As front-end or client-side applications grew in complexity, developers found themselves wanting to leverage more advanced JavaScript features and newer syntax like classes, arrow functions, destructuring, async/await, etc. Using a code transpiler, like Babel, allows you to use all of the latest and greatest features and syntax without worrying about what browsers support what.
Module loaders and bundlers, like webpack, also allowed developers to use JavaScript modules without requiring users to use a browser that natively supports ES modules. Also, module bundling (along with minification and tree-shaking) helps to reduce the bandwidth that's required to deliver the assets for your application to the client.
[Create React App][cra] uses webpack (along with Babel) under the covers to build your React applications. Even if you're not using Create React App, webpack and Babel are still very popular choices for building React applications.
Pulling back the covers (a bit) on the Create React App build process
Running an application created by Create React App using npm start can feel magical. Some stuff happens in the terminal and your application opens into your default browser. Even better, when you make changes to your application, your changes will (usually) automatically appear in the browser!
The Create React App build process
At a high level, here's what happens when you run npm start:
- Environment variables are loaded (more about this in a bit);
- -
- The list of browsers to support are checked (more about this too in
- -
- The configured HTTP port is checked to ensure that it's available;
- -
- The application compiler is configured and created;
- -
- webpack-dev-server is started;
- webpack-dev-server compiles your application;
- The index.html file is loaded into the browser; and
- A file watcher is started to watch your files, waiting for changes.
Ejecting
Create React App provides a script that you can run to "eject" your application from the Create React App tooling. When you eject your application, all of the hidden stuff is exposed so that you can review and customize it.
The need to customize Create React App rarely happens. Also, don't eject an actual project as it's a one-way trip! Once a Create React App project has been ejected, there's no going back (though you could always undo the ejection process by reverting to an earlier commit if you're using source control).
To eject your application from Create React App, run the command npm run eject. You'll be prompted if you want to continue; type "y" to continue with the ejection process. Once the ejection process has completed, you can review the files that were previously hidden from you.
In the package.json file, you'll see the following npm scripts:
You can open the ./scripts/start.js file to see the code that's executed when you run npm start.
If you're curious about the webpack configuration, you can open and review the ./config/webpack.config.js.
Preparing to deploy a React application for production
Before you deploy your application to production, you'll want to make sure that you've replaced static values in your code with environment variables and considered what browsers you need to support.
Defining environment variables
Create React App supports defining environment variables in an .env file. To define an environment variable, add an .env file to your project and define one or more variables that start with the prefix REACTAPP\:
Environment variables can be used in code like this:
You can also reference environment variables in your index.html like this:
Important: Environment variables are embedded into your HTML, CSS, and JavaScript bundles during the build process. Because of this, it's very important to not store any secrets, like API keys, in your environment variables as anyone can view your bundled code in the browser by inspecting your files.
Configuring the supported browsers
In your project's package.json file, you can see the list of targeted browsers:
Adjusting these targets affect how your code will be transpiled. Specifying older browser versions will result in your code being transpiled to older versions of JavaScript in order to be compatible with the specified browser versions. The production list specifies the browsers to target when creating a production build and the development list specifics the browsers to target when running the application using npm start.
The browserl.ist website can be used to see the browsers supported by your configured browserslist.
Creating a production build
To create a production build, run the command npm run build. The production build process bundles React in production mode and optimizes the build for the best performance. When the command completes, you'll find your production ready files in the build folder.
Now your application is ready to be deployed!
For more information about how to deploy a Create React App project into production, see _[this page](https://facebook.github.io/create-react-app/docs/deployment) in the official documentation._
What you learned
In this article, you learned how to:
- Describe what front-end builds are and why they're needed;
- -
- Describe at a high level what happens in a Create React App when you run npm start; and
- Prepare to deploy a React application into a production environment.
React Router Documentation
Now that you've had an introduction to React Router, feel free to explore the official documentation to learn more! As you become a full-fledged software engineer, remember that documentation is your friend. You can take a brief overview for now, as the documentation might include a lot of information at first. The more you learn about React, the more you should revisit the official documentation and learn!
Setting up React Router
Routes and Links
Switch and Redirect
React Router Params (ownProps)
Rainbow Routes Project
Today you're going to get our first experience using React Router. The goal is to create a basic app that displays the colors of the rainbow. This rainbow, however, has something special about it — some of the colors are nested within others.
Phase 0: Setup
Begin by creating a new React project:
Now you'll remove all the contents of your src and all the contents from your public directory to build the application architecture from scratch! After you have deleted all your files within the directories, create a new index.html file in your public folder. Use the html:5 emmet shortcut to generate an HTML template. Title your page "Rainbow Routes" and create a div with an id of root in your DOM's <body> element. Create an index.css file in your src directory with the following code. Now let's create your entry file!
Create an index.js entry file in the src directory. At the top of the file, make sure to import React from the react package and ReactDOM from the react-dom package. Make sure to also import your the index.css file you just created! This will take care of styling your rainbow routes.
Now you can use the ReactDOM.render() method to render a <Root /> component instead of the DOM element with an id of root. Lastly, wrap your render function with a DOMContentLoaded event listener, like so:
Let's create your Root component right in your entry file! Your Root component will take care of applying your BrowserRouter to the application. Applying the BrowserRouter to your Root component allows all the child components rendering within <BrowserRouter> tags to use and access the Route, Link, and NavLink components within the react-router-dom package.
Install the react-router-dom package:
Now import BrowserRouter from the react-router-dom package, like so:
You're going to be rendering a lot of components, so let's keep your src directory organized by creating a components directory within. Within your new ./src/components directory, create a Rainbow.js file for your Rainbow component with the following code:
Your Rainbow component will act as the home page or default path (/) of your application. Import the Rainbow component into your entry file and have your Root component render <Rainbow /> wrapped within <BrowserRouter> tags, like so:
Within your Rainbow component, you'll be rendering <NavLink> and <Route> components to add different navigation paths to different components. Let's create all the components you will render!
Create files for the following components in your ./src/components directory:
- Red
- -
- Blue
- -
- Green
- -
- Indigo
- Orange
- Violet
- Yellow
Your Red and Blue components will look something like this:
Your Green, Indigo, Orange, Violet, and Yellow components will look something like this:
Now start your server and verify you can see the "Rainbow Router!" header from your Rainbow component. Currently there is no functionality. Let's fix that!
Phase 1: Routes
As a reminder, wrapping the Rainbow component in <BrowserRouter> tags makes the router available to all descendent React Router components. Now open the Rainbow.js file. You're going to render some of your color components from here. Ultimately you want your routes to look like this.
URLComponents/Rainbow/redRainbow -> Red/red/orangeRainbow -> Red -> Orange/red/yellowRainbow -> Red -> Yellow/greenRainbow -> Green/blueRainbow -> Blue/blue/indigoRainbow -> Blue -> Indigo/violetRainbow -> Violet
This means that the Red, Green, Blue, and Violet components need to render in the Rainbow component, but only when you are at the corresponding URL. You'll do this with Route components. Begin by importing the Red, Green, Blue, and Violet components into your Rainbow.js file. Then add the necessary Route components inside the div with id="rainbow" in the Rainbow component. For example to render the Red component with the /red path, you would use the following Route component:
Test that your code works! Manually type in each URL you just created, and you should see the color component pop up. Remember, these are React Routes, so the paths you created will come after the /. For example, your default rainbow route will look like http://localhost:3000/ while your red route will look like http://localhost:3000/red.
You want to nest the Orange and Yellow components inside the Red component, and the Indigo component inside the Blue component. Remember to import your components to use them in a Route tag. You'll have to go add the corresponding Route tags to the Red.js and Blue.js files. Make sure to use the correct nested paths, such as "/red/orange" for the orange Route.
Phase 2: Links
Manually navigating to our newly created routes is tiresome, so let's add functionality to take care of this process for us. React Router provides the Link and NavLink components for this purpose.
Add Links to the paths /red, /green, /blue, and /violet in the Rainbow component. For example, your red link should look like
When you are at blue you want to be able to get to /blue/indigo, and then back to /blue. Add the corresponding Links to the Blue component like this:
Similarly, add Links to /red, /red/orange and /red/yellow to the Red component. Test all your links. Navigation is so much easier now!
Phase 3: NavLinks
It would be nice if our links gave us some indication of which route you were at. Fortunately, React Router has a special component for that very purpose: NavLink. NavLinks get an extra CSS class when their to prop matches the current URL. By default this class is called active.
Go ahead and switch all your Links to NavLinks. If you open the app you won't see any change yet. That's because you haven't added any special styling to the active class. Go ahead and open the index.css file. Create an .active class and add the line font-weight: 700. Now your active links will be bold. Isn't that nice!
The only problem is that now the Blue only link is active even when the path is /blue/indigo. That doesn't make a lot of sense. Let's add the exact flag to that link so it will only be active when its to exactly matches the current path. Now it should look like:
Do the same for the Red only link. Everything should be working now.
Phase 4 — Changing NavLink's Active Class
You've already set up NavLink to bold the link text using the .active class in src/index.css. But what if you wanted this class to be something else? For instance, what if you want your main color links (Red, Green, Blue, Violet) to be styled differently when active than your sub-route links (Red Only, Add Orange, Add Yellow, etc.).
You can set the class that React Router sets to an active NavLink by adding the activeClassName prop.
For instance, when we are at a route matching the below NavLink's to prop, the component will have a class of .parent-active applied:
This allows much more flexibility to style an active NavLink!
Using the example above, add an activeClassName prop to each of your NavLinks in src/components/Rainbow.js. Now, add some CSS styling for that class in your src/index.css to distinguish your main and your sub-route links.
Compare your work to the solution and make sure the behavior is the same. Time to celebrate! ✨ 🌈 ✨
You can also learn more about using the React Router at reacttraining.com!
Exploring React Builds Project
In this project, you'll use Create React App to create a simple React application. You'll experiment with some of the features that Create React App provides and deploy a production build of your application to a standalone Express application.
Phase 0: Setup
Begin by using the create-react-app package to create a React application:
Remember that using the create-react-app command initializes your project as a Git repository. If you use the ls -a to view the hidden files in your project, you'll see the .git file.
Update the App component:
- Wrap the <h1> element with a <div> element; and
- -
- Change the <h1> element content to something like "Exploring React Builds".
Phase 1: Using CSS modules
You've already seen an example of using the import keyword to import a stylesheet into a module so that it'll be included in your application build. That's the technique being used to include the global index.css stylesheet:
You can also leverage CSS modules in your Create React App projects. CSS Modules scope stylesheet class names so that they are unique to a specific React component. This allows you to create class names without having to worry if they might collide with class names used in another component.
Add a new css-modules folder to the src folder. Within that folder, add the following files:
- HeadingA.js
- -
- HeadingA.modu
- -
- HeadingB.js
- HeadingB.module.css
Then update the contents of each file to the following:
Notice how the .heading CSS class name is being used within each component to set the color of the <h1> element. For the HeadingA component, the color is green, and for the HeadingB component, the color is red. Using the file naming convention [name].module.css let's Create React App know that we want these stylesheets to be processed as CSS Modules. Using CSS Modules allows the .heading class name to be reused across components without any issue.
To see this feature in action, update your App component to render both of your new components:
Then run your application (npm start) to see "Heading A" and "Heading B" displayed respectively in green and red. If you use the browser's developer tools to inspect "Heading A", you'll see that the .heading class name has been modified so that it's unique to the HeadingA component:
CSS Modules is an example of how a front-end build process can be used to modify code to enable a feature that's not natively supported by browsers.
Phase 2: Using an image in a component
Create React App configures webpack with support for loading images (as well as CSS, fonts, and other file types). What this means, for you as the developer, is that you can add an image file to your project, import it directly into a module, and render it in a React component.
Download any image of off the Web or click here to download the below image.
Then within the src folder add a new folder named image. Within that folder add a new component file named Image.js. Also add your downloaded image file to the image folder (so it's a sibling to the Image.js file).
Update the contents of the Image.js file to this:
You can import an image into a component using the import keyword. This tells webpack to include the image in the build. Notice that when you import an image into a module, you'll get a path to the image's location within the build. You can use this path to set the src attribute on an <img> element.
Be sure to update the image import statement to the correct file name if you're using your own image!
Now update the App component to import and render the Image component:
If you run your application (npm start) you'll see your image displayed on the page! You can also open your browser's developer tools and view the "Sources" for the current page. If you can expand the localhost:3000 > static > media node on the left, you can see the image file that webpack copied to your build.
Images in stylesheets
You can also reference images in your CSS files too. Add a CSS file named Image.css to the ./src/image folder and update its contents to this:
Then update the Image component to this:
Now you'll see the image displayed twice on the page!
Phase 3: Updating the supported browsers (and its affect on code transpilation)
Earlier you learned about the browerslist setting in the package.json file and now adjusting these targets affect how your code will be transpiled:
The production list specifies the browsers to target when creating a production build and the development list specifics the browsers to target when running the application using npm start. Currently, you're targeting relatively recent versions of the major browsers when creating a development build. Targeting older browser versions results in your code being transpiled to an older version of JavaScript.
To experiment with this configuration option, let's add a class component to the project. Add a new folder named class-component to the src folder. Within that folder, add a file named ClassComponent.js containing the following code:
Don't forget to update your App component to render the new component:
Now run your application using npm start. Open your browser's developer tools and view the "Sources" for the current page. Expand the localhost:3000 > static > js node on the left and select the main.chunk.js file. Press CMD+F on macOS or CTRL+F on Windows to search the file for "Class Component". Here's what the transpiled code looks like for the ClassComponent class:
Have you wondered yet why you need to use the developer tools to view the bundles generated by Create React App? Remember that when you run npm start, Create React App builds your application using _[webpack-dev-server](https://webpack.js.org/configuration/dev-server/). To keep things as performant as possible, the bundles generated by [webpack-dev-server](https://webpack.js.org/configuration/dev-server/) are stored in memory instead of writing them to the file system._
The JSX in the component's render method has been converted to JavaScript but the ClassComponent ES2015 class is left alone. This makes sense though as JSX isn't natively supported by any browser while ES2015 classes have been natively supported by browsers for awhile now.
But what if you need to target a version of a browser that doesn't support ES2015 classes? You can use the "Can I use…" website to see when browsers started supporting ES2105 (or ES6) classes. Starting with version 49, Chrome natively supported classes. But imagine that you need to support Chrome going back to version 30, a version of Chrome that doesn't support classes.
Change the browserslist.development property in the package.json file to this:
The query chrome >= 30 specifies that you want to target Chrome version 30 or newer.
The _[browserl.ist](https://browserl.ist/) website can be used to see the browsers supported by your configured browserslist._
Stop your application if it's currently running. Delete the ./node_modules/.cache folder and run npm start again. Then view the main.chunk.js bundle again in the developer tools:
Now your ES2015 class component is being converted to a constructor function! Here's the transpiled code for reference:
Luckily it's very rare that you'll need to read the code in your generated bundles. webpack, by default, is configured to generate sourcemaps. Sourcemaps are a mapping of the code in a generated file, like a bundle file, to the original source code. This gives you access to your original source code in the browser's developer tools:
You can even set a breakpoint in your source within the developer tools to stop execution on a specific line of code!
Phase 4: Adding environment variables
Earlier you learned that Create React App supports defining environment variables in an .env file. This gives you a convenient way to avoid hard coding values that vary across environments.
Let's experiment with this feature so that you can see how the Create React App build process embeds environment variables into your HTML, CSS, and JavaScript bundles.
Add an .env file to the root of your Create React App project. Define an environment variable named REACTAPPTITLE:
Remember that environment variables need to be prefixed with REACTAPP for Create React App to process them. After defining your environment variable, you can refer to it within JSX using an expression and process.env:
Environment variables can also be referred to in regular JavaScript code:
You can also reference environment variables in your ./public/index.html file like this:
Run your application again using npm start. Open your browser's developer tools and view the "Sources" for the current page. Expand the localhost:3000 node on the left and select (index). Notice that the text %REACTAPPTITLE% within the <title> element has been converted to the text literal Exploring React Builds:
If you expand the localhost:3000 > static > js node on the left and select the main.chunk.js file, you can see how the App component's JSX has been converted to JavaScript:
Here's a closer look at the relevant React.createElement method call:
Again, notice how the environment variable has been replaced with a text literal. This has important security implications for you to consider. Because environment variables are embedded into your HTML, CSS, and JavaScript bundles during the build process, it's very important to not store any secrets, like API keys, in your environment variables. Remember, anyone can view your bundled code in the browser by inspecting your files!
Phase 5: Deploying a production build
In the last phase of this project, let's add routing to the React application, create a production build, and deploy the build to an Express application!
Adding routing
To add React Router to the application, start by installing the react-router-dom npm package:
Then update the App component to this code:
Be sure to run and test your application to ensure that the defined routes work as expected:
- / - Should display the HeadingA and HeadingB components;
- -
- /image - Should display the Image component; and
- /class-component - Should display the ClassComponent component.
Creating a production build
To create a production build, run the command npm run build from the root of your project. The output in the terminal should look something like this:
Ignore the comments about using serve to deploy your application (i.e. npm install -g serve and serve -s build). In the next step, you'll create a simple Express application to server your React application.
Serving a React application using Express
Create a new folder for your Express application outside of the Create React App project folder.
For example, from the root of your project, use cd .. to go up a level and then create a new folder named express-server by running the command mkdir express-server. This makes the express-server folder a sibling to your Create React App project folder.
Browse into the express-server folder and initialize it to use npm (i.e. npm init -y). Then install Express by running the command npm install express@^4.0.0.
App a file named app.js with the following contents:
This simple Express application will:
- Attempt to match incoming requests to static files located in the public folder; and
- -
- If a matching static file isn't found, then the ./public/index.html file will be served for all other requests.
Now add a folder named public to the root of your Express project. Copy the files from the build folder in your Create React App project to the public folder in the Express application project. Then run your application using the command node app.js.
Open a browser and browse to the URL http://localhost:9000/. You should see your React application served from your Express application! Be sure to click the navigation links to verify that all of your configured routes work as expected.
Also, because you configured Express to serve the ./public/index.html file for any request that doesn't match a static file, you can "deep link" to any of your React application's routes:
A Comprehensive Deep Dive into React
An in-depth look into the world of React.
React in Depth: A Comprehensive Guide
A deep dive into the world of React.

bryanguner.medium.com
Random Things to Remember
- Using
()implictly returns components. - Role of
index.jsis to render your application. - The reference to
rootcomes from a div in the body of your public HTML file. - State of a component is simply a regular JS Object.
- Class Components require
render()method to return JSX. - Functional Components directly return JSX.
ClassisclassNamein React.- When parsing for an integer just chain
Number.parseInt("123") - Use ternary operator if you want to make a conditional inside a fragment.
{ x === y ? <div>Naisu</div> : <div>Not Naisu</div>; }- Purpose of
React.Fragmentis to allow you to create groups of children without adding an extra dom element.
Front-End History
- React makes it easier for you to make front-end elements. A front-end timeline
- Some noteworthy front end libraries that have been used in the past few years:
- 2005: Script.aculo.us
- 2005: Dojo
- 2006: YUI
- 2010: Knockout
- 2011: AngularJS
- 2012: Elm
- 2013: React (Considered the standard front-end library)
- React manages the creation and updating of DOM nodes in your Web page.
- All it does is dynamically render stuff into your DOM.
- What it doesn't do:
- Ajax
- Services
- Local Storage
- Provide a CSS framework
- React is unopinionated
- Just contains a few rules for developers to follow, and it just works.
- JSX : Javascript Extension is a language invented to help write React Applications (looks like a mixture of JS and HTML)
- Here is an overview of the difference between rendering out vanilla JS to create elements, and JSX:
fetch("https://example.com/api/people")
  .then((response) => response.json())
  .then((people) => {
    const html = "<ul>";
    for (let person of data.people) {
      html += `<li>${person.lastName}, ${person.firstName}</li>`;
    }
    html += "</ul>";
    document.querySelector("#people-list").innerHTML = html;
  });

function PeopleList(props) {
  return (
    <ul>
      $
      {props.people.map((person) => (
        <li>
          {person.lastName}, {person.firstName}
        </li>
      ))}
    </ul>
  );
}
const peopleListElement = document.querySelector("#people-list");
fetch("https://example.com/api/people")
  .then((response) => response.json())
  .then((people) => {
    const props = { people };
    ReactDOM.render(<PeopleList props={props} />, peopleListElement);
});- This may seem like a lot of code but when you end up building many components, it becomes nice to put each of those functions/classes into their own files to organize your code. Using tools with React
React DevTools: New tool in your browser to see ow React is working in the browsercreate-react-app: Extensible command-line tool to help generate standard React applications.Webpack: In between tool for dealing with the extra build step involved.
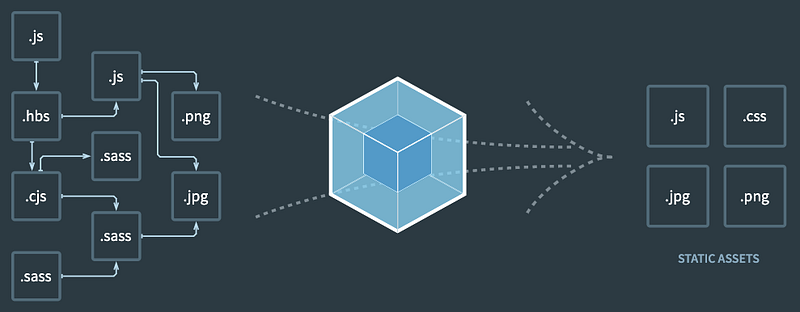
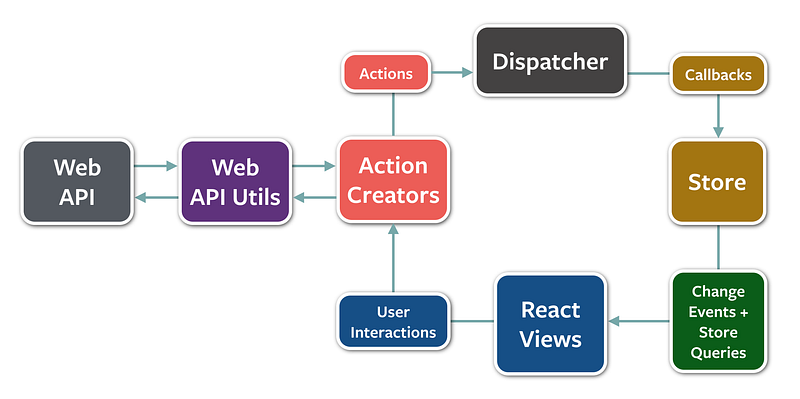
React Concepts and Features
There are many benefits to using React over just Vanilla JavaScript.
Modularity- To avoid the mess of many event listeners and template strings, React gives you the benefit of a lot of modularity.
Easy to start- No specials tools are needed to use Basic React.
- You can start working directly with
createElementmethod in React. Declarative Programming- React is declarative in nature, utilizing either it's built-in createElement method or the higher-level language known as JSX.
Reusability- Create elements that can be re-used over and over. One-flow of data
- React apps are built as a combination of parent and child components.
- Parents can have one or more child components, all children have parents.
- Data is never passed from child to the parent.
Virtual DOM: React provides a Virtual DOM that acts as an agent between the real DOM and the developer to help debug, maintain, and provide general use.- Due to this usage, React handles web pages much more intelligently; making it one of the speediest Front End Libraries available.
ES6 Refresher
Exporting one item per file
- Use
export defaultstatement in ES6 to export an item. ES6
export default class Wallet {
  // ...
}
// sayHello will not be exported
function sayHello() {
  console.log("Hello!");
}
CommonJS (Equivalent)
class Wallet {
  // ...
}
// sayHello will not be exported
function sayHello() {
  console.log("Hello!");
}
module.exports = Wallet;
Exporting multiple items per file
- Use just thw
exportkeyword (without default) to export multiple items per file. ES6 (Better to export them individually like this, rather than bunching them all into an object)
export class Wallet {
  // ...
}
export function sayHello() {
  console.log("Hello!");
}
export const sayHi = () => {
  console.log("Hi!");
};
class Wallet {
  // ...
}
function sayHello() {
  console.log("Hello!");
}
const sayHi = () => {
  console.log("Hi!");
};
export { Wallet, sayHello, sayHi };
CommonJS (Equivalent)
class Wallet {
  // ...
}
function sayHello() {
  console.log("Hello!");
}
const sayHi = () => {
  console.log("Hi!");
};
module.exports = {
  Wallet,
  sayHello,
  sayHi,
};
Importing with ES6 vs CommonJS

import { Wallet } from "./wallet";
import * as fs from "fs";
const wallet = new Wallet();
CommonJS
let { Wallet } = require("./wallet");
const wallet = new Wallet();
let fs = require("fs");
Unnamed default imports
- You can name unnamed items exported with export default any name when you import them.
// exporting
export default class Wallet {
  // ...
}
// importing
import Money from "wallet.js";
const wallet = new Money();- Just remember if you use
exportinstead ofexport defaultthen your import is already named and cannot be renamed.
// exporting
export class Wallet {
  // ...
}
// importing
import { Wallet } from "wallet.js";
const wallet = new Wallet();
Aliasing imports
- Use as asterisk to import an entire module's contents.
- Keep in mind you must use an
askeyword to refer to it later.
// export
export function sayHello() {
  console.log("Hello!");
}
export const sayHi = () => {
  console.log("Hi!");
};
//import
import * as Greetings from "greetings.js";
Greetings.sayHello(); // Hello!
Greetings.sayHi(); // Hi!- You can also name identically named functions or items from different files.
import { Wallet as W1 } from "./wallet1";
import { Wallet as W2 } from "./wallet2";
const w1 = new W1();
const w2 = new W2();
Browser support for ES6 Modules
- ES6 Modules can only be used when a JS file is specified as a module.
<script type="module" src="./wallet.js"> </script> - You can get browser support for ES6 modules by adding module into your script tag.
Notes
JSX In Depth
- Remember that JSX is just syntactic sugar for the built in
React.createElement(component, props, ...children) - React Library must always be in scope from your JSX code.
- Use Dot Notation for JSX Type
- User-Defined Components Must Be Capitalized
<Foo />vs<div> - Cannot use a general expression as the React element type. (
Incorrect)
function Story(props) {
  // Wrong! JSX type can't be an expression.
    return <components[props.storyType] story={props.story} />;
};(Corrected)
function Story(props) {
  // Correct! JSX type can be a capitalized variable.
  const SpecificStory = components[props.storyType];
  return <SpecificStory story={props.story} />;
}
Props in JSX
- Several ways to specify props in JSX.
Javascript Expressions as Props
<MyComponent foo={1 + 2 + 3 + 4} />String Literals
<MyComponent message="hello world" /> <MyComponent message={'hello world'} /> <MyComponent message="<3" /> <MyComponent message={'❤'} />Props Default to "True"
<MyTextBox autocomplete /> <MyTextBox autocomplete={true} />Spread Attributes
function App1() { return <Greeting firstName="Ben" lastName="Hector" />; } function App2() { const props = { firstName: "Ben", lastName: "Hector" }; return <Greeting {…props} />; }Children in JSX
props.children: The content between opening and closing tag. JavaScript Expressions as Children
function Item(props) {
  return <li>{props.message}</li>;
}
function TodoList() {
  const todos = ["finish doc", "submit pr", "nag dan to review"];
  return (
    <ul>
      {todos.map((message) => (
        <Item key={message} message={message} />
      ))}
    </ul>
  );
}
Functions as Children
props.childrenworks like any other prop, meaning it can pass any sort of data.
// Calls the children callback numTimes to produce a repeated component
function Repeat(props) {
  let items = [];
  for (let i = 0; i < props.numTimes; i++) {
    items.push(props.children(i));
  }
  return <div>{items}</div>;
}
function ListOfTenThings() {
  return (
    <Repeat numTimes={10}>
      {(index) => <div key={index}>This is item {index} in the list</div>}
    </Repeat>
  );
}
Booleans, Null, and Undefined Are Ignored
false,null,undefined, andtrueare all valid children.- They will not render.
- You can use these to conditionally render items.
<div>
  {showHeader && <Header />}
  <Content />
</div>- In this example, the component will only render if
showHeaderevals to True.
// Before work-around
<div>
  {props.messages.length &&
    <MessageList messages={props.messages} />
  }
</div>
// After work-around
<div>
  {props.messages.length > 0 &&
    <MessageList messages={props.messages} />
  }
</div>- Note that certain falsy values such as zero will still be rendered by React, you can work around this by ensuring situations like the above eval. into a boolean.
- In the times you want booleans to be rendered out, simply convert it into a string first.
<div>My JavaScript variable is {String(myVariable)}.</div>Reconciliation
The Diffing Algorithm
Diffing: When the state of a component changes React creates a new virtual DOM tree.- Elements of Different Types
- Every time the root elements have different types, React tears down the old tree and builds the new tree from scratch.
- DOM Elements Of the Same Type
- When comparing two DOM elements of the same type, React keeps the same underlying DOM node and only updates the changes attributes.
<div className="before" title="stuff" /> <div className="after" title="stuff" />

<div style={{ color: "red", fontWeight: "bold" }} /> <div style={{color: 'green', fontWeight: 'bold'}} />- Component Elements Of The Same Type
- When components update, instances will remain the same, so that state maintains across renders.
- React will only update the props, to match the new element.
- Recursing On Children
- React will iterate both lists of children and generate a mutation whenever there's a difference.
- This is why we use
keys. - Makes it easier for React to match children in the original tree with children in the subsequent tree.
- Tradeoffs
- Important to remember that reconciliation algorithm is an implementation detail.
- Re-rendering only to apply the differences following the rules stated in the previous sections.
Typechecking With PropTypes
- As your application grows, you can use React's
typecheckingto catch bugs. propTypesis a special property to run typechecking.- exports range of built in validators to ensure your received data is valid.
- propTypes is only checked in development mode.
import PropTypes from "prop-types";
class Greeting extends React.Component {
  render() {
    return <h1>Hello, {this.props.name}</h1>;
  }
}
Greeting.propTypes = {
  name: PropTypes.string,
};
Requiring Single Child
- Use
PropTypes.elementto specify only a single child can be passed to a component as children.
import PropTypes from "prop-types";
class MyComponent extends React.Component {
  render() {
    // This must be exactly one element or it will warn.
    const children = this.props.children;
    return <div>{children}</div>;
  }
}
MyComponent.propTypes = {
  children: PropTypes.element.isRequired,
};
Default Prop Values
- Use
defaultPropsto assign default values for props.
class Greeting extends React.Component {
  render() {
    return <h1>Hello, {this.props.name}</h1>;
  }
}
// Specifies the default values for props:
Greeting.defaultProps = {
  name: "Stranger",
};
// Renders "Hello, Stranger":
ReactDOM.render(<Greeting />, document.getElementById("example"));

class Greeting extends React.Component {
  static defaultProps = {
    name: 'stranger'
  }
  render() {
    return (
      <div>Hello, {this.props.name}</div>
    )
  }
Notes
React Router Introduction
React Routeris the answer for rendering different components for different pages.- A front-end library that allows you to control which components to display using the browser location.
Client-side RoutingGetting started with routing- Install React Router with:
- npm install — save react-router-dom@⁵.1.2
- Import
Browser Routerfrom package. - import { BrowserRouter } from "react-router-dom";
BrowserRouteris the primary component of the router that wraps your route hierarchy.- Wrap it around components.
- Creates a
React Contextthat passes routing information down to all its descendant components. - You can also use
HashRouter, where it would generate a hash before the endpoint. Creating frontend routes - React Router helps your app render specific components based on the URL.
- The most common component is
<Route> - Wrapped around another component, causing the comp. to only render if the a certain URL is matched.
Props: path, component, exact, and [render]- Browser Router can only have a single child component.
- The Browser Router wraps all routes within a parent div element.
const Root = () => {
  const users = {
    1: { name: "Andrew" },
    2: { name: "Raymond" },
  };
  return (
    <BrowserRouter>
      <div>
        <h1>Hi, I'm Root!</h1>
        <Route exact path="/" component={App} />
        <Route path="/hello" render={() => <h1>Hello!</h1>} />
        <Route path="/users" render={() => <Users users={users} />} />
      </div>
    </BrowserRouter>
  );
};- component
- Indicates component to render.
- path
- Indicates path to render a specific component.
- exact
- Tells route to not pattern match and only render a certain route exclusively to it's associated component.
- render
- Optional prop that takes in a function to be called.
- Causes extra work for React.
- Preferred for inline rendering of simple functional components.
- Difference between
componentandrenderis that component returns new JSX that be re-mounted, but render returns the JSX that will be mounted only once. - // This inline rendering will work, but is unnecessarily slow. <Route path="/hello" component={() => <h1>Hello!</h1>} /> // This is the preferred way for inline rendering. <Route path="/hello" render={() => <h1>Hello!</h1>} />
- Also useful if you need to pass in specific props to a component.
- // `users` to be passed as a prop: const users = { 1: { name: "Andrew" }, 2: { name: "Raymond" }, }; <Route path="/users" render={() => <Users users={users} />} />;
Route path params
- Your component's props can hold information about URL's parameters.
- Will match segments starting at
:to the next/,?,#.
<Route
  path="/users/:userId"
  render={(props) => <Profile users={users} {...props} />}
/>{...props}spreads out the router's props.props.match.paramsis used to access the match prop's parameters.- Useful keys on the
matchobject: isExact: boolean that tells you whether or not the URL exactly matches the path.url: the currentURLpath: Route path it matched against (w/o wildcards)params: Matches for the individual wildcard segments.
Navigation
React Router Navigation
Link,NavLink,Redirect,historyprops of React Router are used to help your user navigate routes. Adding links for navigation- Issues on-click navigation event to a route defined in app.
- Usage renders an anchor tag with a correctly set
hrefattribute.
import { BrowserRouter, Route, Link } from "react-router-dom";Linktakes two properties:toandonClick.to: route location that points to an absolute path.onClick: clickHandler.NavLinkworks just likeLinkbut has a bit of extra functionality.- Adds extra styling, when the path it links to matches the current path.
- As it's name suggests, it is used to Nav Bars.
- Takes three props:
activeClassName: allows you to set a CSS class name for styling. (default set to 'active')activeStyle: style object that is applied inline when it'stoprop. matches the current URL.exactprop is a boolean that defaults to false; you can set it to true to apply requirement of an exact URL match.- exact can also be used as a flag instead of a reg. property value.
- benefit of adding this is so that you don't trigger other matches. Switching between routes
<Switch>: Component allows you to only render one route even if several match the current URL.- You may nest as many routes as you wish but only the first match of the current URL will be rendered.
- Very useful if we want a default component to render if none of our routes match.
<Switch>
  <Route path="some/url" component={SomeComponent} />
  <Route path="some/other/url" component={OtherComponent} />
  <Route component={DefaultComponent} />
</Switch>DefaultComponentwill only render if none of the other URLs match up.<Redirect>: Helps redirect users.- Only takes a single prop:
to.
<Route
  exact
  path="/"
  render={() => (this.props.currentUser ? <Home /> : <Redirect to="/login" />)}
/>
History
Historyallows you to update the URL programmatically.- Contains two useful methods:
push: Adds a new URL to the end of the history stack.replace: Replaces the current URL on the history stack, so the back button won't take you to it.
// Pushing a new URL (and adding to the end of history stack):
const handleClick = () => this.props.history.push("/some/url");
// Replacing the current URL (won't be tracked in history stack):
const redirect = () => this.props.history.replace("/some/other/url");
---
### Nested Routes
Why nested routes?
- <span id="6403">Create routes that tunnel into main components vs getting rendered on the main page as it's own thing. What are nested routes?</span>
<!-- -->
const Profile = (props) => {
// Custom call to database to fetch a user by a user ID.
const user = fetchUser(props.match.params.userId);
const { name, id } = user;
return (
<div>
<h1>Welcome to the profile of {name}!</h1>
<Link to={`/users/${id}/posts`}>{name}'s Posts</Link>
<Link to={`/users/${id}/photos`}>{name}'s Photos</Link>
<Route path="/users/:userId/posts" component={UserPosts} />
<Route path="/users/:userId/photos" component={UserPhotos} />
</div>
);
};
Alt. version using `props.match`
// Destructure `match` prop
const Profile = ({ match: { url, path, params }) => {
// Custom call to database to fetch a user by a user ID.
const user = fetchUser(params.userId);
const { name, id } = user;
return (
<div>
<h1>Welcome to the profile of {name}!</h1>
<Link to={`${url}/posts`}>{name}'s Posts</Link>
<Link to={`${url}/photos`}>{name}'s Photos</Link>
<Route path={`${path}/posts`} component={UserPosts} />
<Route path={`${path}/photos`} component={UserPhotos} />
</div>}
);
};
- <span id="03fb">As you can see above, our end URL isn't even defined until we apply those flexible values in.</span>
---
### React Builds
- <span id="0fae">`Build` : Process of converting code into something that can actually execute or run on the target platform.</span>
- <span id="6fdb">In regards to React, the minimum a build should do is convert JSX to something that browsers can understand. Reviewing common terminology</span>
- <span id="779d">`Linting` : Process of using a tool to analyze your code to catch common errors, bugs, inconsistencies etc...</span>
- <span id="f1e5">`Transpilation` : Process of converting source code, like JS, from one version to another.</span>
- <span id="9f9f">`Minification` : Process of removing all unnecessary characters in your code.</span>
- <span id="57df">`Bundling` : Process of combining multiple code files into a single file.</span>
- <span id="d052">`Tree Shaking` : Process of removing unused or dead code from your application before it's bundled. Configuration or code?</span>
- <span id="ce13">`Configuration` allows developers to create build tasks by declaring either JSON, XML, or YAML without explicitly writing every step in the process.</span>
- <span id="16a6">`Coding` or `Scripting` simply requires code. Babel and webpack (yes, that's intentionally a lowercase 'w')</span>
- <span id="4363">`Babel` : Code Transpiler that allows you to use all of the latest features and syntax wihtout worrying about what browsers support what.</span>
- <span id="804b">`webpack` : Allows developers to use JS modules w/o requiring users to use a browser that natively supports ES modules.</span>
- <span id="77f2">Create React App uses webpack and Babel under the hood to build applications. The Create React App build process</span>
- <span id="222f">What happens when you run `npm start`:</span>
1. <span id="d245">.env variables are loaded.</span>
2. <span id="6209">list of browsers to support are checked.</span>
3. <span id="1c34">config'd HTTP port checked for availability.</span>
4. <span id="950b">application compiler is configured and created.</span>
5. <span id="8e30">`webpack-dev-starter` is started</span>
6. <span id="48cc">`webpack-dev-starter` compiles app.</span>
7. <span id="68ad">`index.html` is loaded into browser</span>
8. <span id="e670">file watcher is started to watch for changes. Ejecting</span>
- <span id="428b">There is a script in Create React App called `eject` that allows you to 'eject' your application and expose all the hidden stuff. Preparing to deploy a React application for production</span>
- <span id="eb79">Defining Env Variables</span>
<!-- -->
REACT_APP_FOO: some value
REACT_APP_BAR: another value
console.log(process.env.REACT_APP_FOO);
Can be referenced in your index.html like so: <title>%REACT_APP_BAR%</title>
Configuring the supported browsers
{
"browserslist": {
"production": [
">0.2%",
"not dead",
"not op_mini all"
],
"development": [
"last 1 chrome version",
"last 1 firefox version",
"last 1 safari version"
]
}
}
- <span id="8a03">If you specify older browsers it will affect how your code get's transpiled. Creating a production build</span>
- <span id="fee3">Run `npm run build` to create a production build.</span>
- <span id="bdaf">Bundles React in production mode and optimizes the build for the best performance.</span>
---
### Notes
### Introduction to React
- <span id="7224">Simply a nice library that turns data into DOM.</span>
- <span id="a9de">`Tree Diffing` : Fast comparison and patching of data by comparing the current virtual DOM and new virtual DOM - updating only the pieces that change.</span>
- <span id="1bbc">`It's just a tree with some fancy diffing`</span>
---
### Create Element
From JavaScript To DOM
- <span id="cae8">The `React.createElement` function has the following form:</span>
<!-- -->
React.createElement(type, [props], [...children]);
- <span id="1688">`Type` : Type of element to create, i.e. a string for an HTML element or a reference to a function or class that is a React component.</span>
- <span id="3249">`Props` : Object that contains data to render the element.</span>
- <span id="56ab">`Children` : Children of the elemet, as many as you want. Creating elements</span>
- <span id="ee64">Our rendering goal:</span>
<!-- -->
<ul>
<li class="selected">
<a href="/pets">Pets</a>
</li>
<li>
<a href="/owners">Owners</a>
</li>
</ul>
- <span id="eb8b">There are five tags to create:</span>
- <span id="ea28">One `ul`</span>
- <span id="a4ba">Two `li`</span>
- <span id="de01">Two `a`</span>
- <span id="90b5">There are certain attributes we want to appear in the DOM for these tags as well:</span>
- <span id="dab5">Each `li` has a `class` (or `className` in React)</span>
- <span id="e88e">Both `a` ele's have `href` attributes</span>
- <span id="fd8c">Also keep in mind the parent child relationships happening between the tags.</span>
- <span id="9893">`ul` is the parent of both `li`</span>
- <span id="eafa">Each `li` has an `a` element as a child</span>
- <span id="84cc">Each `a` has a `text content` child</span>
<figure>
<img src="https://cdn-images-1.medium.com/max/800/0*8ls0PmtREELbf5Wm" class="graf-image" />
</figure>React.createElement(
"ul",
null,
React.createElement(
"li",
{ className: "selected" },
React.createElement("a", { href: "/pets" }, "Pets")
),
React.createElement(
"li",
null,
React.createElement("a", { href: "/owners" }, "Owners")
)
);
Converting to virtual DOM
- <span id="e7d4">After you set up your `React.createElement`, you use `React.render` to take the value returned from cE and a DOM node to insert into the conversion of the real DOM.</span>
<!-- -->
// Put the element tree in a variable
const navList = React.createElement(
"ul",
null,
React.createElement(
"li",
{ className: "selected" },
React.createElement("a", { href: "/pets" }, "Pets")
),
React.createElement(
"li",
null,
React.createElement("a", { href: "/owners" }, "Owners")
)
);
// Get a DOM node for React to render to
const mainElement = document.querySelector("main");
// Give React the element tree and the target
ReactDOM.render(navList, mainElement);
- <span id="2cbc">JS Code => Virtual DOM => Real Dom Updates</span>
- <span id="25d5">If you call React.render a second or multiple times it just checks the existing Virtual DOM and it knows which smaller areas to change. Thinking in Components</span>
- <span id="fe61">Components are pieces of reusable front-end pieces.</span>
- <span id="bffa">Components should be Single Responsibility Principle compliant.</span>
---
### Create Element
`React.createElement Demo`
- <span id="a288">Can import non-local dependencies with `import 'package-link'`</span>
<!-- -->
const App = () => React.createElement("h1", null, "Hello, Programmers!");
const target = document.querySelector("main");
const app = React.createElement(App, null);
// Give React the element tree and the target
ReactDOM.render(app, target);
- <span id="0693">Remember when importing modules from other files you have to denote the file type in the import statement. HTML Original</span>
<!-- -->
<section class="clue">
<h1 class="clue__title">Clue$ 268530</h1>
<div class="clue__question">
2009: I dreamed a Dream
</div>
<div class="clue__category">
<<unparsed>>
</div>
<div class="clue__amount">
$800
</div>
</section>
React Version
const Clue = () =>
React.createElement(
"section",
{ className: "clue" },
React.createElement("h1", { className: "clue__title" }, "Title"),
React.createElement("div", { className: "clue__question" }, "?"),
React.createElement("div", { className: "clue__category" }, "Category"),
React.createElement("div", { className: "clue__amount" }, "$800")
);
- <span id="f587">Because `class` is a reserved keyword in JS, in React we can use `className` to assign a class to an element.</span>
- <span id="4d51">Remember the data that goes into createElement: element type, data to pass into the element, and then children.</span>
- <span id="8199">`props` : Properties;</span>
- <span id="6b53">To handle certain values that are initially undefined, we can use `defaultProps`.</span>
<!-- -->
Clue.defaultProps = {
category: {},
};
- <span id="4abe">You can change in the devTools Network tab the internet speed to check for values that may be undefined to hangle with defaultProps.</span>
- <span id="79e3">If we fetch multiple pieces of data, we can render many things by using `map`.</span>
- <span id="06f2">You need to assign a unique key to each of the clues.</span>
- <span id="c12e">We need to keep track of them individually so that React can easily refer to a specific one if there is an issue. `clue => { key:clue.id, ...clue }`</span>
<!-- -->
const App = (props) =>
React.createElement(
"h1",
null,
props.clues.map((clue) =>
React.createElement(Clue, { key: clue.id, ...clue })
)
);
export default App;
- <span id="1dd5">Note: JSX is preferred over React.createElement;</span>
---
### Notes from Hello Programmer Exercise
- <span id="1fb8">When you import modules from websites they must have CORs activated.</span>
- <span id="1ef6">These import statements, import `global variables`.</span>
- <span id="6613">When we want to move our code into production we need to change the imports into the production minified versions.</span>
<!-- -->
import "https://unpkg.com/react@16/umd/react.production.min.js";
import "https://unpkg.com/react-dom@16.13.1/umd/react-dom.production.min.js";
- <span id="0046">While we will never actually be creating full apps with just React.createElement => it is the enginer that is running under the hood!</span>
<!-- -->
import "https://unpkg.com/react@16/umd/react.development.js";
import "https://unpkg.com/react-dom@16/umd/react-dom.development.js";
const Links = () =>
React.createElement(
"ul",
{ id: "nav-links" },
React.createElement(
"li",
{ className: "is-selected" },
React.createElement("a", { href: "http://appacademy.io" }, "App Academy")
),
React.createElement(
"li",
null,
React.createElement("a", { href: "https://aaonline.io" }, "a/A Open")
)
);
// Set up React Element: Type, Imported Data, Child (Child is Text in this Scenario)
// HelloWorld is a function based component
const HelloWorld = () => React.createElement("h1", null, "Hello, Programmers");
const AllTogether = () =>
React.createElement(
"div",
null,
React.createElement(HelloWorld, null),
React.createElement(Links, null)
);
// Target the Element to append new Ele
const target = document.querySelector("main");
// Assign your 'App' to your created Elements
// We are creating an element from the HelloWorld function.
const app = React.createElement(AllTogether, null);
// Render from the Virtual Dom to the Actual Dom
ReactDOM.render(app, target);Introduction to JSX
JSX: Javascript Extension, a new language created by React developers to have an easier way of interacting with the React API. How to use JSX- We will use
babelto convert version of modern JS into an older version of JS. React Create Element
const ExampleComponent = (props) =>
  React.createElement(
    React.Fragment,
    null,
    React.createElement("h1", null, "Hello!"),
    React.createElement("img", { src: "https://via.placeholder.com/150" }),
    React.createElement("a", { href: props.searchUrl }, props.searchText)
  );
JSX Version
const ExampleComponent = (props) => (
  <React.Fragment>
    <h1>Hello!</h1>
    <img src="https://via.placeholder.com/150" />
    <a href={props.searchUrl}>{props.searchText}</a>
  </React.Fragment>
);- Keep in mind that self closing tags in React must have a
forward slashto close it.

<img src="https://via.placeholder.com/150" />;
// becomes..
React.createElement("img", { src: "https://via.placeholder.com/150" });
// if we want to pass in data vs just a string literal
<a href={props.searchUrl}>{props.searchText}</a>;
// so it becomes..
React.createElement("a", { href: props.searchUrl }, props.searchText);
// if you want the text search uppercase..
<a href={props.searchUrl}>{props.searchText.toUpperCase()}</a>;- Comments in JSX have the following syntax:
<div>
  <h2>This is JSX</h2>
  {/* This is a comment in JSX */}
</div>
Property Names:checked: Attribute of input components such as checkbox or radio, use it to set whether the component is checked or not.className: Used to specify a CSS class.dangerouslySetInnerHTML: React's equivalent of innerHTML because it is risky to cross-site scripting attacks.htmlFor: Becauseforis protected keyword, React elements use this instead.onChange: Event fired whenever a form field is changed.style: Accepts a JS object with camelCase properties rather than a CSS string.value: Supported by Input, Select, and TextArea components; use it to set the value of the component.- Note: React uses camel-case!!! The JSX semicolon gotcha
function App() {
  return (
    <div>
      <h1>Hello!</h1>
      <div>Welcome to JSX.</div>
    </div>
  );
}
create Element equivalent
is equivalent to
function App() {
  return (
    React.createElement(
      'div',
      null,
      React.createElement('h1', null, 'Hello!'),
      React.createElement('div', null, 'Welcome to JSX.'),
    )
  );
}- We wrap what want to return in parenthesis so JS doesn't auto add semi-colons after every line and run the code incorrectly.
- Just remember if you decided to use the return keyword in a function to 'return some JSX', then make sure you wrap the JSX in parenthesis.
npx create-react-app my-app
- Single line used to initiate a React application.
- React has a great toolchain where you can see changes live as you're editing your application.
- React errors will be rendered directly onto the browser window.
- A downside is that it installs a lot of bloat files.
- Examples of React create Element and JSX equivalent
React.createElement(
  "a",
  {
    className: "active",
    href: "https://appacademy.io",
  },
  "App Academy"
);
// JSX Version
<a className="active" href="https://appacademy.io">
  App Academy
</a>;

React.createElement(
  OwnerDetails,
  {
    owner: props.data.owner,
    number: props.index + 1,
  },
  props.name
);
// JSX Version
<OwnerDetails owner={props.data.owner} number={props.index + 1}>
  {props.name}
</OwnerDetails>;
More Complex JSX Example
const BookPanel = (props) => {
  <section className="book" id={`book-${props.id}`}>
    <h1 className="book__title">{props.title}</h1>
    <img src={props.coverUrl} />
    <div className="book__desc">{props.description}</div>
  </section>;
};
Notes
Using Custom CRA Templates
Using a Custom Template npx create-react-app my-app --template @appacademy/simple
- Keep in mind that using
create-react-appautomatically initializes a git repository for you! - App Academy custom template for creating a react app.
- If using the default react create project you can delete the following files:
- favicon.ico
- robots.txt
- logo192.png
- logo512.png
- manifest.json
- You can also simplify the
htmlfile into:
<!DOCTYPE html>
<html lang="en">
  <head>
    <meta charset="utf-8" />
    <title>React App</title>
  </head>
  <body>
    <div id="root">
Simplifying the src folder
- Remove: App.css App.test.js logo.svg serviceWorker.js setupTests.js
- Update the Following Files:
// ./src/App.js
import React from "react";
function App() {
  return <h1>Hello world!</h1>;
}
export default App;
``;

// ./src/index.js
import React from "react";
import ReactDOM from "react-dom";
import "./index.css";
import App from "./App";
ReactDOM.render(
  <React.StrictMode>
    <App />
  </React.StrictMode>,
  document.getElementById("root")
);
---
### React Class Components
Class Components
- <span id="b5e6">You can write React components using ES2015 Classes: Function Component</span>
<!-- -->
// ./src/Message.js
import React from "react";
const Message = (props) => {
return <div>{props.text}</div>;
};
export default Message;
ES2015 Version
// ./src/Message.js
import React from "react";
class Message extends React.Component {
render() {
return <div>{this.props.text}</div>;
}
}
export default Message;
- <span id="ae33">We can access props within a `class component` by using `this.props`</span>
- <span id="0b60">Keep in mind Class Components are used just like function components.</span>
<!-- -->
// ./src/index.js
import React from "react";
import ReactDOM from "react-dom";
import Message from "./Message";
ReactDOM.render(
<React.StrictMode>
<Message text="Hello world!" />
</React.StrictMode>,
document.getElementById("root")
);
Setting and accessing props
class Message extends React.Component {
constructor(props) {
super(props);
// TODO Initialize state, etc.
}
render() {
return <div>{this.props.text}</div>;
}
}
- <span id="cd5a">If we define a constructor method in our Class Component, we have to define the `super` method with `props` passed through it.</span>
- <span id="8bf7">Side Note: Before React used ES2015 Classes, it used `React.createclass` function, if you ever need to use this antiquated method make sure you install a module called `create-react-class` Stateful components</span>
- <span id="4b12">One of the major reasons why you would choose to use a Class Component over a Function Component is to add and manage local or internal state to your component.</span>
- <span id="8e82">Second of the major reasons is to be able to use a Class Component's lifecycle methods. What is state?</span>
- <span id="7fab">Props are data that are provided by the consumer or caller of the component.</span>
- <span id="98f4">Not meant to be changed by a component.</span>
- <span id="c6a9">State is data that is `internal` to the component.</span>
- <span id="3e89">Intended to be updated or mutated. When to use state</span>
- <span id="c03f">_Only Use State when it is absolutely necessary_</span>
- <span id="204b">If the data never changes, or if it's needed through an entire application use props instead.</span>
- <span id="0b53">State is more often used when creating components that retrieve data from APIs or render forms.</span>
- <span id="1b6b">The general rule of thumb: If a component doesn't need to use state or lifecyle methods, it should be prioritized as a `function component`.</span>
- <span id="d708">Functional:Stateless || Class:Stateful Initializing state</span>
- <span id="e5d5">Use a class constructor method to initialize `this.state` object. // Application Entry Point</span>
<!-- -->
// ./src/index.js
import React from 'react'
import ReactDOM from 'react-dom';
import RandomQuote from './RandomQuote';
ReactDOM.render(
<React.StrictMode>
<RandomQuote />
</React.StrictMode>
document.getElementById('root');
)
// Class Component: RandomQuote
import React from "react";
class RandomQuote extends React.Component {
constructor() {
super();
const quotes = [
"May the Force be with you.",
"There's no place like home.",
"I'm the king of the world!",
"My mama always said life was like a box of chocolates.",
"I'll be back.",
];
this.state = {
quotes,
currentQuoteIndex: this.getRandomInt(quotes.length);
}
}
getRandomInt(max) {
return Math.floor(Math.random() * Math.floor(max));
}
render() {
return (
<div>
<h2>Random Quote</h2>
<p>{this.state.quotes[this.state.currentQuoteIndex]}</p>
</div>
)
}
}
export default RandomQuote;
Updating State
- <span id="3fdc">Let's say we want to update our state with a new quote.</span>
- <span id="eddc">We can set up event listeners in React similarly to how we did them before.</span>
- <span id="106c"><button type="button" onClick={this.changeQuote}> Change Quote </button></span>
- <span id="a77a">`onClick` is the event listener.</span>
- <span id="f406">`{this.changeQuote}` is the event handler method.</span>
- <span id="7dca">Our Class Component File should now look like this with the new additions:</span>
<!-- -->
import React from "react";
class RandomQuote extends React.Component {
constructor() {
super();
const quotes = [
"May the Force be with you.",
"There's no place like home.",
"I'm the king of the world!",
"My mama always said life was like a box of chocolates.",
"I'll be back.",
];
this.state = {
quotes,
currentQuoteIndex: this.getRandomInt(quotes.length);
}
}
changeQuote = () => {
const newIndex = this.getRandomInt(this.state.quotes.length);
// Setting the 'new state' of currentQuoteIndex state property
// to newly generated random index #.
this.setState({
currentQuoteIndex: newIndex;
})
}
getRandomInt(max) {
return Math.floor(Math.random() * Math.floor(max));
}
render() {
return (
<div>
<h2>Random Quote</h2>
<p>{this.state.quotes[this.state.currentQuoteIndex]}</p>
<button type="button" onClick={this.changeQuote}>
Change Quote
</button>
</div>
)
}
}
export default RandomQuote;
Don't modify state directly
- <span id="ca27">It is important to `never` modify your state directly!</span>
- <span id="780d">ALWAYS use `this.setState` method to update state.</span>
- <span id="1581">This is because when you only use this.state to re-assign, no re-rendering will occur => leaving our component out of sync. Properly updating state from the previous state</span>
- <span id="dc5a">In our current example, the way we have `changeQuote` set up leaves us with occasionally producing the same index twice in a row.</span>
- <span id="0bff">One solution is to design a loop but keep in mind that state updates are handled asynchronously in React (your current value is not guaranteed to be the latest)</span>
- <span id="39f9">A safe method is to pass an anonymous method to `this.setState` (instead of an object literal) Previous</span>
<!-- -->
changeQuote = () => {
const newIndex = this.getRandomInt(this.state.quotes.length);
this.setState({
currentQuoteIndex: newIndex;
})
}
Passing w/ Anon Method
changeQuote = () => {
this.setState((state, props) => {
const { quotes, currentQuoteIndex } = state;
let newIndex = -1;
do {
newIndex = this.getRandomInt(quote.length);
} while (newIndex === currentQuoteIndex);
return {
currentQuoteIndex: newIndex,
};
});
};
Providing default values for props
- <span id="7e8c">In our current example, we pass in a static array of predefined quotes in our constructor.</span>
- <span id="3e8f">The way it is set up right now leaves our list of quotes unchanged after initialization.</span>
- <span id="add0">We can make quotes more dynamic by replacing our static array with a `props` argument passed into `super`.</span>
- <span id="53d6">constructor(props) { super(props); }</span>
- <span id="918a">We can now move our quotes array to our application entry point and pass it in as a prop. // Application Entry Point</span>
<!-- -->
// ./src/index.js
import React from 'react'
import ReactDOM from 'react-dom';
import RandomQuote from './RandomQuote';
// Re-assign our array here and pass it in as a prop in Render.
const quotes = [
"May the Force be with you.",
"There's no place like home.",
"I'm the king of the world!",
"My mama always said life was like a box of chocolates.",
"I'll be back.",
"This way I can define more quotes",
];
ReactDOM.render(
<React.StrictMode>
<RandomQuote quotes={quotes}/>
</React.StrictMode>
document.getElementById('root');
)
- <span id="a0bb">One thing to note about this workaround is that the caller of the component _must_ set the quotes prop or the component will throw an error => so use `defaultProps`!</span>
<!-- -->
// At the bottom of RandomQuote.js...
RandomQuote.defaultProps = {
quotes: [
"May the Force be with you.",
"There's no place like home.",
"I'm the king of the world!",
"My mama always said life was like a box of chocolates.",
"I'll be back.",
"This way I can define more quotes",
],
};
- <span id="c575">A good safety net in case the consumer/caller doesn't provide a value for the quotes array.</span>
- <span id="3be6">We can even remove it from our index.js now and an error will not be thrown.</span>
---
### Handling Events
- <span id="a82e">To add an event listener to an element, just define a method to handle the event and associate that method with the element event you are listening for. Example</span>
<!-- -->
import React from "react";
class AlertButton extends React.Component {
showAlert = () => {
window.alert("Button Clicked!");
};
render() {
return (
<button type="button" onClick={this.showAlert}>
Submit
</button>
);
}
}
- <span id="a852">Note that when refering the handler method in onClick we're not invoking showAlert simply just passing a reference. Preventing default behavior</span>
- <span id="5cb0">HTML Elements in the browser often have a lot of default behavior.</span>
- <span id="df4d">I.E. Clicking on an `<a>` element navigates so a resource denoted by `<href>` property.</span>
- <span id="952c">Here is an example of where using `e.preventDefault()` could come in handy.</span>
<!-- -->
import React from "react";
class NoDefaultSubmitForm extends React.Component {
submitForm = (e) => {
e.preventDefault();
window.alert("Handling form submission...");
};
render() {
return (
<form onSubmit={this.submitForm}>
<button>Submit</button>
</form>;
)}
}
- <span id="b149">The button contained within the form will end up refreshing the page before `this.submitForm` method can be completed.</span>
- <span id="a034">We can stick an `e.preventDefault()` into the actual method to get around this problem.</span>
- <span id="004a">`e` : Parameter that references a `Synthetic Event` object type. Using `this` in event handlers</span>
<!-- -->
// ./src/AlertButton.js
import React from "react";
class AlertButton extends React.Component {
showAlert = () => {
window.alert("Button clicked!");
console.log(this);
};
render() {
return (
<button type="button" onClick={this.showAlert}>
Click Me
</button>
);
}
}
export default AlertButton;
- <span id="3c8f">When we console log `this` we see the AlertButton object.</span>
- <span id="42a0">If we were to write the showAlert method with a regular class method like:</span>
<!-- -->
showAlert() {
console.log(this);
}
- <span id="c081">We would get `undefined` => remember that fat arrow binds to the current context! Reviewing class methods and the `this` keyword</span>
- <span id="e98e">Let's refresh on binding.</span>
<!-- -->
class Boyfriend {
constructor() {
this.name = "Momato Riruru";
}
displayName() {
console.log(this.name);
}
}
const Ming = new Boyfriend();
Ming.displayName(); // => Momato Riruru
const displayAgain = Ming.displayName;
displayAgain(); // => Result in a Type Error: Cannot read property 'name' of undefined.
- <span id="fb85">The first time we use our `displayMethod` call, it is called directly on the instance of the boyfriend class, which is why `Momato Riruru` was printed out.</span>
- <span id="3a9b">The second time it was called, the ref of the method is stored as a variable and method is called on that variable instead of the instance; resulting in a type error (it has lost it's context)</span>
- <span id="0a2c">Remember we can use the `bind` method to rebind context!</span>
- <span id="d6d9">We can refactor to get the second call working like this:</span>
- <span id="7ead">const displayAgain = Ming.displayName.bind(Ming); displayAgain(); // => Now Momato Riruru will be printed out.</span>
- <span id="a8b0">To continue using function declarations vs fat arrow we can assign context in a constructor within a class component.</span>
<!-- -->
import React from "react";
class AlertButton extends React.Component {
constructor() {
super();
this.showAlert = this.showAlert.bind(this); // binding context
}
showAlert() {
console.log(this);
}
render() {
return (
<button type="button" onClick={this.showAlert}>
Submit
</button>
);
}
}
export default AlertButton;
- <span id="a4e6">`Experimental Syntax` : Syntax that has been proposed to add to ECMAScript but hasn't officially been added to the language specification yet.</span>
- <span id="801d">It's good to pick one approach and use it consistently, either:</span>
1. <span id="2e3e">Class Properties & Arrow Functions</span>
2. <span id="cc27">Bind Method & This Keyword The `SyntheticEvent` object</span>
- <span id="f177">Synthetic Event Objects: Cross Browser wrappeds around the browser's native event.</span>
- <span id="418f">Includes the use of stopPropagation() and preventDefault();</span>
- <span id="b94f">Attributes of the Synthetic Event Object:Attributesboolean bubblesboolean cancelableDOMEventTarget currentTargetboolean defaultPreventednumber eventPhaseboolean isTrustedDOMEvent nativeEventvoid preventDefault()boolean isDefaultPrevented()void stopPropagation()boolean isPropagationStopped()void persist()DOMEventTarget targetnumber timeStampstring type</span>
- <span id="7484">`nativeEvent` : property defined in a synthetic event object that gives you access to the underlying native browser event (rarely used!)</span>
---
### Forms in React
_Exercise being done in a separate file_ Random Notes
- <span id="45ec">`onChange` : detects when a value of an input element changes.</span>
- <span id="9ca4">Assigning `onChange` to our input fields makes our component's state update in real time during user input.</span>
- <span id="eb83">Dont forget to add `preventDefault` onto form submissions to deal with the default behavior of the browser refreshing the page!</span>
- <span id="c413">`submittedOn: new Date(),` Can be added to a form, most likely will persist into a DB.</span>
- <span id="b97f">Controlled Components</span>
- <span id="ac48">We use the `onChange` event handlers on form fields to keep our component's state as the `"one source of truth"`</span>
- <span id="4685">Adding an `onChange` event handler to every single input can massively bloat your code.</span>
- <span id="448c">Try assiging it to it's own method to apply everywhere.</span>
- <span id="f229">`textarea` is handled differently in react: it takes in a value property to handle what the inner text will be.</span>
<!-- -->
// ./src/ContactUs.js
import React from "react";
class ContactUs extends React.Component {
constructor() {
super();
this.state = {
name: "",
email: "",
phone: "",
phoneType: "",
comments: "",
validationErrors: [],
};
}
onChange = (e) => {
const { name, value } = e.target;
this.setState({ [name]: value });
};
// Vanilla JS Function for validating inputs
validate(name, email) {
const validationErrors = [];
if (!name) {
validationErrors.push("Please provide a Name");
}
if (!email) {
validationErrors.push("Please provide an Email");
}
return validationErrors;
}
onSubmit = (e) => {
// Prevent the default form behavior
// so the page doesn't reload.
e.preventDefault();
// Retrieve the contact us information from state.
const { name, email, phone, phoneType, comments } = this.state;
// Get Validation Errors - proceeding destructuring values from this.state.
const validationErrors = this.validate(name, email);
// If we have errors...
if (validationErrors.length > 0) {
this.setState({ validationErrors });
} else {
// Proceed normally
// Create a new object for the contact us information.
const contactUsInformation = {
name,
email,
phone,
phoneType,
comments,
submittedOn: new Date(),
};
console.log(contactUsInformation);
// Reset the form state.
this.setState({
name: "",
email: "",
phone: "",
phoneType: "",
comments: "",
validationErrors: [],
});
}
};
render() {
const { name, email, phone, phoneType, comments, validationErrors } =
this.state;
return (
<div>
<h2>Contact Us</h2>
{validationErrors.length > 0 && (
<div>
The following errors were found:
<ul>
{validationErrors.map((error) => (
<li key={error}>{error}</li>
))}
</ul>
</div>
)}
<form onSubmit={this.onSubmit}>
<div>
<label htmlFor="name">Name:</label>
<input
id="name"
name="name"
type="text"
onChange={this.onChange}
value={name}
/>
</div>
<div>
<label htmlFor="email">Email:</label>
<input
id="email"
name="email"
type="text"
onChange={this.onChange}
value={email}
/>
</div>
<div>
<label htmlFor="phone">Phone:</label>
<input
id="phone"
name="phone"
type="text"
onChange={this.onChange}
value={phone}
/>
<select name="phoneType" onChange={this.onChange} value={phoneType}>
<option value="">Select a phone type...</option>
{this.props.phoneTypes.map((phoneType) => (
<option key={phoneType}>{phoneType}</option>
))}
</select>
</div>
<div>
<label htmlFor="comments">Comments:</label>
<textarea
id="comments"
name="comments"
onChange={this.onChange}
value={comments}
/>
</div>
<div>
<button>Submit</button>
</div>
</form>
</div>
);
}
}
ContactUs.defaultProps = {
phoneTypes: ["Home", "Work", "Mobile"],
};
export default ContactUs;
- <span id="a2da">We can use validation libraries like `validate` to make our validation functions more complex.</span>
<!-- -->
import isEmail from "validator/es/lib/isEmail";
validate(name, email) {
const validationErrors = [];
if (!name) {
validationErrors.push("Please provide a Name");
}
if (!email) {
validationErrors.push("Please provide an Email");
} else if (!isEmail(email)) {
validationErrors.push("Please provide a valid Email");
}
return validationErrors;
}
Note About Client-side vs server-side validation
- <span id="5808">Server-side validation is not optional.</span>
- <span id="3bb8">Tech-savvy users can manipulate client-side validations.</span>
- <span id="311f">Sometimes the 'best approach' is to skip implementing validations on the client-side and rely completely on the server-side validation.</span>
---
### Component Lifecycle
<figure>
<img src="https://cdn-images-1.medium.com/max/800/0*c24XQBvqBBg0Eztz" class="graf-image" />
</figure>- <span id="e1d9">Component Lifecycle is simply a way of describing the key moments in the lifetime of a component.</span>
1. <span id="8e64">Loading (Mounting)</span>
2. <span id="7e94">Updating</span>
3. <span id="2cd3">Unloading (Unmounting) The lifecycle of a React component</span>
- <span id="7740">Each `Class Component` has several `lifecycle methods` that you can add to run code at specific times.</span>
- <span id="e7d0">`componentDidMount` : Method called after your component has been added to the component tree.</span>
- <span id="6d92">`componentDidUpdate` : Method called after your component has been updated.</span>
- <span id="9ee2">`componentWillUnmount` : Method called just before your component is removed from the component tree.</span>
- <span id="7bd8">`Mounting`</span>
1. <span id="6f9e">`constructor` method is called</span>
2. <span id="e9c7">`render` method is called</span>
3. <span id="eef3">React updates the `DOM`</span>
4. <span id="19bb">`componentDidMount` is called</span>
- <span id="85f1">`Updating`</span>
- <span id="94f5">When component receives new `props`</span>
1. <span id="e635">`render` method is called</span>
2. <span id="70f9">React updates the `DOM`</span>
3. <span id="9507">`componentDidUpdate` is called</span>
- <span id="b00a">When `setState` is called</span>
1. <span id="6864">`render` method is called</span>
2. <span id="e13b">React updates the `DOM`</span>
3. <span id="c459">`componentDidUpdate` is called</span>
- <span id="bfdd">`Unmounting`</span>
- <span id="10c1">The moment before a class component is removed from the component tree:</span>
- <span id="c214">`componentDidMount` will be called. Avoiding the legacy lifecycle methods</span>
- <span id="d438">Occasionally you will encounter some deprecated lifecycle methods:</span>
- <span id="1f6b">UNSAFE_componentWillMount</span>
- <span id="48ac">UNSAFE_componentWillReceiveProps</span>
- <span id="df27">UNSAFE_componentWillUpdate</span>
- <span id="af07">Just know they will be removed soon from React's API, peace. Using the class component lifecycle methods _Exercise done in sep. directory_</span>
- <span id="344c">Assorted Notes:</span>
- <span id="d6b1">Common Use for `componentDidMount` lifecycle method is for fetching data from an API.</span>
---
—
### Notes
### React Context
- <span id="e968">You can use `React Context` to pass data through a component tree without having to manually thread props.</span>
- <span id="89d9">Convenient way to share & update `global data`. Creating a Context</span>
<!-- -->
// PupContext.js
import { createContext } from "react";
const PupContext = createContext();
export default PupContext;
- <span id="a8bf">We use `React.createContext` to create context.</span>
- <span id="98b9">Keep in mind if you invoke this method with aruguments, those arguments will be set as default context. Adding a Provider to the App component</span>
- <span id="a919">In order to pass context over to child components we need to wrap them in a provider component.</span>
- <span id="9afc">The provider component takes in a value property that points to the information that needs to be passed to the children.</span>
<!-- -->
<MyContext.Provider value={/* some value */}>
<ChildComponent />
</MyContext.Provider>
Setting up a Consumer
<MyContext.Consumer>
{(value) => <Component value={value} />}
</MyContext.Consumer>
- <span id="2693">Keep in mind that `Context.Consumer` expects a function as a child.</span>
- <span id="19fc">The function has a value prop passed in from `Context.Provider`</span>
---
### Notes
### Redux Explained
- <span id="eab4">JS Framework for managing the frontend state of a web application.</span>
- <span id="3c8b">Gives us ability to store information in an organized manner in a web app and quickly retrieve that information from anywhere in the app.</span>
- <span id="695d">`Redux`</span>
- <span id="00d5">Client Side Data Management</span>
- <span id="dd41">Controls "Frontend State"</span>
- <span id="d828">NOT Your Database</span>
- <span id="855a">NOT Component State</span>
- <span id="4c1a">Just used for managing Data</span>
<figure>
<img src="https://cdn-images-1.medium.com/max/800/0*N7KFfhOZZ7UrY8s4" class="graf-image" />
</figure>- <span id="04c0">Visual of how an app without React manages it's data.</span>
- <span id="bae2">A lot of prop threading happening.</span>
- <span id="989f">Data stored in a sep. location — `global data`. The Anatomy of Redux</span>
- <span id="cd66">`Store`</span>
- <span id="9453">Holds the Frontend State</span>
- <span id="cea4">Provides an API for the Frontend State</span>
- <span id="c653">`Action`</span>
- <span id="7fb4">POJOs</span>
- <span id="69a1">Outline Changes to Frontend State</span>
- <span id="1a0a">`Reducers`</span>
- <span id="a372">Functions</span>
- <span id="8bb8">Make Changes to Frontend State Where did Redux come from?</span>
- <span id="6d0b">There are three central philosophies of Redux:</span>
1. <span id="12ac">`A Single Source of Truth` : state is stored in a POJO</span>
2. <span id="d178">`State is Read Only` : State is immutable, modified by dispatching actions.</span>
3. <span id="51c5">`Changes are Made with Pure Functions` : Reducers that receive the actions and return updated state are pure functions of the old state and action. When is it appropriate to use Redux?</span>
- <span id="117f">When doing a project with simpler global state requirements, it may be better to choose React's Context API over Redux.</span>
- <span id="5d3d">Redux offers more flexibility and support for middleware along with richer developer tools. Vocabulary</span>
- <span id="1ceb">`State`</span>
- <span id="49e7">_Redux is a State Manager_</span>
- <span id="5018">State is all the information stored by that program at a particular point in time.</span>
- <span id="8fdb">Redux's main job is to store the state and make it directly available to your entire app.</span>
- <span id="8bbd">`Store`</span>
- <span id="f027">_Redux stores state in a single store_.</span>
- <span id="c97e">Redux store is a single JS object with a couple of methods (not a class!)</span>
- <span id="199d">Methods include: `getState`, `dispatch(action)`, and `subscribe(listener)`</span>
- <span id="8bcf">`Actions`</span>
- <span id="2049">_Redux store is updated by dispatching actions_</span>
- <span id="cbac">Action is just a POJO that includes a mandatory `type` property.</span>
- <span id="f2d5">Contain info to update the store.</span>
- <span id="1bd9">We dispatch actions in response to User actions or AJAX requests.</span>
- <span id="1b78">`Pure Functions`</span>
- <span id="c436">_Redux Reducers are Pure Functions_</span>
- <span id="e204">Functions are pure when their behavior depends only on it's arguments as has no side effects.</span>
- <span id="450b">Simply takes in an argument and outputs a value.</span>
- <span id="e146">`Reducer`</span>
- <span id="9721">_Redux handles actions using reducers_</span>
- <span id="c312">A function that is called each time an action is dispatched.</span>
- <span id="84d8">Takes in an `action` and `current state`</span>
- <span id="90a3">Required to be pure functions so their behavior is predictable.</span>
- <span id="5c36">`Middleware`</span>
- <span id="6b22">_Customize response to dispatch actions by using Middleware_</span>
- <span id="9287">Middleware is an optional component of Redus that allows custom responses to dispatched actions.</span>
- <span id="f953">Most common use is to dispatch async requests to a server.</span>
- <span id="773e">`Time Traveling Dev Tools`</span>
- <span id="d703">_Redux can time travel wow_</span>
- <span id="7187">Time travel refers to Redux's ability to revert to a previous state because reducers are all pure functions.</span>
- <span id="ada3">`Thunks`</span>
- <span id="ee0f">_Convenient format for taking async actions in Redux_</span>
- <span id="586e">General concept in CS referring to a function who's primary purpose is to call another function.</span>
- <span id="6f45">Most commonly used to make async API requests.</span>
---
### Flux and Redux
What is Flux?
- <span id="06d1">Front-end application architecutre.</span>
- <span id="8311">A pattern in which to structure an application.</span>
- <span id="05e6">Unidirectional Data Flow — offers more predictability.</span>
- <span id="751c">`Actions` : Begins the data flow of data, simple object that contains a type; type indicates the type of change to be performed.</span>
- <span id="e8e7">`Dispatcher` : Mechanism for distributing actions to the store.</span>
- <span id="af4f">`Store` : The entire state of the application, responsible for updating the state of your app.</span>
- <span id="d7ff">`View` : Unit of code that's responsible for rendering the user interface. Used to re-render the application when actions and changes occur.</span>
<figure>
<img src="https://cdn-images-1.medium.com/max/800/0*ywV6dO4a4QcGJxK5" class="graf-image" />
</figure>- <span id="af94">Redux</span>
<figure>
<img src="https://cdn-images-1.medium.com/max/800/0*Nd73GjTY1PVQtjtQ" class="graf-image" />
</figure>- <span id="dc16">Library that facilitates the implementation of Flux.</span>
- <span id="623a">Redux Three Principles</span>
- <span id="2ac6">`Single Source of Truth`</span>
- <span id="a2b9">`State is Read-Only`</span>
- <span id="897b">`Only Pure Functions Change State`</span>
---
### Store
- <span id="cd1e">Simply an object that holds the application state wrapped in an API.</span>
- <span id="f57c">`Three methods`:</span>
- <span id="354c">`getState()` : Returns the store's current state.</span>
- <span id="537c">`dispatch(action)` : Passes an action into the store's reducer to tell it what info to update.</span>
- <span id="4539">`subscribe(callback)` : Registers a callback to be triggered whenever the store updates. Updating the Store</span>
<!-- -->
store.dispatch(action);
// Add Orange Action
const addOrange = {
type: "ADD_FRUIT",
fruit: "orange",
};
// Reducer for Orange Action
const fruitReducer = (state = [], action) => {
switch (action.type) {
case "ADD_FRUIT":
return [...state, action.fruit];
default:
return state;
}
};
// Run the Dispatch
console.log(store.getState()); // []
store.dispatch(addOrange);
console.log(store.getState()); // [ 'orange' ]
Subscribing to the store
- <span id="1a02">Whenever a store process a dispatch(), it triggers all its subscribers.</span>
- <span id="e667">`Subscribers` : callbacks that can be added to the store via subscribe().</span>
<!-- -->
const display = () => {
console.log(store.getState());
};
const unsubscribeDisplay = store.subscribe(display);
store.dispatch(addOrange); // [ 'orange', 'orange' ]
// display will no longer be invoked after store.dispatch()
unsubscribeDisplay();
store.dispatch(addOrange); // no output
Reviewing a simple example
// app.js
const { createStore } = require("redux");
// Define the store's reducer.
const fruitReducer = (state = [], action) => {
switch (action.type) {
case "ADD_FRUIT":
return [...state, action.fruit];
default:
return state;
}
};
// Create the store.
const store = createStore(fruitReducer);
// Define an 'ADD_FRUIT' action for adding an orange to the store.
const addOrange = {
type: "ADD_FRUIT",
fruit: "orange",
};
// Log to the console the store's state before and after
// dispatching the 'ADD_FRUIT' action.
console.log(store.getState()); // []
store.dispatch(addOrange);
console.log(store.getState()); // [ 'orange' ]
// Define and register a callback to listen for store updates
// and console log the store's state.
const display = () => {
console.log(store.getState());
};
const unsubscribeDisplay = store.subscribe(display);
// Dispatch the 'ADD_FRUIT' action. This time the `display` callback
// will be called by the store when its state is updated.
store.dispatch(addOrange); // [ 'orange', 'orange' ]
// Unsubscribe the `display` callback to stop listening for store updates.
unsubscribeDisplay();
// Dispatch the 'ADD_FRUIT' action one more time
// to confirm that the `display` method won't be called
// when the store state is updated.
store.dispatch(addOrange); // no output
### Reducers
- <span id="98f3">Reducer function receives the current `state` and `action`, updates the state appropriately based on the `action.type` and returns the following state.</span>
- <span id="4cee">You can bundles different action types and ensuing logic by using a switch/case statement.</span>
<!-- -->
const fruitReducer = (state = [], action) => {
switch (action.type) {
case "ADD_FRUIT":
return [...state, action.fruit];
case "ADD_FRUITS":
return [...state, ...action.fruits];
case "SELL_FRUIT":
const index = state.indexOf(action.fruit);
if (index !== -1) {
// remove first instance of action.fruit
return [...state.slice(0, index), ...state.slice(index + 1)];
}
return state; // if action.fruit is not in state, return previous state
case "SELL_OUT":
return [];
default:
return state;
}
};
Reviewing how Array\#slice works
const fruits = ["apple", "apple", "orange", "banana", "watermelon"];
// The index of the 'orange' element is 2.
const index = fruits.indexOf("orange");
// `...fruits.slice(0, index)` returns the array ['apple', 'apple']
// `...fruits.slice(index + 1)` returns the array ['banana', 'watermelon']
// The spread syntax combines the two array slices into the array
// ['apple', 'apple', 'banana', 'watermelon']
const newFruits = [...fruits.slice(0, index), ...fruits.slice(index + 1)];
- <span id="f322">Approach that can be used to remove an element without mutating the original array. Avoiding state mutations</span>
- <span id="f862">Your reducer must always return a new object if the state changes. GOOD</span>
<!-- -->
const goodReducer = (state = { count: 0 }, action) => {
switch (action.type) {
case "INCREMENT_COUNTER":
const nextState = Object.assign({}, state);
nextState.count++;
return nextState;
default:
return state;
}
};
BAD
const badReducer = (state = { count: 0 }, action) => {
switch (action.type) {
case "INCREMENT_COUNTER":
state.count++;
return state;
default:
return state;
}
};
---
### Actions
- <span id="64b4">Actions are the only way to trigger changes to the store's state. Using action creators</span>
<!-- -->
const addOrange = {
type: "ADD_FRUIT",
fruit: "orange",
};
store.dispatch(addOrange);
console.log(store.getState()); // [ 'orange' ]
- <span id="c39d">fruit is the `payload key` and orange is the `state data`</span>
- <span id="43e2">`Action Creators` : Functions created from extrapolating the creation of an action object.</span>
<!-- -->
const addFruit = (fruit) => ({
type: "ADD_FRUIT",
fruit,
});
- <span id="11fd">Use parenthesis for implicit return value.</span>
- <span id="eea8">We can now add whatever fruit we'd like.</span>
<!-- -->
store.dispatch(addFruit("apple"));
store.dispatch(addFruit("strawberry"));
store.dispatch(addFruit("lychee"));
console.log(store.getState()); // [ 'orange', 'apple', 'strawberry', 'lychee' ]
Preventing typos in action type string literals
const ADD_FRUIT = "ADD_FRUIT";
const ADD_FRUITS = "ADD_FRUITS";
const SELL_FRUIT = "SELL_FRUIT";
const SELL_OUT = "SELL_OUT";
const addFruit = (fruit) => ({
type: ADD_FRUIT,
fruit,
});
const addFruits = (fruits) => ({
type: ADD_FRUITS,
fruits,
});
const sellFruit = (fruit) => ({
type: SELL_FRUIT,
fruit,
});
const sellOut = () => ({
type: SELL_OUT,
});
- <span id="ae86">Using constant variables helps reduce simple typos in a reducer's case clauses.</span>
---
### Debugging Arrow Functions
- <span id="43c6">It is important to learn how to use debugger statements with arrow functions to effectively debug Redux cycle. Understanding the limitations of implicit return values</span>
<!-- -->
const addFruit = (fruit) => {
return {
type: "ADD_FRUIT",
fruit,
};
};
const addFruit = (fruit) => {
debugger;
return {
type: "ADD_FRUIT",
fruit,
};
};
- <span id="2806">You must use explicit return statement arrow function to use a debugger.</span>
---
### React Router Introduction
Now that you know how to render components in a React app, how do you handle rendering different components for different website pages? React Router is the answer!
Think of how you have created server-side routes in Express. Take the following URL and server-side route. Notice how the `/users/:userId` path corresponds with the `http://localhost:3000/users/2` URL to render a specific HTML page.
// http://localhost:3000/users/2
app.get('/users/:userId', (req, res) => {
res.render('userProfile.pug');
});
In the default React setup, you lose the ability to create routes in the same manner as in Express. This is what React Router aims to solve!
<a href="https://github.com/ReactTraining/react-router" class="markup--anchor markup--p-anchor">React Router</a> is a frontend routing library that allows you to control which components to display using the browser location. A user can also copy and paste a URL and email it to a friend or link to it from their own website.
When you finish this article, you should be able to use the following from the `react-router-dom` library:
- <span id="e5d3">`<BrowserRouter>` to provide your application access to the `react-router-dom` library; and</span>
- <span id="e1cd">`<Route>` to connect specific URL paths to specific components you want rendered; and</span>
- <span id="bf15">`<Switch>` to wrap several `Route` elements, rendering only one even if several match the current URL; and</span>
- <span id="0318">React Router's `match` prop to access route path parameters.</span>
### Getting started with routing
Since you are writing single page apps, you don't want to refresh the page each time you change the browser location. Instead, you want to update the browser location and your app's response using JavaScript. This is known as client-side routing. You are using React, so you will use React Router to do this.
Create a simple react project template:
npx create-react-app my-app --template @appacademy/simple
Then install React Router:
npm install --save react-router-dom@^5.1.2
Now import `BrowserRouter` from `react-router-dom` in your entry file:
import { BrowserRouter } from 'react-router-dom`;
### BrowserRouter
`BrowserRouter` is the primary component of the router that wraps your route hierarchy. It creates a React context that passes routing information down to all its descendent components. For example, if you want to give `<App>` and all its children components access to React Router, you would wrap `<App>` like so:
// ./src/index.js
import React from 'react';
import ReactDOM from 'react-dom';
import { BrowserRouter } from 'react-router-dom';
import App from './App';
const Root = () => {
return (
<BrowserRouter>
<App />
</BrowserRouter>
);
};
ReactDOM.render(
<React.StrictMode>
<Root />
</React.StrictMode>,
document.getElementById('root'),
);
Now you can route the rendering of certain components to certain URLs (i.e `https://www.website.com/profile`<a href="https://www.website.com/profile%29." class="markup--anchor markup--p-anchor">).</a>
### HashRouter
Alternatively, you could import and use `HashRouter` from `react-router-dom`. Links for applications that use `<HashRouter>` would look like `https://www.website.com/#/profile` (with an `#` between the domain and path).
You'll focus on using the `<BrowserRouter>`.
### Creating frontend routes
React Router helps your React application render specific components based on the URL. The React Router component you'll use most often is `<Route>`.
The `<Route>` component is used to wrap another component, causing that component to only be rendered if a certain URL is matched. The behavior of the `<Route>` component is controlled by the following props: `path`, `component`, `exact`, and `render` (optional).
Create a simple `Users` component that returns `<h1>This is the users index!</h1>`. Now let's refactor your `index.js` file so that you can create your routes within the component:
// ./src/index.js
import React from 'react';
import ReactDOM from 'react-dom';
import { BrowserRouter, Route } from 'react-router-dom';
import App from './App';
import Users from './Users';
const Root = () => {
return (
<BrowserRouter>
<div>
{/* TODO: Routes */}
</div>
</BrowserRouter>
);
};
ReactDOM.render(
<React.StrictMode>
<Root />
</React.StrictMode>,
document.getElementById('root'),
);
Note that `BrowserRouter` can only have a single child component, so the snippet above wraps all routes within parent a `<div>` element. Now let's create some routes!
### component
Begin with the `component` prop. This prop takes a reference to the component to be rendered. Let's render your `App` component:
const Root = () => {
return (
<BrowserRouter>
<div>
<Route component={App} />
</div>
</BrowserRouter>
);
};
Now you'll need to connect a path to the component!
### path
The wrapped component will only be rendered when the path is matched. The path matches the URL when it matches some initial portion of the URL. For example, a path of `/` would match both of the following URLs: `/` and `/users`. (Because `/users` begins with a `/` it matches the path `/`)
<Route path='/' component={App} />
<Route path='/users' component={Users} />
Take a moment to navigate to `http://localhost:3000/users` to see how both the `App` component and `Users` component are rendering.
### exact
If this `exact` flag is set, the path will only match when it exactly matches the URL. Then browsing to the `/users` path would no longer match `/` and only the `Users` component will be rendered (instead of both the `App` component and `Users` component).
<Route exact path='/' component={App} />
<Route path='/users' component={Users} />
### render
This is an optional prop that takes in a function to be called. The function will be called when the path matches. The function's return value is rendered. You could also define a functional component inside the `component` prop, but this results in extra, unnecessary work for React. The `render` prop is preferred for inline rendering of simple functional components.
The difference between using `component` and `render` is that `component` returns new JSX to be re-mounted every time the route renders, while `render` simply returns to JSX what will be mounted once and re-rendered. For any given route, you should only use either the `component` prop, or the `render` prop. If both are supplied, only the `component` prop will be used.
// This inline rendering will work, but is unnecessarily slow.
<Route path="/hello" component={() => <h1>Hello!</h1>} />
// This is the preferred way for inline rendering.
<Route path="/hello" render={() => <h1>Hello!</h1>} />
It can be helpful to use `render` instead of `component` in your `<Route>` when you need to pass props into the rendered component. For example, imagine that you needed to pass the `users` object as a prop to your `Users` component. Then you could pass in props from `Root` to `Users` by returning the `Users` component like so:
// `users` to be passed as a prop:
const users = {
1: { name: 'Andrew' },
2: { name: 'Raymond' }
};
<Route path="/users" render={() => <Users users={users} />} />
As a reminder, `BrowserRouter` can only have a single child component. That's why you have wrapped all your routes within parent a `<div>` element.
const Root = () => {
const users = {
1: { name: 'Andrew' },
2: { name: 'Raymond' }
};
return (
<BrowserRouter>
<div>
<h1>Hi, I'm Root!</h1>
<Route exact path="/" component={App} />
<Route path="/hello" render={() => <h1>Hello!</h1>} />
<Route path="/users" render={() => <Users users={users} />} />
</div>
</BrowserRouter>
);
};
With this `Root` component, you will always render the `<h1>Hi, I'm Root!</h1>`, regardless of the path. Because of the first `<Route>`, you will only render the `App` component if the path exactly matches `/`. Because of the second `<Route>`, you will only render the `Users` component if the path matches `/users`.
### Route path params
A component's props can also hold information about a URL's parameters. The router will match route segments starting at `:` up to the next `/`, `?`, or `#`. Those matched values are then passed to components via their props. Such segments are _wildcard_ values that make up your route parameters.
For example, take the route below:
<Route path="/users/:userId"
render={(props) => <Profile users={users} {...props} />} />
The router would break down the full `/users/:userId/photos` path to two parts: `/users`, `:userId`.
The `Profile` component's props would have access to the `:userId` part of the `http://localhost:3000/users/:userId/photos` URL through the `props` with router parameter information. You would access the the `match` prop's parameters (`props.match.params`). If you are using the `render` prop of the `Route` component, make sure to spread the props back into the component if you want it to know about the "match" parameters.
// Route's `render` prop allows you to pass the `users`
// prop and spread the router `props`.
render={(props) => <Profile users={users} {...props} />}
The `params` object would then have a property of `userId` which would hold the value of the `:userId` _wildcard_ value. Let's render the `userId` parameter in a user profile component. Take a moment to create a `Profile.js` file with the following code:
// ./src/Profile.js
import React from "react";
const Profile = (props) => (
<div>
The user's id is {props.match.params.userId}.
</div>
);
export default Profile;
Notice how it uses the `match` prop to access the `:userId` parameter from the URL. You can use this wildcard to make and AJAX call to fetch the user information from the database and render the return data in the `Profile` component. Recall that your `Profile` component was rendered at the path `/users/:userId`. Thus you can use your `userId` parameters from `match.params` to fetch a specific user:
// ./src/Profile.js
import React from "react";
const Profile = ({ users, match: { params } }) => {
// In a real-world scenario, you'd make a call to an API to fetch the user,
// instead of passing down and keying into a `users` prop.
const user = users[params.userId];
return (
<div>
The user's id is {params.userId} and the user's name is {user.name}.
</div>
);
};
export default Profile;
### Match
Now that you've seen your React Router's `match` prop in action, let's go over more about <a href="https://reacttraining.com/react-router/web/api/Route/route-props" class="markup--anchor markup--p-anchor">route props</a>! React Router passes information to the components as route props, accessible to all components with access to the React Router. The three props it makes available are `location`, `match` and `history`. You've learned about `props.match.params`, but now let's review the other properties of the `match` prop!
This is an object that contains important information about how the current URL matches the route path. Here are some of the more useful keys on the `match` object:
- <span id="1d2c">`isExact`: a boolean that tells you whether or not the URL exactly matches the path</span>
- <span id="b558">`url`: the current URL</span>
- <span id="ab28">`path`: the route path it matched against (without wildcards filled in)</span>
- <span id="be5b">`params`: the matches for the individual wildcard segments, nested under their names</span>
When you use React Router, the browser `location` and `history` are a part of the state of your app. You can store information about which component should be displayed, which user profile you are currently viewing, or any other piece of state, in the browser location. You can then access that information from anywhere your Router props are passed to in your app.
Now that you've learned about parameters and route props, let's revisit your `Root` component to add an `exact` flag to your `/users` route so that it does not render with your `/users/:userId` route. Your component should look something like this:
const Root = () => {
const users = {
1: { name: 'Andrew' },
2: { name: 'Raymond' }
};
return (
<BrowserRouter>
<h1>Hi, I'm Root!</h1>
<div>
<Route exact path="/" component={App} />
<Route path="/hello" render={() => <h1>Hello!</h1>} />
{/* Render the `Users` page if no ID is included. */}
<Route exact path="/users" render={() => <Users users={users} />} />
{/* Otherwise, render the profile page for that userId. */}
<Route path="/users/:userId" component={(props) => <Profile users={users} {...props} />} />
</div>
</BrowserRouter>
);
};
### What you learned
In this article, you learned how to:
- <span id="92fc">Use components from the React Router library; and</span>
- <span id="19b5">Create routes to render specific components; and</span>
- <span id="fc9d">Manage the order of rendered routes; and</span>
- <span id="3281">Use the `exact` flag to ensure that a specific path renders a specific component; and</span>
- <span id="3949">Use the React Router `match` prop to access Router params.</span>
---
### React Router Navigation
Now that you know how to create front-end routes with React Router, you'll need to implement a way for your users to navigate the routes! This is what using React Router's `Link`, `NavLink`, `Redirect`, and `history` prop can help you do.
In this article, you'll be working off of the demo project you built in the React Router Intro reading. When you finish this article, you should be able to use the following components from the `react-router-dom` library:
- <span id="76bc">`<Link>` or `<NavLink>` to create links with absolute paths to routes in your application (like "/users/1"); and,</span>
- <span id="cdc2">`<Redirect>` to redirect a user to another path (i.e. a login page when the user is not logged in); and</span>
- <span id="d8a7">React Router's `history` prop to update a browser's URL programmatically.</span>
### Adding links for navigation
React Router's `<Link>` is one way to simplify navigation around your app. It issues an on-click navigation event to a route defined in your app's router. Using `<Link>` renders an anchor tag with a correctly set `href` attribute.
### Link
To use it, update your imports from the `react-router-dom` package to include `Link`:
import { BrowserRouter, Route, Link } from 'react-router-dom';
Note that `<Link>` can take two props: `to` and `onClick`.
The `to` prop is a route location description that points to an absolute path, (i.e. `/users`). Add the following `Link` components in your `index.js` file above your routes:
<Link to="/">App</Link>
<Link to="/users">Users</Link>
<Link to="/users/1">Andrew's Profile</Link>
The `onClick` prop is just like any other JSX click handler. You can write a function that takes in an `event` and handles it. Add the following `Link` before your routes and the following click handler function within your `Root` component:
// Link with onClick prop
<Link to="/" onClick={handleClick}>App with click handler</Link>
// Click handler function
const handleClick = () => {
console.log('Thanks for clicking!')
};
Now, test your routes and links! If you inspect the page, you'll see that your links are now rendered as `<a>` elements. Notice that clicking the `App with click handler` link logs a message in your console while directing your browser to render the `App` component.
### NavLink
The `<NavLink>` works just like a `<Link>`, but with a little extra functionality. It has the ability to add extra styling when the path it links to matches the current path. This makes it an ideal choice for a navigation bar, hence the name. This styling can be controlled by three extra props: `activeClassName`, `activeStyle`, and `exact`. To begin using `NavLink`, update your imports from the `react-router-dom` package:
import { BrowserRouter, Route, NavLink } from 'react-router-dom';
The `activeClassName` prop of the `NavLink` component allows you to set a CSS class name for styling the `NavLink` when its route is active. By default, the `activeClassName` is already set to `active`. This means that you simply need to add an `.active` class to your CSS file to add active styling to your link. A `NavLink` will be active if its `to` prop path matches the current URL.
Let's change your "Users", "Hello", and "Andrew's Profile" links to be different colors and have a larger font size when active.
<NavLink to="/">App</NavLink>
<NavLink activeClassName="red" to="/users">Users</NavLink>
<NavLink activeClassName="blue" to="/hello">Hello</NavLink>
<NavLink activeClassName="green" to="/users/1">Andrew's Profile</NavLink>
<NavLink to="/" onClick={handleClick}>App with click handler</NavLink>
For example, this is what the rendered HTML `<a>` tag would look like when when the browser is navigated to the `/` path or the `/users` path:
<!-- Navigated to the / path (the activeClassName
prop is set to active by default) -->
<a href="/" class="active">App</a>
<!-- NOT navigated to the `/` path -->
<a href="/">App</a>
<!-- Navigated to the /users path (the activeClassName
prop is manually set to red) -->
<a href="/users" class="red">Users</a>
<!-- NOT navigated to the `/users` path -->
<a href="/users">Users</a>
Import `NavLink` into your `index.js` file and take a moment to update all your `Link` elements to `NavLink` elements. Set an `activeClassName` prop to an `active` class. Add the following `.active` class to your `index.css` file:
.active {
font-weight: bold;
}
.red {
color: red;
font-size: 30px;
}
.blue {
color: blue;
font-size: 30px;
}
.green {
color: green;
font-size: 30px;
}
Test your styled links! Notice how the `App` and `App with click handler` links are always bolded. This is because all of your links include the `/` path, meaning that the link to `/` will be active when browsing to `/users` and `/users/1` because of how `users` and `users/1` are both prefaced by a `/`.
The `activeStyle` prop is a style object that will be applied inline to the `NavLink` when its `to` prop matches the current URL. Add the following `activeStyle` to your `App` link and comment out the `.active` class in your CSS file.
<NavLink to="/" activeStyle={{ fontWeight: "bold" }}>App</NavLink>
The following html is rendered when at the `/` path:
<a href="/" style="font-weight:bold;" class="active">App</a>
Notice how your `App with click handler` is not bolded anymore. This is because the default `active` class being applied does not have any CSS stylings set to the class. Uncomment your `.active` class in your CSS file to bring back bolding to this NavLink.
The `exact` prop is a boolean that defaults to `false`. If set to `true`, then the `activeStyle` and `activeClassName` props will only be applied when the current URL exactly matches the `to` prop. Update your `App` and `App with click handler` links with an `exact` prop set. Just like in your routes, you can use the `exact` flag instead of `exact={true}`.
<NavLink to="/" exact={true} activeStyle={{ fontWeight: "bold" }}>App</NavLink>
<NavLink to="/" exact onClick={handleClick}>App with click handler</NavLink>
Now your `App` and `App with click handler` links will only be bolded when you have navigated precisely to the `/` path.
### Switching between routes
You came across styling issues when the `/users` and `/users/1` paths matched the `/` path. Routing can have this issue as well. This is why you need to control the switching between routes.
React Router's `<Switch>` component allows you to only render one `<Route>` even if several match the current URL. You can nest as many `Route`s as you wish between the opening and closing `Switch` tags, but only the first one that matches the current URL will be rendered.
This is particularly useful if you want a default component that will only render if none of our other routes match. View the example below. Without the Switch, `DefaultComponent` would always render. Since there isn't set a path in the `DefaultComponent` route, it will simply use the default path of `/`. Now the `DefaultComponent` will only render when neither of the preceding routes match.
<Switch>
<Route path="some/url" component={SomeComponent} />
<Route path="some/other/url" component={OtherComponent} />
<Route component={DefaultComponent} />
</Switch>
Import `Switch` from `react-router-dom` and add `<Switch>` tags around your routes to take care of ordering and switching between your routes! Begin by adding the following route to the bottom of your routes to render that a `404: Page not found` message:
<Route render={() => <h1>404: Page not found</h1>} />
This is what your `Root` component should look like at this point:
const Root = () => {
const users = [
{ name: 'andrew' },
{ name: 'raymond' }
];
const handleClick = () => {
console.log('Thanks for clicking!')
};
return (
<BrowserRouter>
<h1>Hi, I'm Root!</h1>
<div>
<NavLink to="/" exact={true} activeStyle={{ fontWeight: "bold" }}>App</NavLink>
<NavLink activeClassName="red" to="/users">Users</NavLink>
<NavLink activeClassName="blue" to="/hello">Hello</NavLink>
<NavLink activeClassName="green" to="/users/1">Andrew's Profile</NavLink>
<NavLink to="/" exact onClick={handleClick}>App with click handler</NavLink>
<Switch>
<Route path="/users/:userId" component={(props) => <Profile users={users} {...props} />} />
<Route exact path="/users" render={() => <Users users={users} />} />
<Route path="/hello" render={() => <h1>Hello!</h1>} />
<Route exact path="/" component={App} />
<Route render={() => <h1>404: Page not found</h1>} />
</Switch>
</div>
</BrowserRouter>
);
};
Now you have control over the precedence of rendered components! Try navigating to `http://localhost:3000/asdf` or any other route you have not defined. The `<h1>404: Page not found</h1>` JSX of the last `<Route>` will be rendered whenever the browser attempts to visit an undefined route.
### Redirecting users
But what if you want to redirect users to a login page when they aren't logged in? The `<Redirect>` component from React Router helps you redirect users!
The component takes only one prop: `to`. When it renders, it replaces the current URL with the value of its `to` prop. Typically you conditionally render `<Redirect>` to redirect the user away from some page you don't want them to visit. The example below checks whether there is a defined `currentUser` prop. If so, the `<Route>` will render the `Home` component. Otherwise, it will redirect the user to the `/login` path.
<Route
exact path="/"
render={() => (this.props.currentUser ? <Home /> : <Redirect to="/login" />)}
/>
Note: you will learn how to use a more flexible auth pattern — don't directly imitate this example.
### History
You know how to redirect users with a `<Redirect>` component, but what if you need to redirect users programmatically? You've learned about the React Router's `match` prop, but now let's go over another one of the <a href="https://reacttraining.com/react-router/web/api/Route/route-props" class="markup--anchor markup--p-anchor">route props</a>: `history`!
// Pushing a new URL (and adding to the end of history stack):
const handleClick = () => this.props.history.push('/some/url');
// Replacing the current URL (won't be tracked in history stack):
const redirect = () => this.props.history.replace('/some/other/url');
This prop lets you update the URL programmatically. For example, suppose you want to push a new URL when the user clicks a button. It has two useful methods:
- <span id="31f3">`push` - This adds a new URL to the end of the history stack. That means that clicking the back button will take the browser to the previous URL. Note that pushing the same URL multiple times in a row will have no effect; the URL will still only show up on the stack once. In development mode, pushing the same URL twice in a row will generate a console warning. This warning is disabled in production mode.</span>
- <span id="90c1">`replace` - This replaces the current URL on the history stack, so the back button won't take you to it. For example:</span>
### What you learned
In this article, you learned how to:
- <span id="169b">Create navigation links for your route paths; and</span>
- <span id="d108">Redirect users through using the `<Redirect>` component; and</span>
- <span id="d090">Update a browser's URL programmatically by using React Router's `history` prop.</span>
---
### React Router Nested Routes
Now you know how to create front-end routes and add navigation with React Router. When initializing Express projects, you declare static routes. Static routes are routes that are declared when an application is initialized. When using React Router in your application's initialization, you can declare dynamic routes. React Router introduces dynamic routing, where your routes are created as your application is rendering. This allows you to create nested routes within components!
In this article, let's dive into <a href="https://reacttraining.com/react-router/core/guides/philosophy/nested-routes" class="markup--anchor markup--p-anchor">nested routes</a>! When you finish the article, you should:
- <span id="38ee">Describe what nested routes are; and</span>
- <span id="0559">Be able to use React Router to create and navigate nested routes; and</span>
- <span id="ce4a">Know how to use the React Router `match` prop to generate links and routes.</span>
### Why nested routes?
Let's begin with why you might need nested routes. As you remember, you are using React to create a single-page application. This means that you'll be organizing your application into different components and sub-components.
For example, imagine creating a simple front-end application with three main pages: a home welcome page (path of `/`), a users index page (path of `/users`), and user profile pages (path of `/users/:userId`). Now imagine if every user had links to separate `posts` and `photos` pages.
You can create those routes and links within the user profile component, instead of creating the routes and links where the main routes are defined.
### What are nested routes?
Now let's dive into a user profile component to understand what are nested routes! Imagine you have a route in your application's entry file to each user's profile like so:
<Route path="/users/:userId" component={Profile} />
This means that upon navigating to `http://localhost:3000/users/1`, you would render the following `Profile` component and the `userId` parameter within `props.match.params` would have the value of `"1"`.
const Profile = (props) => {
// Custom call to database to fetch a user by a user ID.
const user = fetchUser(props.match.params.userId);
const { name, id } = user;
return (
<div>
<h1>Welcome to the profile of {name}!</h1>
{/* Links to a specific user's posts and photos */}
<Link to={`/users/${id}/posts`}>{name}'s Posts</Link>
<Link to={`/users/${id}/photos`}>{name}'s Photos</Link>
{/* Routes to a specific user's posts and photos */}
<Route path='/users/:userId/posts' component={UserPosts} />
<Route path='/users/:userId/photos' component={UserPhotos} />
</div>
);
};
Since this route is not created until the `Profile` component is rendered, you are dynamically creating your nested `/users/:userId/posts` and `/users/:userId/photos` routes. Remember that your `match` prop also has other helpful properties. You can use `match.url` instead of `/users/${id}` in your profile links. You can also use `match.path` instead of `/users/:userId` in your profile routes. Remember that you can destructure `url`, `path`, and `params` from your `match` prop!
// Destructure `match` prop
const Profile = ({ match: { url, path, params }) => {
// Custom call to database to fetch a user by a user ID.
const user = fetchUser(params.userId);
const { name, id } = user;
return (
<div>
<h1>Welcome to the profile of {name}!</h1>
{/* Replaced `/users/${id}` URL with `props.match.url` */}
<Link to={`${url}/posts`}>{name}'s Posts</Link>
<Link to={`${url}/photos`}>{name}'s Photos</Link>
{/* Replaced `/users/:userId` path with `props.match.path` */}
<Route path={`${path}/posts`} component={UserPosts} />
<Route path={`${path}/photos`} component={UserPhotos} />
</div>}
);
};
In tomorrow's project, you'll build a rainbow of routes as well as define nested routes. In the future, you may choose to implement nested routes to keep your application's routes organized within related components.
### What you learned
In this article, you learned:
- <span id="2378">What nested routes are; and</span>
- <span id="e072">About creating and navigating nested routes with React Router; and</span>
- <span id="c8b8">How to use the React Router props to generate nested links and routes.</span>
---
### React Builds
A "build" is the process of converting code into something that can actually execute or run on the target platform. A "front-end build" is a process of preparing a front-end or client-side application for the browser.
With React applications, that means (at a minimum) converting JSX to something that browsers can actually understand. When using Create React App, the build process is automatically configured to do that and a lot more.
When you finish this article, you should be able to:
- <span id="2448">Describe what front-end builds are and why they're needed;</span>
- <span id="efab">Describe at a high level what happens in a Create React App when you run `npm start`; and</span>
- <span id="502f">Prepare to deploy a React application into a production environment.</span>
### Understanding front-end builds
The need for front-end builds predates React. Over the years, developers have found it helpful to extend the lowest common denominator version of JavaScript and CSS that they could use.
Sometimes developers extend JavaScript and CSS with something like <a href="https://www.typescriptlang.org/" class="markup--anchor markup--p-anchor">TypeScript</a> or <a href="https://sass-lang.com/" class="markup--anchor markup--p-anchor">Sass</a>. Using these non-standard languages and syntaxes require you to use a build process to convert your code into standard JavaScript and CSS that can actually run in the browser.
Browser-based applications also require a fair amount of optimization to deliver the best, or at least acceptable, experience to end users. Front-end build processes could be configured to lint code, run unit tests, optimize images, minify and bundle code, and more — all automatically at the press of a button (i.e. running a command at the terminal).
### JavaScript versions and the growth of front-end builds
Developers are generally an impatient lot. When new features are added to JavaScript, we don't like to wait for browsers to widely support those features before we start to use them in our code. And we _really_ don't like when we have to support older, legacy versions of browsers.
In recent years, JavaScript has been updated on a yearly basis and browser vendors do a decent job of updating their browsers to support the new features as they're added to the language. Years ago though, there was an infamous delay between versions 5 and 6 of JavaScript. It took _years_ before ES6 (or ES2015 as it eventually was renamed to) to officially be completed and even longer before browsers supported all of its features.
In the period of time before ES2015 was broadly supported by browsers, developers used front-end builds to convert or _transpile_ ES2015 features and syntax to an older version of the language that was more broadly supported by browsers (typically ES5). The transpilation from ES2015/ES6 down to ES5 was one of the major drivers for developers to add front-end builds to their client-side projects.
### Reviewing common terminology
When learning about front-end or React builds, you'll encounter a lot of terminology that you may or may not be familiar with. Here's some of the terminology that you'll likely encounter:
Linting is process of using a tool to analyze your code to catch common programming errors, bugs, stylistic inconsistencies, and suspicious coding patterns. <a href="https://eslint.org/" class="markup--anchor markup--p-anchor">ESLint</a> is a popular JavaScript linting tool.
Transpilation is the process of converting source code, like JavaScript, from one version to another version. Usually this means converting newer versions of JavaScript, <a href="https://www.ecma-international.org/ecma-262/10.0/index.html" class="markup--anchor markup--p-anchor">ES2019</a> or <a href="https://tc39.es/ecma262/" class="markup--anchor markup--p-anchor">ES2021</a>, to a version that's more widely supported by browsers, like <a href="http://www.ecma-international.org/ecma-262/6.0/" class="markup--anchor markup--p-anchor">ES2015</a>, or even <a href="https://www.ecma-international.org/ecma-262/5.1/" class="markup--anchor markup--p-anchor">ES5</a> or <a href="https://www.ecma-international.org/publications/files/ECMA-ST-ARCH/ECMA-262,%203rd%20edition,%20December%201999.pdf" class="markup--anchor markup--p-anchor">ES3</a> (if you need to support the browser that your parents or grandparents use).
Minification is the process of removing all unnecessary characters in your code (e.g. white space characters, new line characters, comments) to produce an overall smaller file. Minification tools will often also rename identifers in your code (i.e. parameter and variable names) in the quest for smaller and smaller file sizes. Source maps can also be generated to allow debugging tools to cross reference between minified code and the original source code.
Bundling is the process of combining multiple code files into a single file. Creating a bundle (or a handful of bundles) reduces the number of requests that a client needs to make to the server.
Tree shaking is the process of removing unused (or dead) code from your application before it's bundled. Tree shaking external dependencies can sometimes have a dramatic positive impact on overall bundled file sizes.
### Configuration or code?
Front-end build tools have come and gone over the years; sometimes very quickly, which helped bring about the phenomenon known as <a href="https://sdtimes.com/softwaredev/is-the-javascript-fatigue-real/" class="markup--anchor markup--p-anchor">JavaScript fatigue</a>.
Configuration based tools allow you to create your build tasks by declaring (usually using JSON, XML, or YAML) what you want to be done, without explicitly writing every step in the process. In contrast, coding or scripting based tools allow you to, well, write code to create your build tasks. Configuration based tools _can_ sometimes feel simpler to use while giving up some control (at least initially) while coding based tools _can_ feel more familiar and predictable (since you're describing tasks procedurally). Every generalization is false though (including this one), so there are plenty of exceptions.
<a href="https://gruntjs.com/" class="markup--anchor markup--p-anchor">Grunt</a> is a JSON configuration based task runner that can be used to orchestrate the various tasks that make up your front-end build. Grunt was very quickly supplanted by <a href="https://gulpjs.com/" class="markup--anchor markup--p-anchor">Gulp</a>, which allowed developers to write JavaScript to define front-end build tasks. After Gulp, the front-end tooling landscape became a bit more muddled. Some developers preferred the simplicity of using <a href="https://docs.npmjs.com/misc/scripts" class="markup--anchor markup--p-anchor">npm scripts</a> to define build tasks while others preferred the power of configuration based bundlers like <a href="https://webpack.js.org/" class="markup--anchor markup--p-anchor">webpack</a>.
### Babel and webpack (yes, that's intentionally a lowercase 'w')
As front-end or client-side applications grew in complexity, developers found themselves wanting to leverage more advanced JavaScript features and newer syntax like classes, arrow functions, destructuring, async/await, etc. Using a code transpiler, like <a href="https://babeljs.io/" class="markup--anchor markup--p-anchor">Babel</a>, allows you to use all of the latest and greatest features and syntax without worrying about what browsers support what.
Module loaders and bundlers, like <a href="https://webpack.js.org/" class="markup--anchor markup--p-anchor">webpack</a>, also allowed developers to use JavaScript modules without requiring users to use a browser that natively supports ES modules. Also, module bundling (along with minification and tree-shaking) helps to reduce the bandwidth that's required to deliver the assets for your application to the client.
\[Create React App\]\[cra\] uses webpack (along with Babel) under the covers to build your React applications. Even if you're not using Create React App, webpack and Babel are still very popular choices for building React applications.
### Pulling back the covers (a bit) on the Create React App build process
Running an application created by Create React App using `npm start` can feel magical. Some stuff happens in the terminal and your application opens into your default browser. Even better, when you make changes to your application, your changes will (usually) automatically appear in the browser!
### The Create React App build process
At a high level, here's what happens when you run `npm start`:
- <span id="2808">Environment variables are loaded (more about this in a bit);</span>
- <span id="f272">The list of browsers to support are checked (more about this too in a bit);</span>
- <span id="71b2">The configured HTTP port is checked to ensure that it's available;</span>
- <span id="f826">The application compiler is configured and created;</span>
- <span id="c605">`webpack-dev-server` is started;</span>
- <span id="a696">`webpack-dev-server` compiles your application;</span>
- <span id="c66e">The `index.html` file is loaded into the browser; and</span>
- <span id="6add">A file watcher is started to watch your files, waiting for changes.</span>
### Ejecting
Create React App provides a script that you can run to "eject" your application from the Create React App tooling. When you eject your application, all of the hidden stuff is exposed so that you can review and customize it.
> _The need to customize Create React App rarely happens. Also, don't eject an actual project as it's a one-way trip! Once a Create React App project has been ejected, there's no going back (though you could always undo the ejection process by reverting to an earlier commit if you're using source control)._
To eject your application from Create React App, run the command `npm run eject`. You'll be prompted if you want to continue; type "y" to continue with the ejection process. Once the ejection process has completed, you can review the files that were previously hidden from you.
In the `package.json` file, you'll see the following npm scripts:
{
"scripts": {
"start": "node scripts/start.js",
"build": "node scripts/build.js",
"test": "node scripts/test.js"
}
}
You can open the `./scripts/start.js` file to see the code that's executed when you run `npm start`.
If you're curious about the webpack configuration, you can open and review the `./config/webpack.config.js`.
### Preparing to deploy a React application for production
Before you deploy your application to production, you'll want to make sure that you've replaced static values in your code with environment variables and considered what browsers you need to support.
### Defining environment variables
Create React App supports defining environment variables in an `.env` file. To define an environment variable, add an `.env` file to your project and define one or more variables that start with the prefix `REACT_APP_`:
REACT_APP_FOO: some value
REACT_APP_BAR: another value
Environment variables can be used in code like this:
console.log(process.env.REACT_APP_FOO);
You can also reference environment variables in your `index.html` like this:
<title>%REACT_APP_BAR%</title>
> _Important: Environment variables are embedded into your HTML, CSS, and JavaScript bundles during the build process. Because of this, it's_ very important _to not store any secrets, like API keys, in your environment variables as anyone can view your bundled code in the browser by inspecting your files._
### Configuring the supported browsers
In your project's `package.json` file, you can see the list of targeted browsers:
{
"browserslist": {
"production": [
">0.2%",
"not dead",
"not op_mini all"
],
"development": [
"last 1 chrome version",
"last 1 firefox version",
"last 1 safari version"
]
}
}
Adjusting these targets affect how your code will be transpiled. Specifying older browser versions will result in your code being transpiled to older versions of JavaScript in order to be compatible with the specified browser versions. The `production` list specifies the browsers to target when creating a production build and the `development` list specifics the browsers to target when running the application using `npm start`.
The <a href="https://browserl.ist/" class="markup--anchor markup--p-anchor">browserl.ist</a> website can be used to see the browsers supported by your configured `browserslist`.
### Creating a production build
To create a production build, run the command `npm run build`. The production build process bundles React in production mode and optimizes the build for the best performance. When the command completes, you'll find your production ready files in the `build` folder.
Now your application is ready to be deployed!
> _For more information about how to deploy a Create React App project into production, see_ <a href="https://facebook.github.io/create-react-app/docs/deployment" class="markup--anchor markup--blockquote-anchor">
<em>this page</em>
</a> _in the official documentation._
### What you learned
In this article, you learned how to:
- <span id="1ff3">Describe what front-end builds are and why they're needed;</span>
- <span id="1fc3">Describe at a high level what happens in a Create React App when you run `npm start`; and</span>
- <span id="6adc">Prepare to deploy a React application into a production environment.</span>
---
### React Router Documentation
Now that you've had an introduction to React Router, feel free to explore the official documentation to learn more! As you become a full-fledged software engineer, remember that documentation is your friend. You can take a brief overview for now, as the documentation might include a lot of information at first. The more you learn about React, the more you should revisit the official documentation and learn!
### Setting up React Router
- <span id="bfa4">
<a href="https://reacttraining.com/react-router/web/guides/quick-start" class="markup--anchor markup--li-anchor">React Router Quick Start</a>
</span>
- <span id="b0cb">
<a href="https://reacttraining.com/react-router/web/api/HashRouter" class="markup--anchor markup--li-anchor">HashRouter</a>
</span>
- <span id="f48b">
<a href="https://reacttraining.com/react-router/web/api/BrowserRouter" class="markup--anchor markup--li-anchor">BrowserRouter</a>
</span>
### Routes and Links
- <span id="72bd">
<a href="https://reacttraining.com/react-router/web/api/Route" class="markup--anchor markup--li-anchor">Route</a>
</span>
- <span id="e256">
<a href="https://reacttraining.com/react-router/web/api/Link" class="markup--anchor markup--li-anchor">Link</a>
</span>
- <span id="1d9d">
<a href="https://reacttraining.com/react-router/web/api/NavLink" class="markup--anchor markup--li-anchor">NavLink</a>
</span>
### Switch and Redirect
- <span id="5240">
<a href="https://reacttraining.com/react-router/web/api/Switch" class="markup--anchor markup--li-anchor">Switch</a>
</span>
- <span id="b405">
<a href="https://reacttraining.com/react-router/web/api/Redirect" class="markup--anchor markup--li-anchor">Redirect</a>
</span>
### React Router Params (ownProps)
- <span id="e0d6">
<a href="https://reacttraining.com/react-router/web/api/history" class="markup--anchor markup--li-anchor">props.history</a>
</span>
- <span id="5f4a">
<a href="https://reacttraining.com/react-router/web/api/location" class="markup--anchor markup--li-anchor">props.location</a>
</span>
- <span id="bd15">
<a href="https://reacttraining.com/react-router/web/api/match" class="markup--anchor markup--li-anchor">props.match</a>
</span>
---
### Rainbow Routes Project
Today you're going to get our first experience using React Router. The goal is to create a basic app that displays the colors of the rainbow. This rainbow, however, has something special about it — some of the colors are nested within others.
### Phase 0: Setup
Begin by creating a new React project:
npx create-react-app rainbow-routes --template @appacademy/simple
Now you'll remove all the contents of your `src` and all the contents from your `public` directory to build the application architecture from scratch! After you have deleted all your files within the directories, create a new `index.html` file in your `public` folder. Use the `html:5` emmet shortcut to generate an HTML template. Title your page "Rainbow Routes" and create a `div` with an `id` of `root` in your DOM's `<body>` element. Create an `index.css` file in your `src` directory with the following code. Now let's create your entry file!
h4 {
color: darkblue;
cursor: pointer;
}
h4:hover {
text-decoration: underline;
}
#rainbow {
position: absolute;
top: 0;
left: 300px;
}
h3 {
position: absolute;
top: 1px;
}
.red {
background-color: red;
width: 100px;
height: 100px;
}
.orange {
background-color: orange;
width: 100px;
height: 50px;
}
.yellow {
background-color: yellow;
width: 100px;
height: 50px;
}
.green {
background-color: green;
width: 100px;
height: 100px;
}
.blue {
background-color: blue;
width: 100px;
height: 100px;
}
.indigo {
background-color: mediumslateblue;
width: 100px;
height: 50px;
}
.violet {
background-color: darkviolet;
width: 100px;
height: 100px;
}
a {
display: block;
margin-bottom: 10px;
}
Create an `index.js` entry file in the `src` directory. At the top of the file, make sure to import `React` from the `react` package and `ReactDOM` from the `react-dom` package. Make sure to also import your the `index.css` file you just created! This will take care of styling your _rainbow routes_.
Now you can use the `ReactDOM.render()` method to render a `<Root />` component instead of the DOM element with an `id` of `root`. Lastly, wrap your render function with a `DOMContentLoaded` event listener, like so:
document.addEventListener('DOMContentLoaded', () => {
ReactDOM.render(
<Root />,
document.getElementById('root'),
);
});
Let's create your `Root` component right in your entry file! Your `Root` component will take care of applying your `BrowserRouter` to the application. Applying the `BrowserRouter` to your `Root` component allows all the child components rendering within `<BrowserRouter>` tags to use and access the `Route`, `Link`, and `NavLink` components within the `react-router-dom` package.
const Root = () => (
// TODO: Apply BrowserRouter
// TODO: Render rainbow
);
Install the `react-router-dom` package:
npm install react-router-dom@^5.0.0
Now import `BrowserRouter` from the `react-router-dom` package, like so:
import { BrowserRouter } from 'react-router-dom';
You're going to be rendering a lot of components, so let's keep your `src` directory organized by creating a `components` directory within. Within your new `./src/components` directory, create a `Rainbow.js` file for your `Rainbow` component with the following code:
// ./src/components/Rainbow.js
import React from 'react';
import { Route, Link, NavLink } from 'react-router-dom';
const Rainbow = () => (
<div>
<h1>Rainbow Router!</h1>
{/* Your links should go here */}
<div id="rainbow">
{/* Your routes should go here */}
</div>
</div>
);
export default Rainbow;
Your `Rainbow` component will act as the home page or default path (`/`) of your application. Import the `Rainbow` component into your entry file and have your `Root` component render `<Rainbow />` wrapped within `<BrowserRouter>` tags, like so:
const Root = () => (
<BrowserRouter>
<Rainbow />
</BrowserRouter>
);
Within your `Rainbow` component, you'll be rendering `<NavLink>` and `<Route>` components to add different navigation paths to different components. Let's create all the components you will render!
Create files for the following components in your `./src/components` directory:
- <span id="1c8e">`Red`</span>
- <span id="a8dd">`Blue`</span>
- <span id="6ca3">`Green`</span>
- <span id="8e44">`Indigo`</span>
- <span id="f8f2">`Orange`</span>
- <span id="0f47">`Violet`</span>
- <span id="8a89">`Yellow`</span>
Your `Red` and `Blue` components will look something like this:
import React from 'react';
import { Route, Link, NavLink } from 'react-router-dom';
const Color = () => (
<div>
<h2 className="color">Color</h2>
{/* Links here */}
{/* Routes here */}
</div>
);
export default Color;
Your `Green`, `Indigo`, `Orange`, `Violet`, and `Yellow` components will look something like this:
import React from 'react';
const Color = () => (
<div>
<h3 className="color">Color</h3>
</div>
);
export default Color;
Now start your server and verify you can see the "Rainbow Router!" header from your `Rainbow` component. Currently there is no functionality. Let's fix that!
### Phase 1: Routes
As a reminder, wrapping the `Rainbow` component in `<BrowserRouter>` tags makes the router available to all descendent React Router components. Now open the `Rainbow.js` file. You're going to render some of your color components from here. Ultimately you want your routes to look like this.
URLComponents`/Rainbow/redRainbow -> Red/red/orangeRainbow -> Red -> Orange/red/yellowRainbow -> Red -> Yellow/greenRainbow -> Green/blueRainbow -> Blue/blue/indigoRainbow -> Blue -> Indigo/violetRainbow -> Violet`
This means that the `Red`, `Green`, `Blue`, and `Violet` components need to render in the `Rainbow` component, but only when you are at the corresponding URL. You'll do this with `Route` components. Begin by importing the `Red`, `Green`, `Blue`, and `Violet` components into your `Rainbow.js` file. Then add the necessary `Route` components inside the `div` with `id="rainbow"` in the `Rainbow` component. For example to render the `Red` component with the `/red` path, you would use the following `Route` component:
<Route path="/red" component={Red} />
Test that your code works! Manually type in each URL you just created, and you should see the color component pop up. Remember, these are React Routes, so the paths you created will come after the `/`. For example, your default rainbow route will look like `http://localhost:3000/` while your red route will look like `http://localhost:3000/red`<a href="http://localhost:3000/red." class="markup--anchor markup--p-anchor">.</a>
You want to nest the `Orange` and `Yellow` components inside the `Red` component, and the `Indigo` component inside the `Blue` component. Remember to import your components to use them in a `Route` tag. You'll have to go add the corresponding `Route` tags to the `Red.js` and `Blue.js` files. Make sure to use the correct nested paths, such as `"/red/orange"` for the orange `Route`.
### Phase 2: Links
Manually navigating to our newly created routes is tiresome, so let's add functionality to take care of this process for us. React Router provides the `Link` and `NavLink` components for this purpose.
Add `Link`s to the paths `/red`, `/green`, `/blue`, and `/violet` in the `Rainbow` component. For example, your red link should look like
<Link to="/red">Red</NavLink>
When you are at `blue` you want to be able to get to `/blue/indigo`, and then back to `/blue`. Add the corresponding `Link`s to the `Blue` component like this:
<Link to='/blue' >Blue only</Link>
<Link to='/blue/indigo' >Add indigo</Link>
Similarly, add `Link`s to `/red`, `/red/orange` and `/red/yellow` to the `Red` component. Test all your links. Navigation is so much easier now!
### Phase 3: NavLinks
It would be nice if our links gave us some indication of which route you were at. Fortunately, React Router has a special component for that very purpose: `NavLink`. NavLinks get an extra CSS class when their `to` prop matches the current URL. By default this class is called `active`.
Go ahead and switch all your `Link`s to `NavLink`s. If you open the app you won't see any change yet. That's because you haven't added any special styling to the `active` class. Go ahead and open the `index.css` file. Create an `.active` class and add the line `font-weight: 700`. Now your active links will be bold. Isn't that nice!
The only problem is that now the `Blue only` link is active even when the path is `/blue/indigo`. That doesn't make a lot of sense. Let's add the `exact` flag to that link so it will only be active when its `to` exactly matches the current path. Now it should look like:
<NavLink exact to="/blue">
Blue only
</NavLink>
Do the same for the `Red only` link. Everything should be working now.
### Phase 4 — Changing NavLink's Active Class
You've already set up `NavLink` to bold the link text using the `.active` class in `src/index.css`. But what if you wanted this class to be something else? For instance, what if you want your main color links (Red, Green, Blue, Violet) to be styled differently when active than your sub-route links (Red Only, Add Orange, Add Yellow, etc.).
You can set the class that React Router sets to an active `NavLink` by adding the `activeClassName` prop.
For instance, when we are at a route matching the below `NavLink`'s `to` prop, the component will have a class of `.parent-active` applied:
<NavLink to="/blue" activeClassName="parent-active" >
Blue
</NavLink>
This allows much more flexibility to style an active `NavLink`!
Using the example above, add an `activeClassName` prop to each of your `NavLink`s in `src/components/Rainbow.js`. Now, add some CSS styling for that class in your `src/index.css` to distinguish your main and your sub-route links.
Compare your work to the solution and make sure the behavior is the same. Time to celebrate! ✨ 🌈 ✨
You can also learn more about using the React Router at <a href="https://reacttraining.com/react-router/web/guides/quick-start" class="markup--anchor markup--p-anchor">reacttraining.com</a>!
---
### Exploring React Builds Project
In this project, you'll use Create React App to create a simple React application. You'll experiment with some of the features that Create React App provides and deploy a production build of your application to a standalone Express application.
### Phase 0: Setup
Begin by using the <a href="https://github.com/facebook/create-react-app" class="markup--anchor markup--p-anchor">create-react-app</a> package to create a React application:
npx create-react-app exploring-react-builds --template @appacademy/simple
> _Remember that using the_ `create-react-app` _command initializes your project as a Git repository. If you use the_ `ls -a` _to view the hidden files in your project, you'll see the _`.git` _file._
Update the `App` component:
- <span id="9186">Wrap the `<h1>` element with a `<div>` element; and</span>
- <span id="5e97">Change the `<h1>` element content to something like "Exploring React Builds".</span>
<!-- -->
// ./src/App.js
import React from 'react';
function App() {
return (
<div>
<h1>Exploring React Builds</h1>
</div>
);
}
export default App;
### Phase 1: Using CSS modules
You've already seen an example of using the `import` keyword to import a stylesheet into a module so that it'll be included in your application build. That's the technique being used to include the global `index.css` stylesheet:
// ./src/index.js
import React from 'react';
import ReactDOM from 'react-dom';
import './index.css';
import App from './App';
ReactDOM.render(
<React.StrictMode>
<App />
</React.StrictMode>,
document.getElementById('root')
);
You can also leverage <a href="https://github.com/css-modules/css-modules" class="markup--anchor markup--p-anchor">CSS modules</a> in your Create React App projects. CSS Modules scope stylesheet class names so that they are unique to a specific React component. This allows you to create class names without having to worry if they might collide with class names used in another component.
Add a new `css-modules` folder to the `src` folder. Within that folder, add the following files:
- <span id="2912">`HeadingA.js`</span>
- <span id="3aa3">`HeadingA.module.css`</span>
- <span id="2ea3">`HeadingB.js`</span>
- <span id="ca2b">`HeadingB.module.css`</span>
Then update the contents of each file to the following:
// ./src/css-modules/HeadingA.js
import React from 'react';
import styles from './HeadingA.module.css';
function HeadingA() {
return (
<h1 className={styles.heading}>Heading A</h1>
);
}
export default HeadingA;
/* ./src/css-modules/HeadingA.module.css */
.heading {
color: green;
}
// ./src/css-modules/HeadingB.js
import React from 'react';
import styles from './HeadingB.module.css';
function HeadingB() {
return (
<h1 className={styles.heading}>Heading B</h1>
);
}
export default HeadingB;
/* ./src/css-modules/HeadingB.module.css */
.heading {
color: red;
}
Notice how the `.heading` CSS class name is being used within each component to set the color of the `<h1>` element. For the `HeadingA` component, the color is `green`, and for the `HeadingB` component, the color is `red`. Using the file naming convention `[name].module.css` let's Create React App know that we want these stylesheets to be processed as CSS Modules. Using CSS Modules allows the `.heading` class name to be reused across components without any issue.
To see this feature in action, update your `App` component to render both of your new components:
import React from 'react';
import HeadingA from './css-modules/HeadingA';
import HeadingB from './css-modules/HeadingB';
function App() {
return (
<div>
<h1>Exploring React Builds</h1>
<HeadingA />
<HeadingB />
</div>
);
}
export default App;
Then run your application (`npm start`) to see "Heading A" and "Heading B" displayed respectively in green and red. If you use the browser's developer tools to inspect "Heading A", you'll see that the `.heading` class name has been modified so that it's unique to the `HeadingA` component:
CSS Modules is an example of how a front-end build process can be used to modify code to enable a feature that's not natively supported by browsers.
### Phase 2: Using an image in a component
Create React App configures webpack with support for loading images (as well as CSS, fonts, and other file types). What this means, for you as the developer, is that you can add an image file to your project, import it directly into a module, and render it in a React component.
Download any image of off the Web or <a href="https://appacademy-open-assets.s3-us-west-1.amazonaws.com/Modular-Curriculum/content/react-redux/topics/react-builds/assets/react-builds-cat.png" class="markup--anchor markup--p-anchor">click here</a> to download the below image.
<figure>
<img src="https://cdn-images-1.medium.com/max/800/0*233dNJ6vfgAmEVCD" class="graf-image" />
</figure>Then within the `src` folder add a new folder named `image`. Within that folder add a new component file named `Image.js`. Also add your downloaded image file to the `image` folder (so it's a sibling to the `Image.js` file).
Update the contents of the `Image.js` file to this:
// ./src/image/Image.js
import React from 'react';
import cat from './react-builds-cat.png';
console.log(cat); // /static/media/react-builds-cat.45f7f4d2.png
function Image() {
// Import result is the URL of your image.
return <img src={cat} alt="images/images/Cat" />;
}
export default Image;
You can import an image into a component using the `import` keyword. This tells webpack to include the image in the build. Notice that when you import an image into a module, you'll get a path to the image's location within the build. You can use this path to set the `src` attribute on an `<img>` element.
> _Be sure to update the image_ `import` _statement to the correct file name if you're using your own image!_
Now update the `App` component to import and render the `Image` component:
// ./src/App.js
import React from 'react';
import HeadingA from './css-modules/HeadingA';
import HeadingB from './css-modules/HeadingB';
import Image from './image/Image';
function App() {
return (
<div>
<h1>Exploring React Builds</h1>
<HeadingA />
<HeadingB />
<Image />
</div>
);
}
export default App;
If you run your application (`npm start`) you'll see your image displayed on the page! You can also open your browser's developer tools and view the "Sources" for the current page. If you can expand the `localhost:3000` > `static` > `media` node on the left, you can see the image file that webpack copied to your build.
### Images in stylesheets
You can also reference images in your CSS files too. Add a CSS file named `Image.css` to the `./src/image` folder and update its contents to this:
/* ./src/image/Image.css */
.cat {
background-image: url(./react-builds-cat.png);
width: 400px;
height: 400px;
}
Then update the `Image` component to this:
// ./src/image/Image.js
import React from 'react';
import './Image.css';
import cat from './react-builds-cat.png';
console.log(cat); // /static/media/react-builds-cat.45f7f4d2.png
function Image() {
return (
<div>
{/* Import result is the URL of your image. */}
<img src={cat} alt="Cat" />
<div className='cat'>
</div>
</div>
);
}
export default Image;
Now you'll see the image displayed twice on the page!
### Phase 3: Updating the supported browsers (and its affect on code transpilation)
Earlier you learned about the `browerslist` setting in the `package.json` file and now adjusting these targets affect how your code will be transpiled:
{
"browserslist": {
"production": [
">0.2%",
"not dead",
"not op_mini all"
],
"development": [
"last 1 chrome version",
"last 1 firefox version",
"last 1 safari version"
]
}
}
The `production` list specifies the browsers to target when creating a production build and the `development` list specifics the browsers to target when running the application using `npm start`. Currently, you're targeting relatively recent versions of the major browsers when creating a development build. Targeting older browser versions results in your code being transpiled to an older version of JavaScript.
To experiment with this configuration option, let's add a class component to the project. Add a new folder named `class-component` to the `src` folder. Within that folder, add a file named `ClassComponent.js` containing the following code:
```js
//x
// ./src/class-component/ClassComponent.js
import React from 'react';
class ClassComponent extends React.Component {
render() {
return <h1>Class Component</h1>;
}
}
export default ClassComponent;Don't forget to update your App component to render the new component:
//x// ./src/App.jsimport React from 'react';import HeadingA from './css-modules/HeadingA';import HeadingB from './css-modules/HeadingB';import Image from './image/Image';import ClassComponent from './class-component/ClassComponent';function App() {return (<div><h1>Exploring React Builds</h1><HeadingA /><HeadingB /><Image /><ClassComponent /></div>);}export default App;Now run your application using npm start. Open your browser's developer tools and view the "Sources" for the current page. Expand the localhost:3000 > static > js node on the left and select the main.chunk.js file. Press CMD+F on macOS or CTRL+F on Windows to search the file for "Class Component". Here's what the transpiled code looks like for the ClassComponent class:
//xclass ClassComponent extends react__WEBPACK_IMPORTED_MODULE_0___default.a.Component {render() {return /*#__PURE__*/ react__WEBPACK_IMPORTED_MODULE_0___default.a.createElement('h1',{__self: this,__source: {fileName: _jsxFileName,lineNumber: 7,columnNumber: 7}},'Class Component');}}Have you wondered yet why you need to use the developer tools to view the bundles generated by Create React App? Remember that when you run
npm start, Create React App builds your application usingwebpack-dev-server. To keep things as performant as possible, the bundles generated bywebpack-dev-serverare stored in memory instead of writing them to the file system.
The JSX in the component's render method has been converted to JavaScript but the ClassComponent ES2015 class is left alone. This makes sense though as JSX isn't natively supported by any browser while ES2015 classes have been natively supported by browsers for awhile now.
But what if you need to target a version of a browser that doesn't support ES2015 classes? You can use the "Can I use…" website to see when browsers started supporting ES2105 (or ES6) classes. Starting with version 49, Chrome natively supported classes. But imagine that you need to support Chrome going back to version 30, a version of Chrome that doesn't support classes.
Change the browserslist.development property in the package.json file to this:
//on{"browserslist": {"production": [">0.2%", "not dead", "not op_mini all"],"development": ["chrome >= 30", "last 1 firefox version", "last 1 safari version"]}}The query chrome >= 30 specifies that you want to target Chrome version 30 or newer.
The browserl.ist website can be used to see the browsers supported by your configured
browserslist.
Stop your application if it's currently running. Delete the ./node_modules/.cache folder and run npm start again. Then view the main.chunk.js bundle again in the developer tools:

//xlet ClassComponent = /*#__PURE__*/ (function (_React$Component) {Object(
        _Users_jameschurchill_Documents_GitHub_Modular_Curriculum_content_react_redux_topics_react_builds_projects_exploring_react_builds_solution_node_modules_babel_preset_react_app_node_modules_babel_runtime_helpers_esm_inherits__WEBPACK_IMPORTED_MODULE_2__['default'])(ClassComponent, _React$Component);let _super = Object(
        _Users_jameschurchill_Documents_GitHub_Modular_Curriculum_content_react_redux_topics_react_builds_projects_exploring_react_builds_solution_node_modules_babel_preset_react_app_node_modules_babel_runtime_helpers_esm_createSuper__WEBPACK_IMPORTED_MODULE_3__['default'])(ClassComponent);function ClassComponent() {Object(
            _Users_jameschurchill_Documents_GitHub_Modular_Curriculum_content_react_redux_topics_react_builds_projects_exploring_react_builds_solution_node_modules_babel_preset_react_app_node_modules_babel_runtime_helpers_esm_classCallCheck__WEBPACK_IMPORTED_MODULE_0__['default'])(this, ClassComponent);return _super.apply(this, arguments);}Object(
        _Users_jameschurchill_Documents_GitHub_Modular_Curriculum_content_react_redux_topics_react_builds_projects_exploring_react_builds_solution_node_modules_babel_preset_react_app_node_modules_babel_runtime_helpers_esm_createClass__WEBPACK_IMPORTED_MODULE_1__['default'])(ClassComponent, [{key: 'render',value: function render() {return /*#__PURE__*/ react__WEBPACK_IMPORTED_MODULE_4___default.a.createElement('h1',{__self: this,__source: {fileName: _jsxFileName,lineNumber: 7,columnNumber: 7}},'Class Component');}}]);return ClassComponent;})(react__WEBPACK_IMPORTED_MODULE_4___default.a.Component);
Luckily it's very rare that you'll need to read the code in your generated bundles. webpack, by default, is configured to generate sourcemaps. Sourcemaps are a mapping of the code in a generated file, like a bundle file, to the original source code. This gives you access to your original source code in the browser's developer tools:
You can even set a breakpoint in your source within the developer tools to stop execution on a specific line of code!
Phase 4: Adding environment variables
Earlier you learned that Create React App supports defining environment variables in an .env file. This gives you a convenient way to avoid hard coding values that vary across environments.
Let's experiment with this feature so that you can see how the Create React App build process embeds environment variables into your HTML, CSS, and JavaScript bundles.
Add an .env file to the root of your Create React App project. Define an environment variable named REACT_APP_TITLE:
REACT_APP_TITLE=Exploring React BuildsRemember that environment variables need to be prefixed with REACT_APP_ for Create React App to process them. After defining your environment variable, you can refer to it within JSX using an expression and process.env:
// ./src/App.js//ximport React from 'react';import HeadingA from './css-modules/HeadingA';import HeadingB from './css-modules/HeadingB';import Image from './image/Image';import ClassComponent from './class-component/ClassComponent';function App() {return (<div><h1>{process.env.REACT_APP_TITLE}</h1><HeadingA /><HeadingB /><Image /><ClassComponent /></div>);}export default App;Environment variables can also be referred to in regular JavaScript code:
console.log(process.env.REACT_APP_TITLE);You can also reference environment variables in your ./public/index.html file like this:
<!DOCTYPE html><html lang="en"><head><meta charset="utf-8" /><title>%REACT_APP_TITLE%</title></head><body><div id="root"></div></body></html>Run your application again using npm start. Open your browser's developer tools and view the "Sources" for the current page. Expand the localhost:3000 node on the left and select (index). Notice that the text %REACT_APP_TITLE% within the <title> element has been converted to the text literal Exploring React Builds:
If you expand the localhost:3000 > static > js node on the left and select the main.chunk.js file, you can see how the App component's JSX has been converted to JavaScript:
Here's a closer look at the relevant React.createElement method call:
//x/*#__PURE__*/ react__WEBPACK_IMPORTED_MODULE_0___default.a.createElement('h1',{__self: this,__source: {fileName: _jsxFileName,lineNumber: 10,columnNumber: 7}},'Exploring React Builds');Again, notice how the environment variable has been replaced with a text literal. This has important security implications for you to consider. Because environment variables are embedded into your HTML, CSS, and JavaScript bundles during the build process, it's very important to not store any secrets, like API keys, in your environment variables. Remember, anyone can view your bundled code in the browser by inspecting your files!
Phase 5: Deploying a production build
In the last phase of this project, let's add routing to the React application, create a production build, and deploy the build to an Express application!
Adding routing
To add React Router to the application, start by installing the react-router-dom npm package:
npm install react-router-dom@^5.0.0Then update the App component to this code:
//x// ./src/App.jsimport React from 'react';import { BrowserRouter, Switch, Route, Link } from 'react-router-dom';import HeadingA from './css-modules/HeadingA';import HeadingB from './css-modules/HeadingB';import Image from './image/Image';import ClassComponent from './class-component/ClassComponent';function App() {return (<BrowserRouter><div><h1>{process.env.REACT_APP_TITLE}</h1><nav><ul><li><Link to="/">Home</Link></li><li><Link to="/image">Image</Link></li><li><Link to="/class-component">Class Component</Link></li></ul></nav><Switch><Route path="/image"><Image /></Route><Route path="/class-component"><ClassComponent /></Route><Route path="/"><HeadingA /><HeadingB /></Route></Switch></div></BrowserRouter>);}export default App;Be sure to run and test your application to ensure that the defined routes work as expected:
/- Should display theHeadingAandHeadingBcomponents;/image- Should display theImagecomponent; and/class-component- Should display theClassComponentcomponent.
Creating a production build
To create a production build, run the command npm run build from the root of your project. The output in the terminal should look something like this:
> solution@0.1.0 build [absolute path to your project]
> react-scripts build

Creating an optimized production build...
Compiled successfully.

File sizes after gzip:

  47.83 KB  build/static/js/2.722c16c4.chunk.js
  773 B     build/static/js/runtime-main.b7d1e5ee.js
  745 B     build/static/js/main.12299197.chunk.js
  197 B     build/static/css/main.e9a0d1f8.chunk.css

The project was built assuming it is hosted at /.
You can control this with the homepage field in your package.json.

The build folder is ready to be deployed.
You may serve it with a static server:

  npm install -g serve
  serve -s build

Find out more about deployment here:

  bit.ly/CRA-deploy
Ignore the comments about using serve to deploy your application (i.e. npm install -g serve and serve -s build). In the next step, you'll create a simple Express application to server your React application.
Serving a React application using Express
Create a new folder for your Express application outside of the Create React App project folder.
For example, from the root of your project, use
cd ..to go up a level and then create a new folder namedexpress-serverby running the commandmkdir express-server. This makes theexpress-serverfolder a sibling to your Create React App project folder.
Browse into the express-server folder and initialize it to use npm (i.e. npm init -y). Then install Express by running the command npm install express@^4.0.0.
App a file named app.js with the following contents:
// ./app.js

const express = require('express');
const path = require('path');

const app = express();

app.use(express.static(path.join(__dirname, 'public')));

app.get('*', function(req, res) {
  res.sendFile(path.join(__dirname, 'public', 'index.html'));
});

const port = 9000;

app.listen(port, () => console.log(`Listening on port ${port}...`));
This simple Express application will:
- Attempt to match incoming requests to static files located in the
publicfolder; and - If a matching static file isn't found, then the
./public/index.htmlfile will be served for all other requests.
Now add a folder named public to the root of your Express project. Copy the files from the build folder in your Create React App project to the public folder in the Express application project. Then run your application using the command node app.js.
Open a browser and browse to the URL http://localhost:9000/. You should see your React application served from your Express application! Be sure to click the navigation links to verify that all of your configured routes work as expected.
Also, because you configured Express to serve the ./public/index.html file for any request that doesn't match a static file, you can "deep link" to any of your React application's routes:
More content at plainenglish.io
By Bryan Guner on July 15, 2021.
August 31, 2021.