
React-Complete-Guide-Course
What is React?
A javascript library for building User Interfaces based on reusable components.
Why use react?
traditionally any button on a website triggered a request from a server to load a new html page. Javascript allows us to manipulate the DOM without loading a new page and react is a JS library
Composition
in react building components using a series of smaller components is called composition
Container Copmonents
import React from "react";import "./Card.css";function Card(props) {return <div className="card">{props.children}</div>;}export default Card;- props.children works because children is a reserved keyword in react and the value of the children prop will always be the content between the opening closing tags of your custom component.
props.children is important for composition using a custom wrapper component often used to apply styles that are shared among components
A closer look at JSX
in package.json we use react and reactDOM
import React from "react";// when you use jsx it is this(React.createElement ... requires importing React from react) method that gets called behind the scenes./* the second argument is an object tha configures atributes of element... in here none so empty object*/// the third and subsequent arguments are the children of each sucessivly nested element or component.return React.createElement("div",{},
  React.createElement("h2", {}, `Let's get started!`),
  React.createElement(Expenses, { items: expenses }));
Events
- On all bult in html elements in react we have access to native dom events... we can use them in react by adding a prop to the element and setting it to a function that will be executed when the event occurs.
- Imperative approach:
document.getElementById("root").addEventListener("click", () => {
  console.log("clicked");});
In react we add a special prop to the element we want to listen to and set it to a function that will be executed when the event occurs.
React exposes events as props that start with prefix on... so onClick, onChange, onSubmit, etc.
i.e.
<button onClick={clickHandler}>Change Title</button>//here we are just pointing to the function and not calling itall the on-event handler props want a function passed as a value which will be executed when the event occurs.
- It is convention that you name your eventHandler functions as the event name + Handler i.e. clickHandler, submitHandler, etc.
const clickHandler = () => {setTitle("Updated!");
  console.log(title);};
UseState
useState is a react hook that allows you to manage state in functional components.
// let title = props.title;const [title, setTitle] = useState(props.title);- We can't use let title = props.title because react will only run the function once and not re-run it when the state changes. so we use useState to manage state in functional components.
import React, { useState } from "react";here {UseState} is a
named importfrom react
- useState is a React hook that returns an array with 2 elements, the first element is the current state and the second element is a function that allows us to update the state.
- useState is declared inside of our component function. It should be called at the top level of the function... do not nest UseState inside of if statements or loops or other functions.
- UseState wants a default value as an argument. This is the initial value that will be used when the component is first rendered.
We use array destructuring to store the current state and update state function in variables.
const [title, setTitle] = useState(props.title);- the initial value of title is the value of props.title which is passed in as a prop from the parent component.
- We can use the update state function (setTitle) to update the state.
The useState hook always returns an array with these two elements.
Now instead of using the title variable we use the state variable.
- So
const clickHandler = () => {
  title = "Updated!";
  console.log(title);};
- becomesconst clickHandler = () => {setTitle("Updated!");
console.log(title);};Expense Item Code:
import React, { useState } from "react";import ExpenseDate from "./ExpenseDate";import Card from "../UI/Card";import "./ExpenseItem.css";const ExpenseItem = (props) => {// let title = props.title;const [title, setTitle] = useState(props.title);
  console.log("ExpenseItem evaluated by React");const clickHandler = () => {setTitle("Updated!");
console.log(title);};return (<Card className="expense-item"><ExpenseDate date={props.date} /><div className="expense-item__description"><h2>{title}</h2><div className="expense-item__price">${props.amount}</div></div><button onClick={clickHandler}>Change Title</button></Card>);};export default ExpenseItem;- In the above code calling setTitle("Updated!") will not update the title variable but will update the state variable which will cause react to re-evaluate the component function and update the dom. Changes to the state will cause react to re-render the component on which the state is used and only that component.
- Notice that below
const [title, setTitle] = useState(props.title);- we are using const here even though we do eventually assign a new value to title. This is because we are not reassigning the variable title but rather the state variable which is managed by react.
- The line above is exicuted whenever the component is re-evaulated by react. So if the state changes react will re-evaluate the component and re-execute the useState hook.
Events in vanilla javascript:
document.getElementById("root").addEventListener("click", (event) => {
console.log("clicked");});- The following syntax:
const titleChangeHandler = (event) => {setUserInput({ ...userInput, enteredTitle: event.target.value });};const amountChangeHandler = (event) => {setUserInput({ ...userInput, enteredAmount: event.target.value });};const dateChangeHandler = (event) => {setUserInput({ ...userInput, enteredDate: event.target.value });};takes all of the properties of the userInput object and adds them to a new object. It then overwrites the enteredTitle property with the new value. This is called merging objects. It is a common pattern in react to merge objects when you want to update a state property that is an object.
Single State version of Expense Form:
import React, { useState } from "react";import "./ExpenseForm.css";const ExpenseForm = () => {//   const [enteredTitle, setEnteredTitle] = useState("");//   const [enteredAmount, setEnteredAmount] = useState("");//   const [enteredDate, setEnteredDate] = useState("");const [userInput, setUserInput] = useState({enteredTitle: "",enteredAmount: "",enteredDate: "",});const titleChangeHandler = (event) => {
    console.log("title change event: value:", event.target.value);// setEnteredTitle(event.target.value);setUserInput((previousState) => {return { ...userInput, enteredTitle: event.target.value };});};const amountChangeHandler = (event) => {
    console.log("amount change event: value:", event.target.value); //event.target.value is a string even if the input type is number// setEnteredAmount(event.target.value);setUserInput((previousState) => {return { ...userInput, enteredAmount: event.target.value };});};const dateChangeHandler = (event) => {
    console.log("date change event: value:", event.target.value);// setEnteredDate(event.target.value);setUserInput((previousState) => {return { ...userInput, enteredDate: event.target.value };});};return (<form><div className="new-expense__controls"><div className="new-expense__control"><label>Title</label><input type="text" onChange={titleChangeHandler} /></div><div className="new-expense__control"><label>Amount</label><input
            type="number"
            min="0.01"
            step="0.01"
            onChange={amountChangeHandler}/></div><div className="new-expense__control"><label>Date</label><input
            type="date"
            min="2019-01-01"
            max="2023-12-31"
            onChange={dateChangeHandler}/></div></div><div className="new-expense__actions"><button type="submit">Add Expense</button></div></form>);};export default ExpenseForm;
Submitting and Working with Form Data:
    const submitHandler = ( event ) => {
event.preventDefault();const expenseData = {title: enteredTitle,amount: enteredAmount,date: new Date( enteredDate ),};return (<form onSubmit={ submitHandler}>- onSubmit is a special event that is triggered when the form is submitted. It submits a request to the server, in this case the development server and that's not what we want here.
- Here we want to prevent the default behavior of the form and instead handle the data ourselves. We do this by calling event.preventDefault() in the submitHandler function.
Two way binding:
In React, data flows one way: from owner to child. We think that this makes your app's code easier to understand. You can think of it as "one-way data binding."
However, there are lots of applications that require you to read some data and flow it back into your program. For example, when developing forms, you'll often want to update some React state when you receive user input. Or perhaps you want to perform layout in JavaScript and react to changes in some DOM element size.
In React, you would implement this by listening to a "change" event, read from your data source (usually the DOM) and call setState() on one of your components. "Closing the data flow loop" explicitly leads to more understandable and easier-to-maintain programs.
Two-way binding --- implicitly enforcing that some value in the DOM is always consistent with some React state --- is concise and supports a wide variety of applications. We've provided LinkedStateMixin: syntactic sugar for setting up the common data flow loop pattern described above, or "linking" some data source to React state.
- For inputs we don't just listen for changes but we can aslo pass a new value back into the input so that we can reset the input programatically. This is called two way binding.
<input type="text" value="" onChange={titleChangeHandler} />// onChange is a prop that wants a function as a valueThis will set the internal value property which every input element has and we can set it to a new value.
const submitHandler = (event) => {
  event.preventDefault();const expenseData = {title: enteredTitle,amount: enteredAmount,date: new Date(enteredDate),};
  console.log(expenseData);setEnteredTitle("");setEnteredAmount("");setEnteredDate("");};
We can clear the data after hittin submit using the following code:
setEnteredTitle("");setEnteredAmount("");setEnteredDate("");```How to pass data from child to parent component:
we pass data from parent to child via props and from child to parent via function props.
We can pass data from child to parent via function props.We can create our own event props that expect functions as values which allows us to pass a function from a parent component to a child component and then call that function inside of the child component. When we call said function we can pass data to that function as a parameter and that data will then be passed back to the parent component.
props can only be passed from parent component to child and we can't skip intermediate components.
Let's say we want to pass expense data which we gather in the expense form component to the new expense component. We can do this by passing a function from the new expense component to the expense form component and then call that function inside of the expense form component and pass the data as a parameter to that function.
NEW EXPENSE COMPONENT:
import React from "react";import "./NewExpense.css";import ExpenseForm from "./ExpenseForm";const NewExpense = (props) => {//the value for onSaveExpenseData should be a function that is triggered when the user clicks the submit button.const onSaveExpenseDataHandler = (enteredExpenseData) => {const expenseData = {...enteredExpenseData,id: Math.random().toString(),};
    console.log("expense data enriched with id property", expenseData);
    props.onAddExpense(expenseData);};//the value for onSaveExpenseData should be a function that is triggered when the user clicks the submit button... we can pass data as an argument to onSaveExpenseDataHandler to pass that data from the child component to the parent component.//onSaveExpenseDataHandler is a function that is passed as a value to onSaveExpenseData ... it does not get executed here, hence the absence of (). It will be exicuted in the expense form component when the user clicks the submit button.return (<div className="new-expense"><ExpenseForm onSaveExpenseData={onSaveExpenseDataHandler} /></div>);};export default NewExpense;
Keys in Lists:
Keys help React identify which items have changed, are added, or are removed. Keys should be given to the elements inside the array to give the elements a stable identity.
A “key” is a special string attribute you need to include when creating lists of elements in React. Keys are used in React to identify which items in the list are changed, updated, or deleted. In other words, we can say that keys are used to give an identity to the elements in the lists. The next thing that comes to mind is that what should be good to be chosen as key for the items in lists. It is recommended to use a string as a key that uniquely identifies the items in the list. Below example shows a list with string keys:
const numbers = [ 1, 2, 3, 4, 5 ];const updatedNums = numbers.map((number)=>{return <li key={index}>{number} </li>;});You can also assign the array indexes as keys to the list items. The below example assigns array indexes as key to the elements.
const numbers = [ 1, 2, 3, 4, 5 ];const updatedNums = numbers.map((number, index)=><li key = {index}>{number}</li>);Assigning indexes as keys are highly discouraged because if the elements of the arrays get reordered in the future then it will get confusing for the developer as the keys for the elements will also change.
Using Keys with Components
Consider a situation where you have created a separate component for list items and you are extracting list items from that component. In that case, you will have to assign keys to the component you are returning from the iterator and not to the list items. That is you should assign keys to
Below code shows incorrect usage of keys:
import React from 'react';import ReactDOM from 'react-dom';// Component to be extractedfunction MenuItems(props){const item = props.item;return(<li key = {item.toString()}>{item}</li>);}// Component that will return an// unordered listfunction Navmenu(props){const list = props.menuitems;const updatedList = list.map((listItems)=>{return (<MenuItems item = { listItems } />);});return(<ul>{updatedList}</ul>);}const menuItems = [1, 2, 3, 4, 5];
ReactDOM.render(<Navmenu menuitems = {
menuItems} />,
document.getElementById('root'));
**Output: **
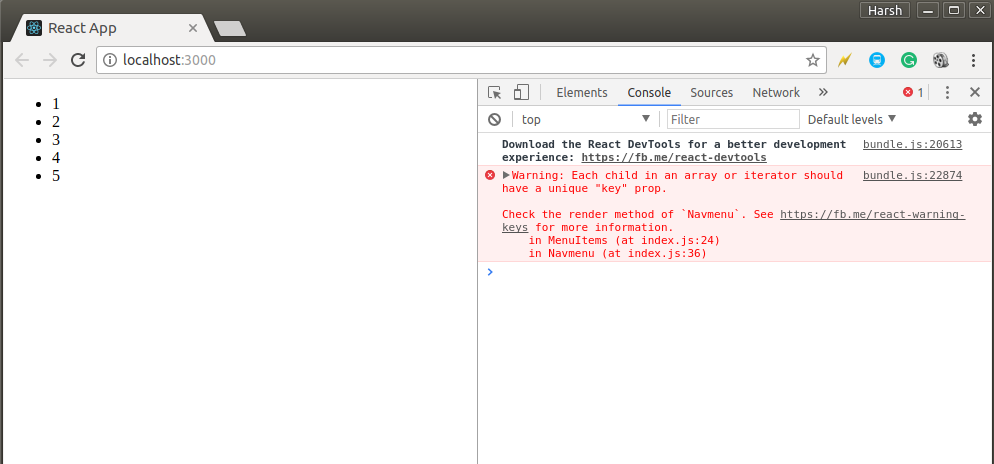
You can see in the above output that the list is rendered successfully but a warning is thrown to the console that the elements inside the iterator are not assigned keys. This is because we had not assigned key to the elements we are returning to the map() iterator.
Below example shows correct usage of keys:
import React from "react";import ReactDOM from "react-dom";// Component to be extractedfunction MenuItems(props) {const item = props.item;return <li>{item}</li>;}// Component that will return an// unordered listfunction Navmenu(props) {const list = props.menuitems;const updatedList = list.map((listItems) => {return <MenuItems key={listItems.toString()} item={listItems} />;});return <ul>{updatedList}</ul>;}const menuItems = [1, 2, 3, 4, 5];

ReactDOM.render(<Navmenu menuitems={menuItems} />,
	document.getElementById("root"));